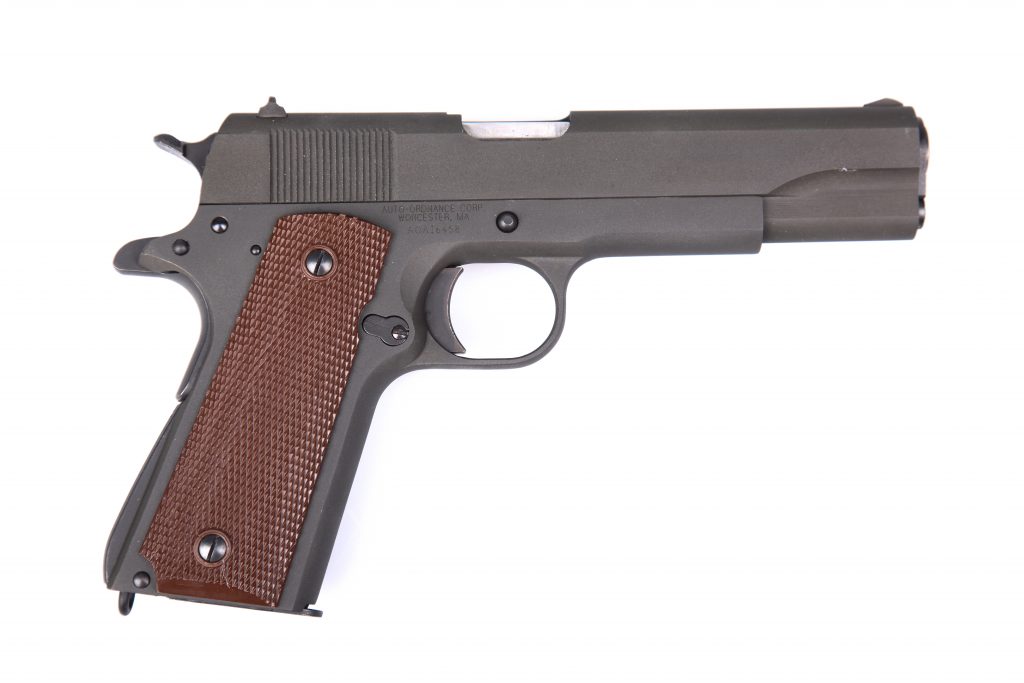
This GI gun is reliable but not as desirable for all around use as the Mil Spec.
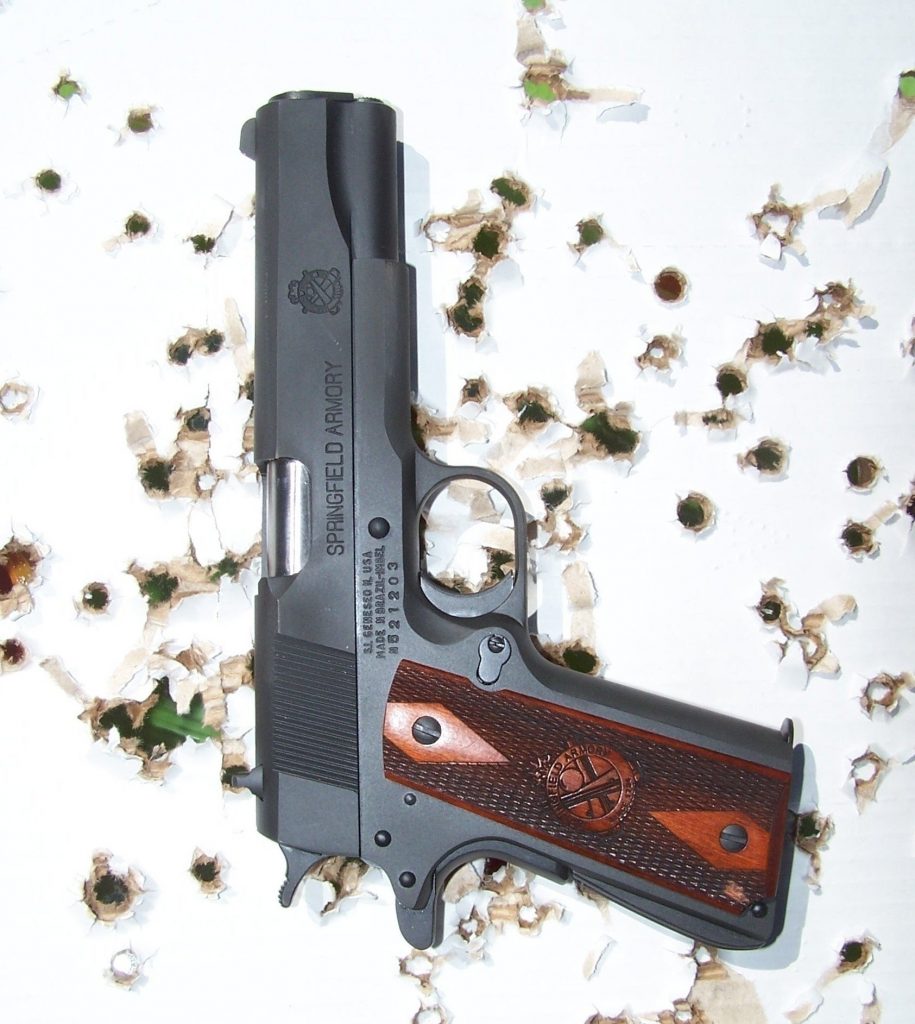
It is an understatement if I say the 1911 is a very popular handgun. It is also fair to say that the majority are of recreational value only. I would never trust most makes for personal defense. There are pistols in the middle range from Springfield, Colt, SIG and Ruger I find reliable enough for personal defense. The 1911 offers a combination of emotional attachment, history, and deadly efficiency in the right handgun. Prices range from a few hundred dollars to several thousand. While you may not need a Les Baer or Wilson Combat pistol you do need a reliable handgun. Springfield recently introduced the Garrison to replace the Mil Spec pistol. There are still plenty of Mil Spec 1911 handguns for sale. One local shop had three on hand. I don’t usually have the reader running about looking for older guns. Usually there are better guns to be had brand hammer new. In this case you may wish to grab a Mil Spec!
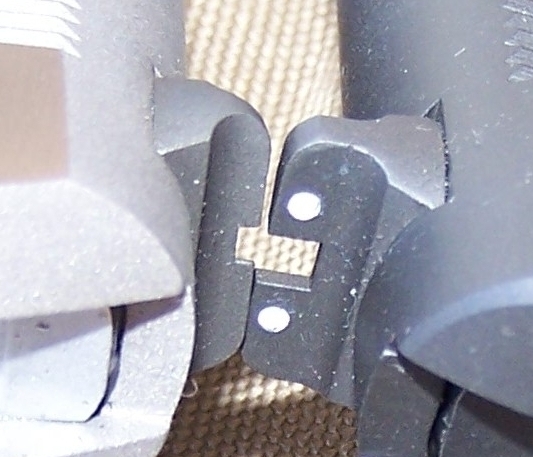
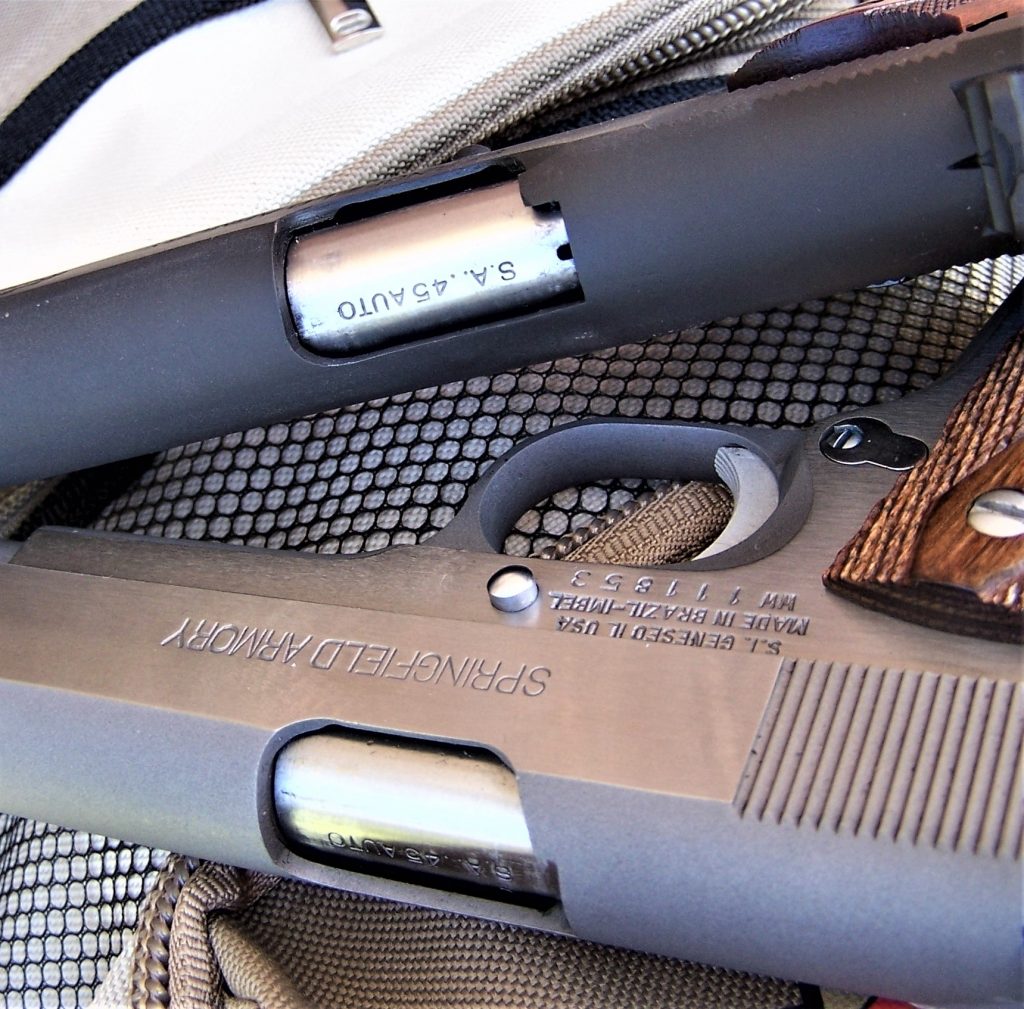
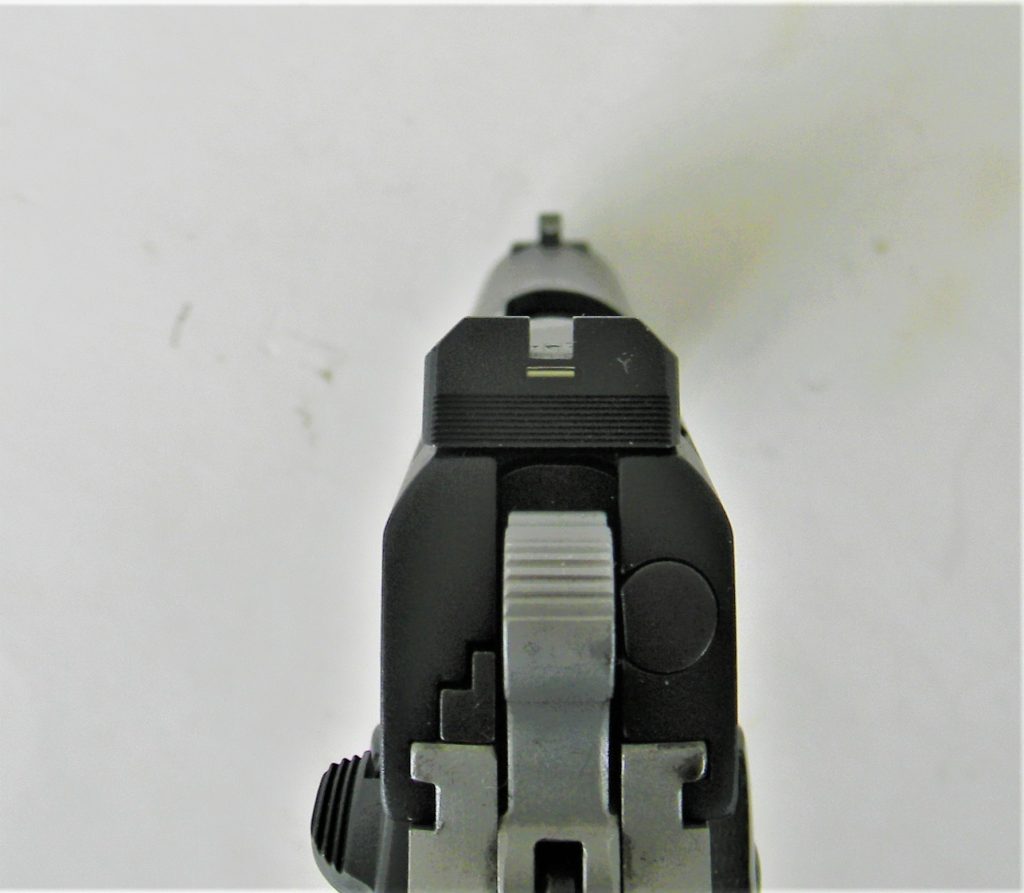
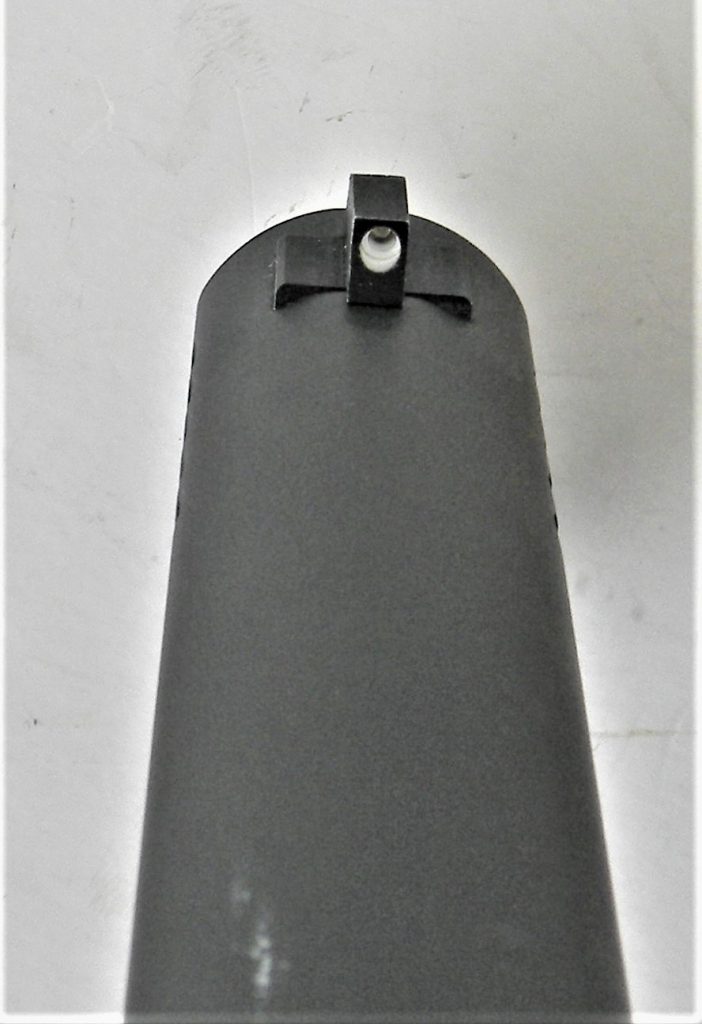
The Mil Spec is a reliable and useful handgun.GI sights, left, compared to the superior Mil Spec units, right.
Most Mil Spec 1911 handguns are parkerized. A very few are stainless steel. Some are two tone although I have seen only photos. Some are olive drab. The parkerized gun seems the majority finish. The pistol features a lightweight firing pin and heavy duty firing pin spring for safety. The action, then, is a Series 70 or Mil Spec without a firing pin block. Yet the lightweight firing pin and heavy duty firing pin spring make the pistol drop safe. A lowered ejection port and high profile sights separate the Mil Spec from GI handguns. GI guns are OK while the Mil Spec is more useful for most shooting chores. The pistol features a short trigger and arched mainspring housing. I find this set up superior for fast combat shooting versus target shooting. Before firing the Springfield Mil Spec 1911A1 .45 lets look at the specifications.
Specifications:
Barrel Length: 5″
Weight: 36 ounces
Overall Length: 8.625″
Trigger Pull Weight: 6.2 pounds.
Recoil Spring & Guide Rod: Standard GI
Sights Fixed: 3-dot
Safety: Slide lock and grip safety
Magazines: 7 round- compatible with all 1911 magazines.
The front sight measures .12 wide as far as I am able to measure. An .11 inch rear notch makes for a good sight picture. There is very little lateral play in the slide to frame fit. Barrel to slide and barrel to bushing fit isn’t tight but snug as it should be. There is room for foreign material and powder ash but enough tolerance to ensure reliability. The slide lock safety is tight and indents properly. The grip safety should release its hold on the trigger about half way into compression. The Springfield requires the grip safety be ‘mashed’ nearly to the frame so be certain you have a good hold on this 1911.
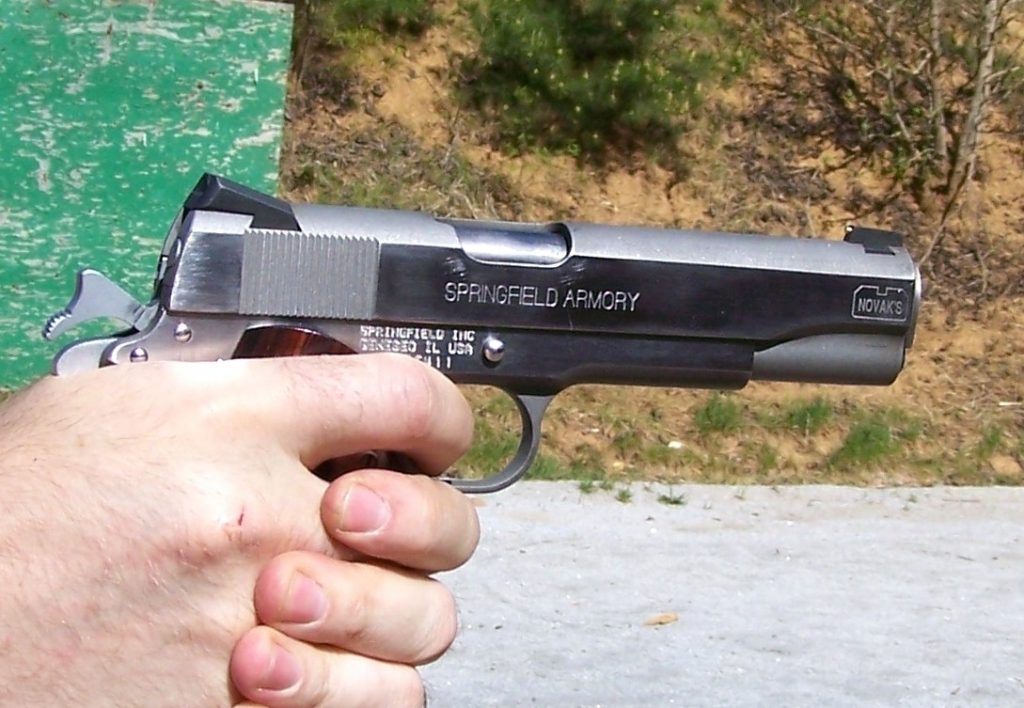
The Springfield is a useful base gun for custom work. This one features Novak Sights.Springfield 1911 handguns are useful personal defense pistols. This one has been to Novak’s Gun Shop.
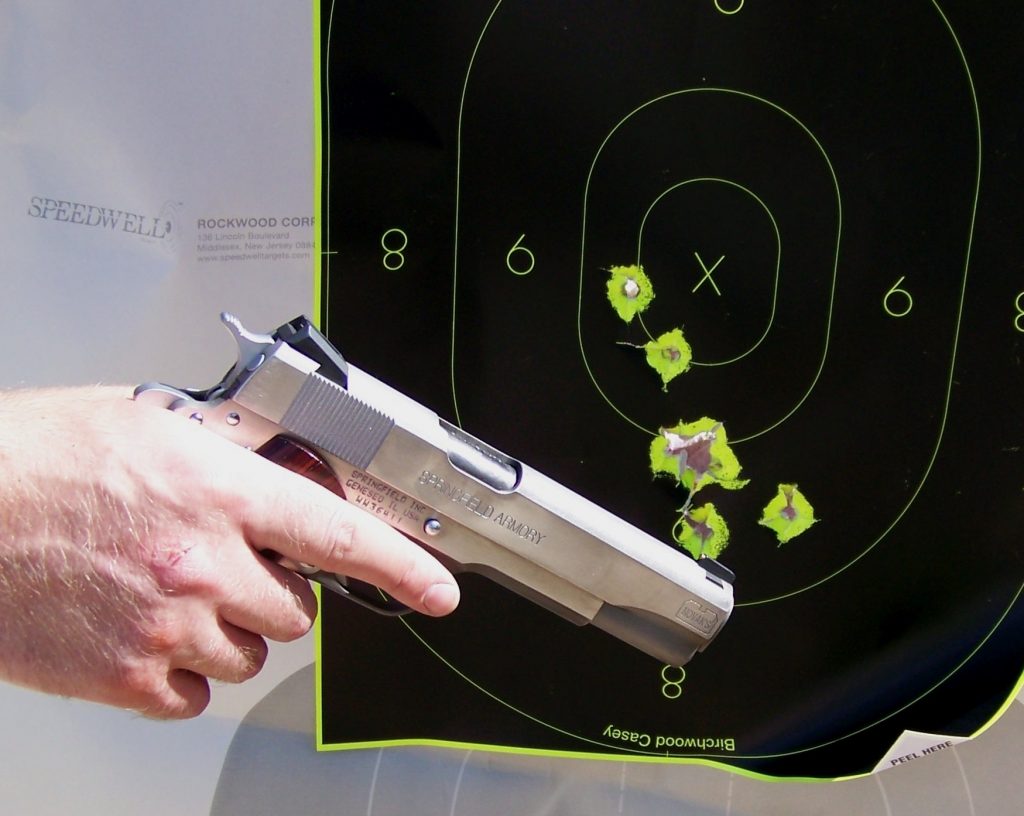
Firing test went as expected. I fired fifty rounds of Black Hills Ammunition 230 grain full metal jacketed ammunition at 7, 10, and 15 yards. The pistol comes on target quickly. Good hits were easy enough. I have a lot of time in with the 1911. I ate the X ring out at 7 yards and made good groups at 15 yards. A steel frame .45 doesn’t kick that much. The pistol is controllable and handles well. The sights are leagues ahead of a GI .45 but certainly are not Novak sights. I find the Springfield Mil Spec well suited to personal defense. The final and least important test was firing for accuracy from a solid bench rest using the MTM Caseguard K Zone firing rest. I used three loads. These included the Black Hills Ammunition 230 grain FMJ loading, the Black Hills 185 grain JHP and the new 135 grain Honey Badger.
Results: Black Hills Ammunition 5 shot group in inches
230 grain FMJ 2.6 in.
185 grain Jacketed hollow point 2.8 in.
135 grain Honey Badger 2.5 in.
Note wider deeper ejection port, top, of the Springfield Mil Spec compared to a GI type gun, below.
The pistol’s sights are well regulated for the six o’clock hold at 25 yards with the 230 grain load giving a dead on hold at about 50 yards. The 135 grain load struck 2.3 inch low. The Springfield Mil Spec is a great shooter for the money. It is well worth your hard earned money.
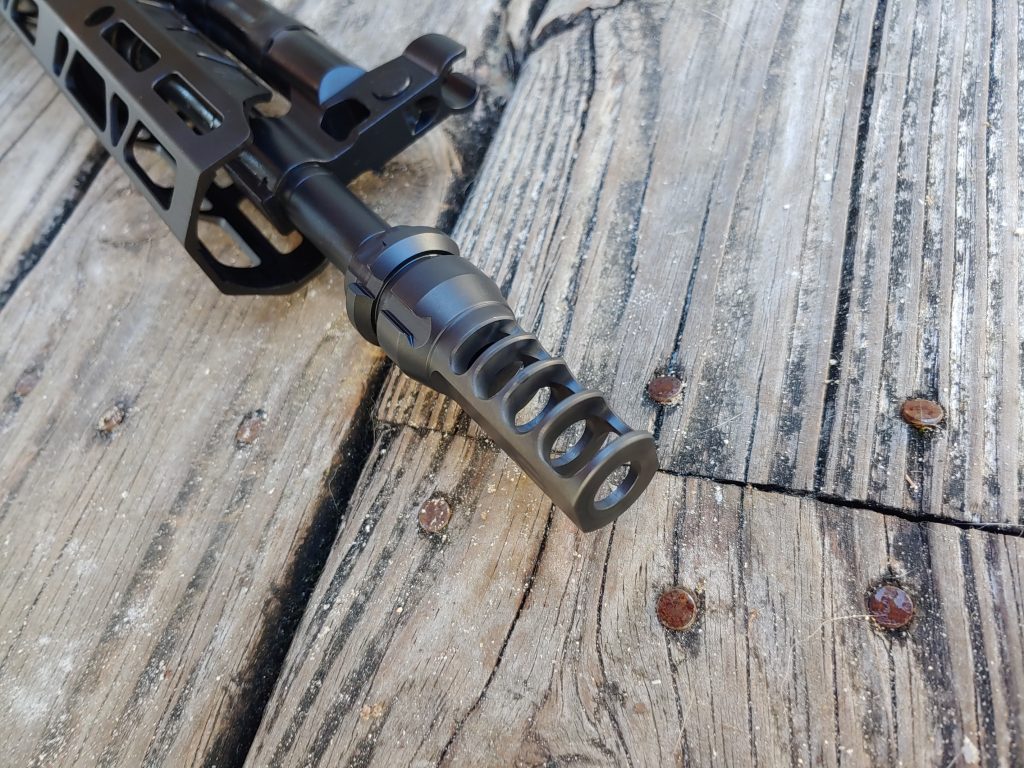
As someone always looking to learn, I’ve been looking at common platforms that I’m not that experienced with. The AK is one of those platforms. I love the classic Cold War AK, but admittedly I’m stuck in the stone age. I’ve begun to look at the world of the AK and what’s new and great within that field. That leads me to the JMAC Customs KeyMount muzzle device.
I’m fairly familiar with the idea of a 14.5 M4 barrel using a pinned and welded muzzle device. These permanently attached devices bring the total length to 16 inches and stay out of the realm of the NFA. I had no idea people did the same thing with their AK rifles.
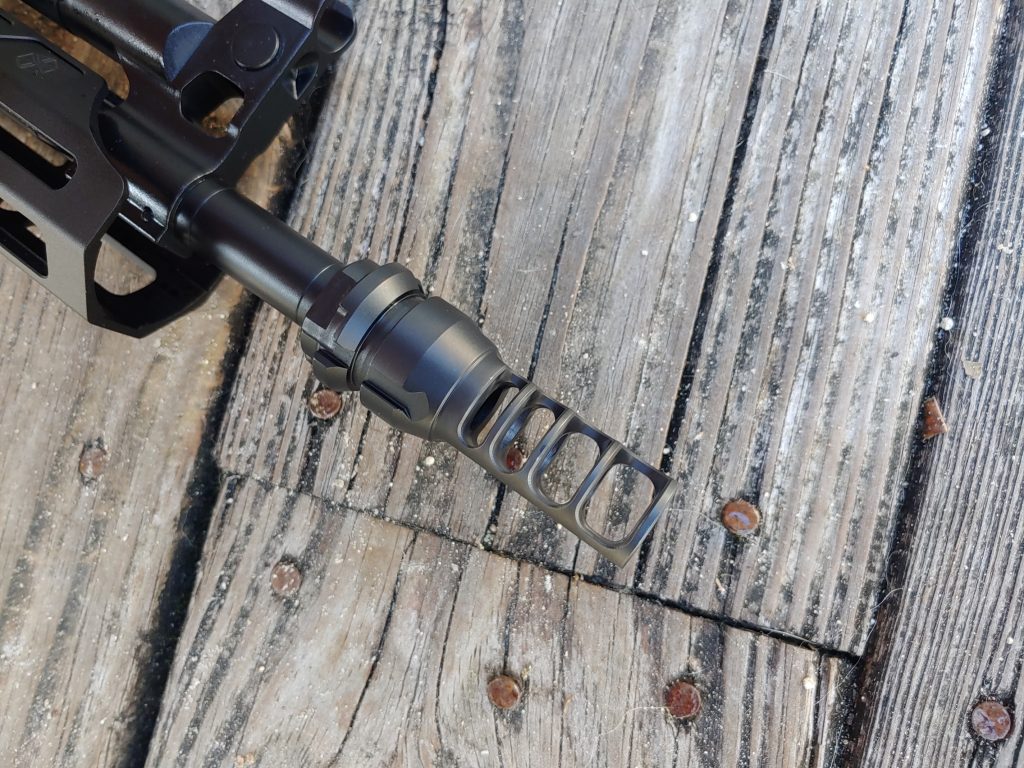
JMAC designs a KeyMount muzzle device to do this and one for more standard 16-inch barrels. Keep in mind that the two models are different, and you don’t want to purchase the model intended for a 14.5-inch barrel for a 16-inch barrel and vice versa. Other than that, what sets the brake apart from the rest of the AK Muzzle devices?
The Humble AK and the KeyMount
My experience with AK muzzles is limited to the old slant muzzle device, the Krinkov style flash can style device, and at one point, a Tapco Razr. I know, but I was young, and it looked cool. I haven’t tried anything too modern, so this was a new experience. The KeyMount muzzle device isn’t just a brake but acts as a means to attach a Dead Air Silencers suppressor to the gun.
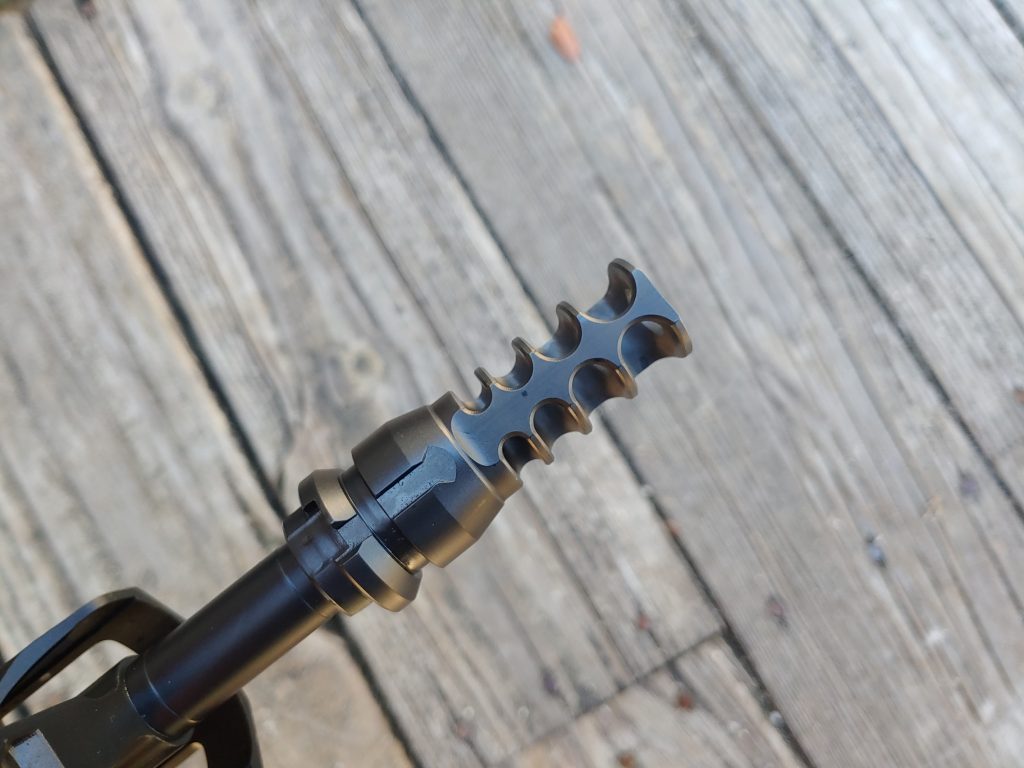
I don’t have one, but now I kind of want one, if only to make the best out of a 135-dollar investment. The brake is 2.82 inches long, but 1.32 inches of that sleeves the barrel. The additional length is only 1.5 inches added to the gun. In that 1.5 inches, we get four ports for recoil reduction. It’s made from 17-4ph Stainless for blast-proof strength and weighs 3.5 ounces.
At the Range
AK rifles aren’t shoulder bruisers by any means, but they do have some noticeable recoil when compared to other intermediate-caliber rifles. The 5.45 variants have much less recoil than the standard 7.62 models. That’s why everyone loves the 5.45, weight savings and better effective range.
However, the 7.62x39mm remains a hammer when it comes to hard cover. If you want to keep that hammer-like prowess without the recoil, then the JMAC KeyMount brake is for you. It takes a 7.62 AK and makes it feel like a 5.45 AK. It’s an impressive degree of recoil reduction.
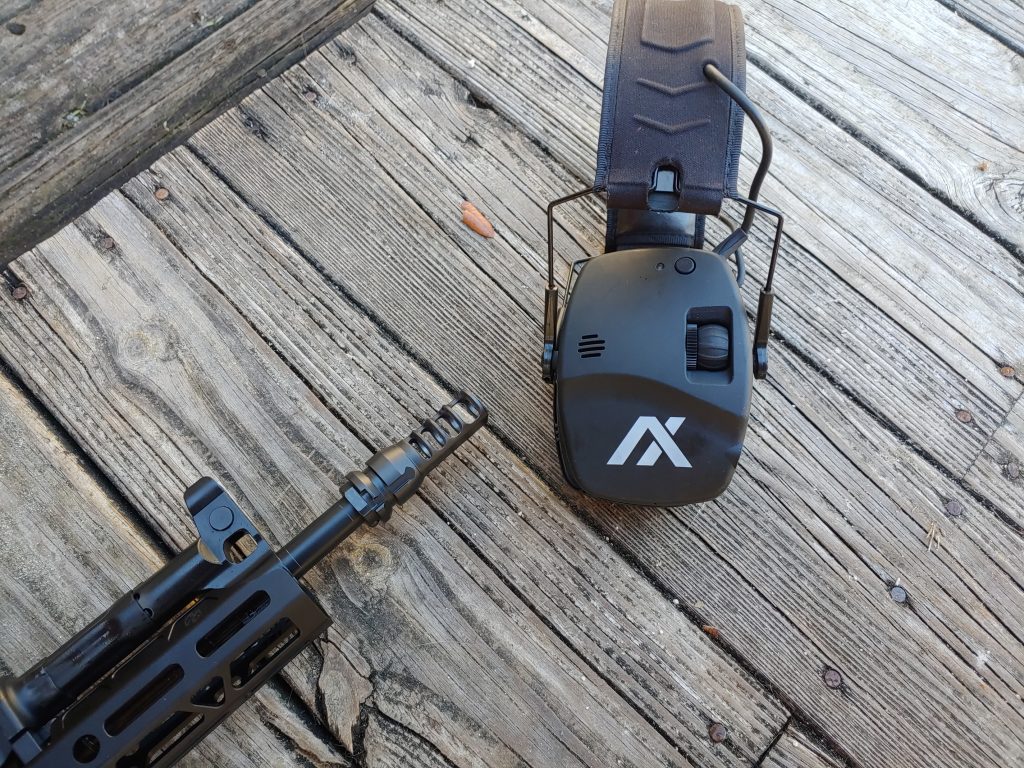
You always expect some, but then sometimes you get absolutely blown away. I was blown away by how well this thing worked. It cut out recoil but also didn’t provide any noticeable increase in flash. I’m not firing under NVGs, but for standard daylight shooting, it’s perfectly fine. There is a lot of noise, and you wouldn’t make friends at an indoor range.
The KeyMount Brake delivers as promised. It’s an impressive showing and an effective way to convince me to try suppressing my AK.
After the gun registration amnesty window closes what happens if the application gets denied because an @ATFHQ bureaucrat doesn't complete the background check on-time? (Denials are automatic after 88 days) A common bureaucratic denial could make compliant gun owners into FELONS! pic.twitter.com/P03KDqv8tk
GOA is raising alarms that the ATF’s ruling on pistol braces, and the resultant pistol brace amnesty and registration period may not be as benign as it seems. In case you’ve missed it, this week the ATF released an administrative ruling that pistol braces -which they have specifically allowed the sale and use of for a decade- placed on a pistol as intended by the manufacturer constitute the construction of an unregistered NFA device. They have graciously offered a 120 day grace period in which some of the 40,000,000 people who bought braces can register their braced guns as SBRs, without the usual $200 fee.
While this pistol brace amnesty period, and waived fee sound pretty great, there has been some understandable skepticism in the gun and legal communities surrounding the details of how this might actually shake out IRL, and they’ve raised some frightening and accurate points. The FBI often, for administrative reasons, fails to complete NICS background checks, to the tune of between 2-3% of the total. After 88 days those checks are purged, and any paperwork or progress simply vanishes, incomplete. It’s like the check was never initiated. Over a 5 year period, the number of such cases was over 1 million.
Now consider, (and this has been proposed by a GOA lawyer and confirmed by an ATF employee which must assume know their stuff) what might happen if you send in an application for what is legally an unregistered SBR, providing a photograph of said unregistered NFA item, along with all of your personal information to take advantage of this pistol brace amnesty. Say you got a late start, and took a while with the paperwork but still got your application in with two months to go before the pistol brace amnesty ends. But you wind up one of those >2% whose application falls off the back of a truck, and 88 days later, is purged. The ATF now knows that you are, under the law, a felon. Not only that, they know everything about you from where you live, to what you and your unregistered SBR look like. Per GOA Attorney Stephen Stamboulieh, ATF representatives @ SHOT 2023 confirmed they would prosecute in such a case.
The consequences of this are functionally life-changing -with up to a decade in federal prison, hundreds of thousands of dollars in fines, and a federal firearms felony on your record- so it’s not without cause that the circumstances of the pistol brace amnesty are drawing attention. Notably the entire ruling is in question after a Federal Appeals Court overturned Trump’s similarly overreaching, contortionist logic bumpstock ban, but in the meantime, gun owners shouldn’t be afraid of a Federal LE Agency ruining their lives for simply attempting to comply with new regulatory decisions.
“After the gun registration amnesty window closes what happens if the application gets denied because an @ATFHQ bureaucrat doesn’t complete the background check on-time? (Denials are automatic after 88 days) A common bureaucratic denial could make compliant gun owners into FELONS!”
“This happens ALL THE TIME and it is UNACCEPTABLE that an @ATFHQ representative @NSSFShotShow told GOA attorney@Stambo2A that they would take enforcement action against a gun owner wishing to comply with this unconstitutional gun registration scheme.”
“The new rule creates background checks for up to 40 million firearms, and if the FBI statistics on not completing 2.2% of them stay the same, that means up to 880,000 new felons with a regulatory stroke of the pen & a bureaucratic screw up.”
Vaultek came to light recently when SIG Sauer launched their Rose line. This line invites women to be apart of the firearms community without the intimidation. The kit includes a custom SIG P365 Rose, dummy rounds, training program from Lena Miculek, and a Vaultek Lifepod. The fact that a new firearms owner can immediately own something that is very important to owning a firearm safely is great. A Vaultek Lifepod allows users to safely store their firearm yet retrieve it quickly with the touch of a button.
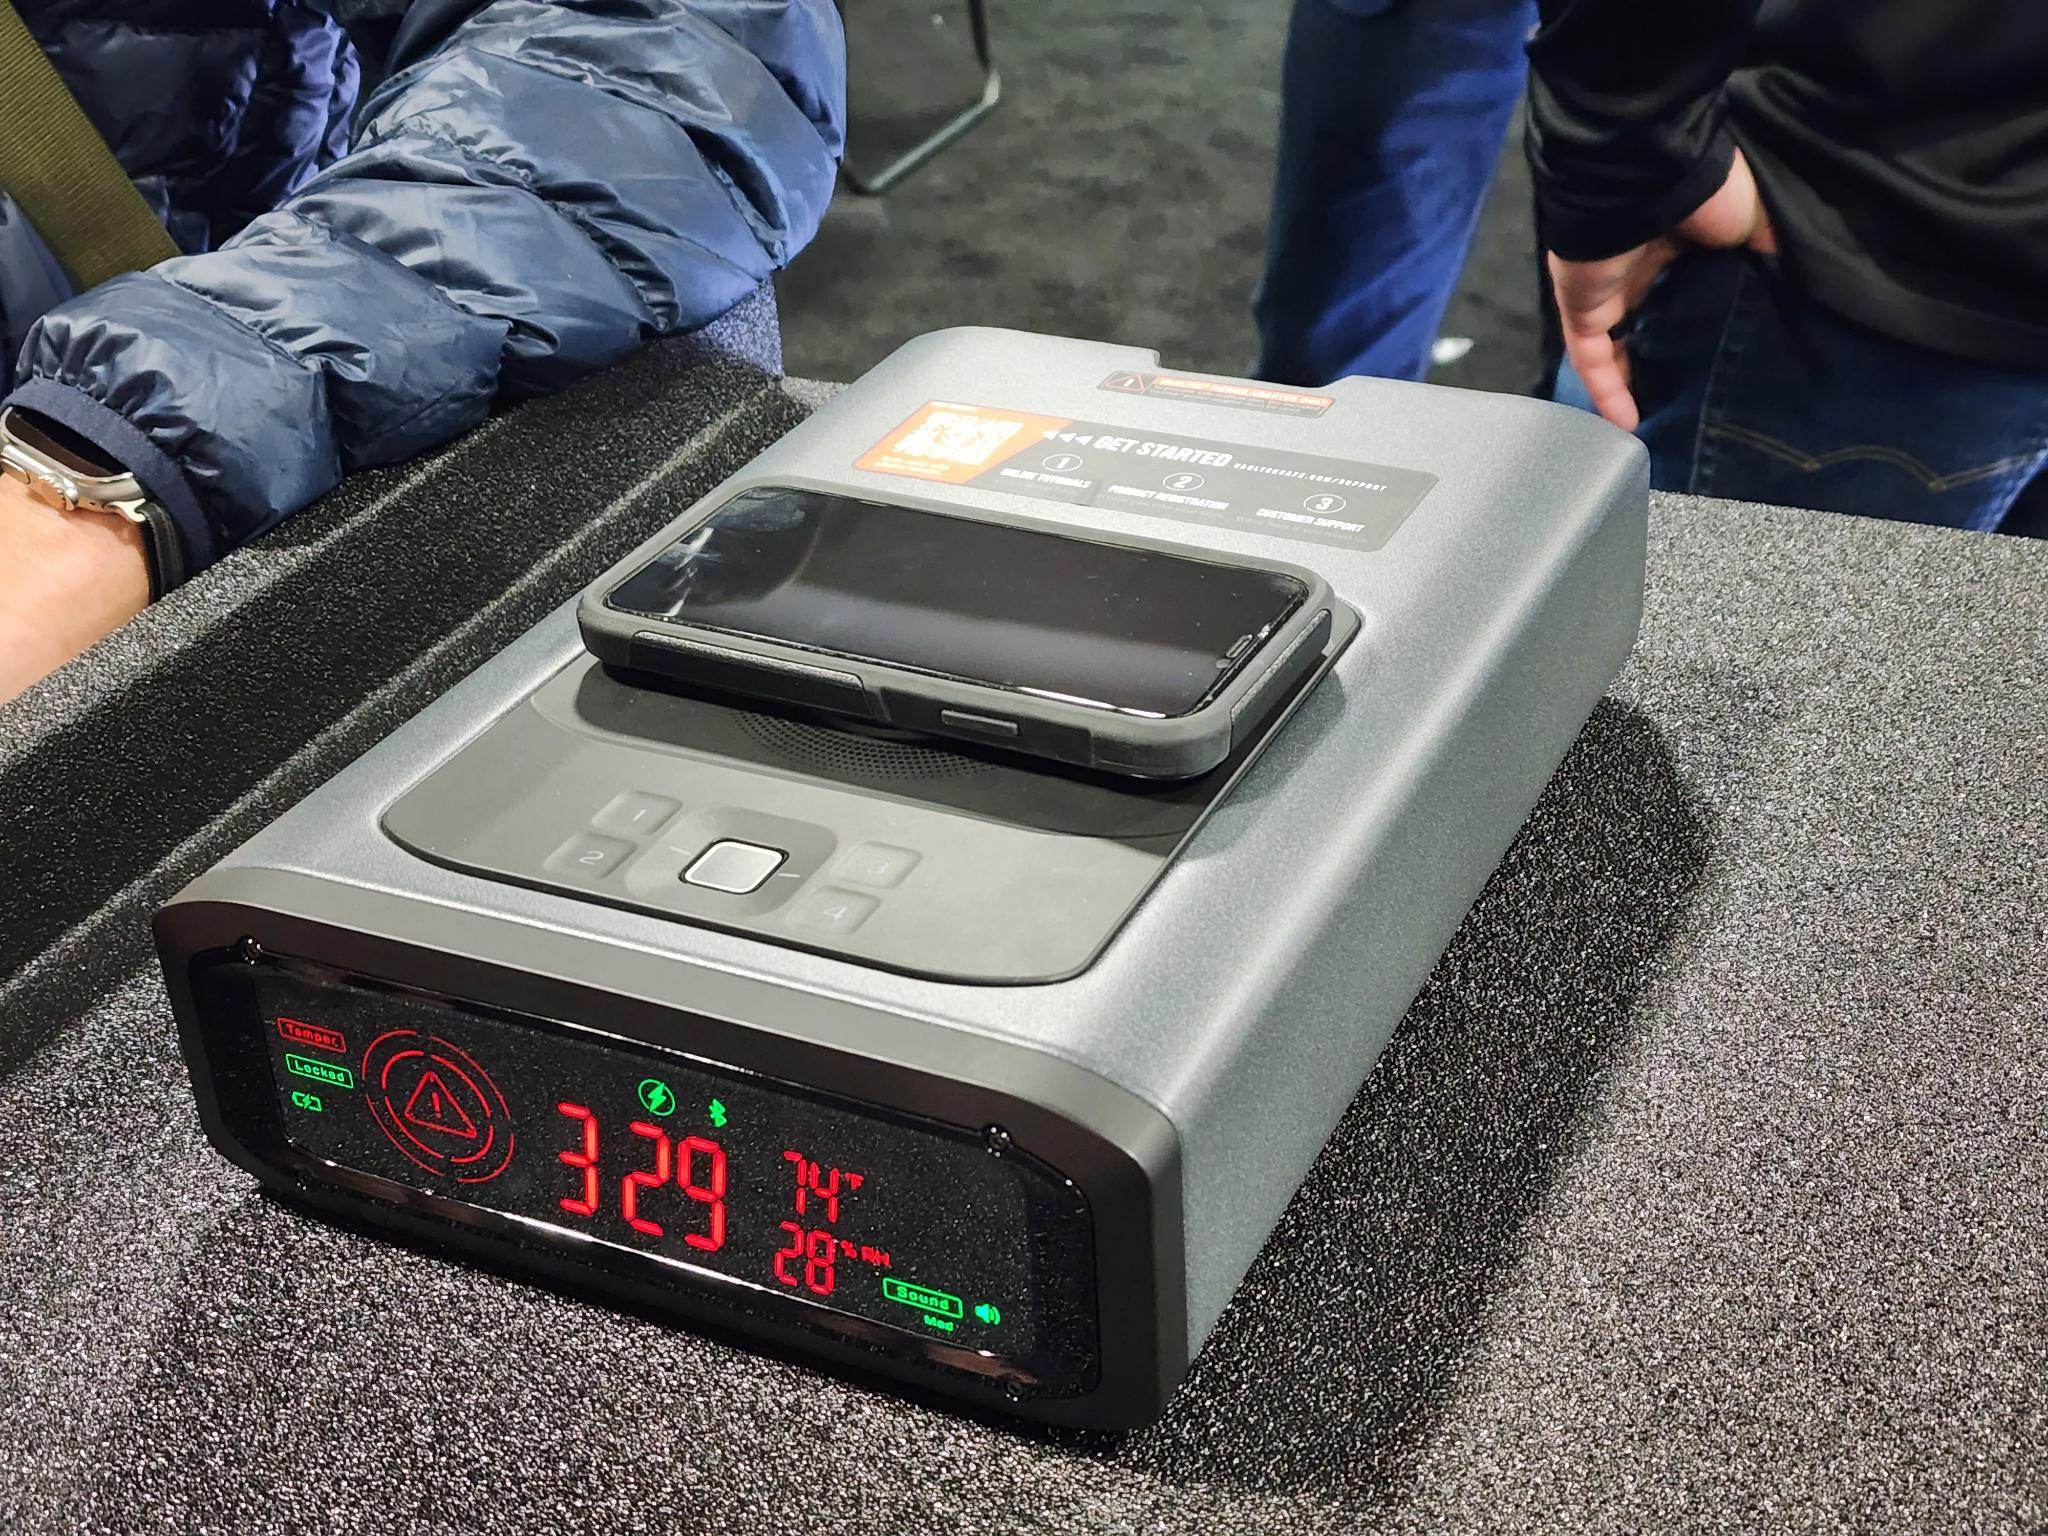
This year at SHOT Show Vaultek showed us this and a couple of other great products that include biometrics, humidity control, and a clock. Crazy right?
DS2I Smart Station
Price:$479.99
Features
Fits one full size pistol and one compact
Entry methods include biometric scanner, smart sense keypad, backup keys, and vaultek nano key
automatic and silent opening drawer once entry method is complete
internal light and soft padded insert
digital touch display that shows time/temp/humidity
wireless charging, micro-usb, and usb-c ports for additional chargers
anti theft features such as the ability to tether it to your wall, tampering detection, and sleep move if wrong codes/fingerprints are entered
The DS2i Smart Station features multiple ways to charge your phone including wireless, micro-usb, and usb-c. The display shows status of the vault, the time, and temperature info.The inside of the DS2i features a protective cushion insert and internal light. When entry is made into the vault this drawer will automatically open up quietly and quickly.
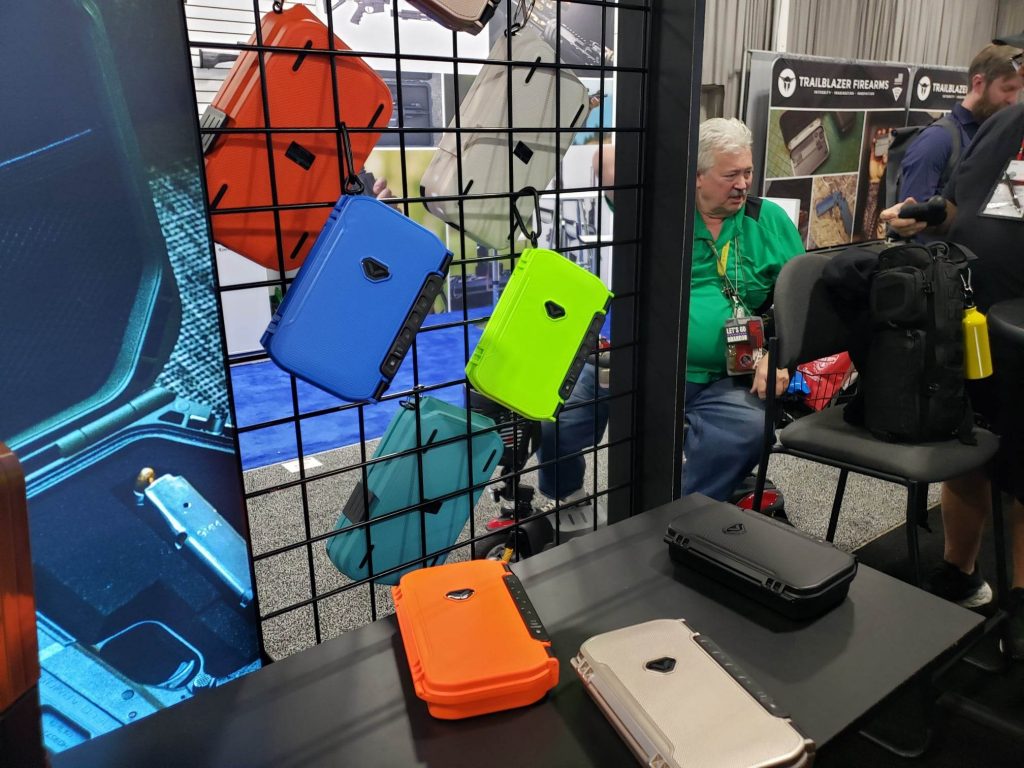
LifePod
Price: $109.99 Special Edition Price: $139.99
Features
4 digit backlit key pad showing lock pad, status of the vault, and battery left
meets TSA guidelines
micro-USB port for back up power if battery dies
backup key access, two manual keys are included in the package
anti-picking feature can be engaged to prevent lock picking
anti impact latch
high density foam interior
tether attachment point
airtight and weather resistant storage
floats
On the left, the custom Lifepod for the SIG Sauer Rose. On the right, the Lifepod 2.0. This is a larger version of the Lifepod 1.0.
LifePod Micro
Coming April 2023 but Accepting Pre-Order Now
The LifePod Micros give you everything that the Lifepod already does but in a smaller size. Though not available until April 2023, pre-orders can be placed by calling Vaultek.
For more information on each product or to place a pre-order for a LifePod Micro visit vaulteksafe.com
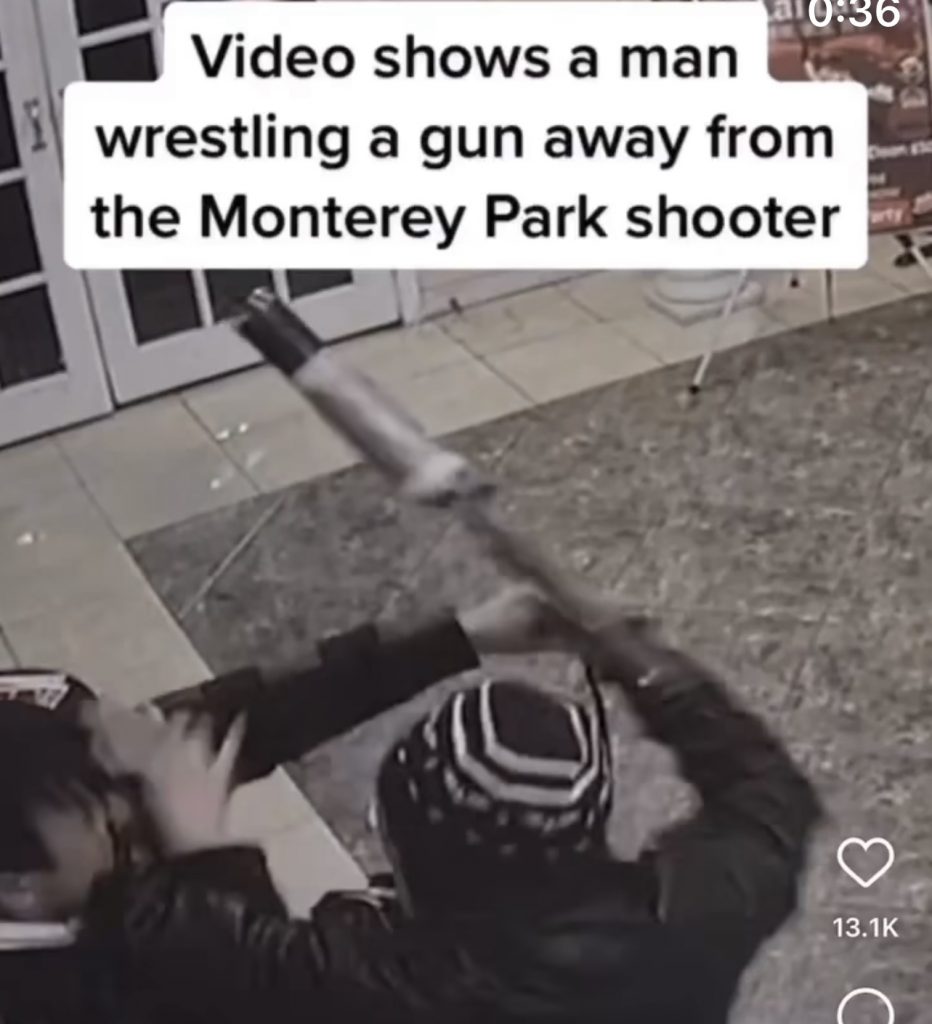
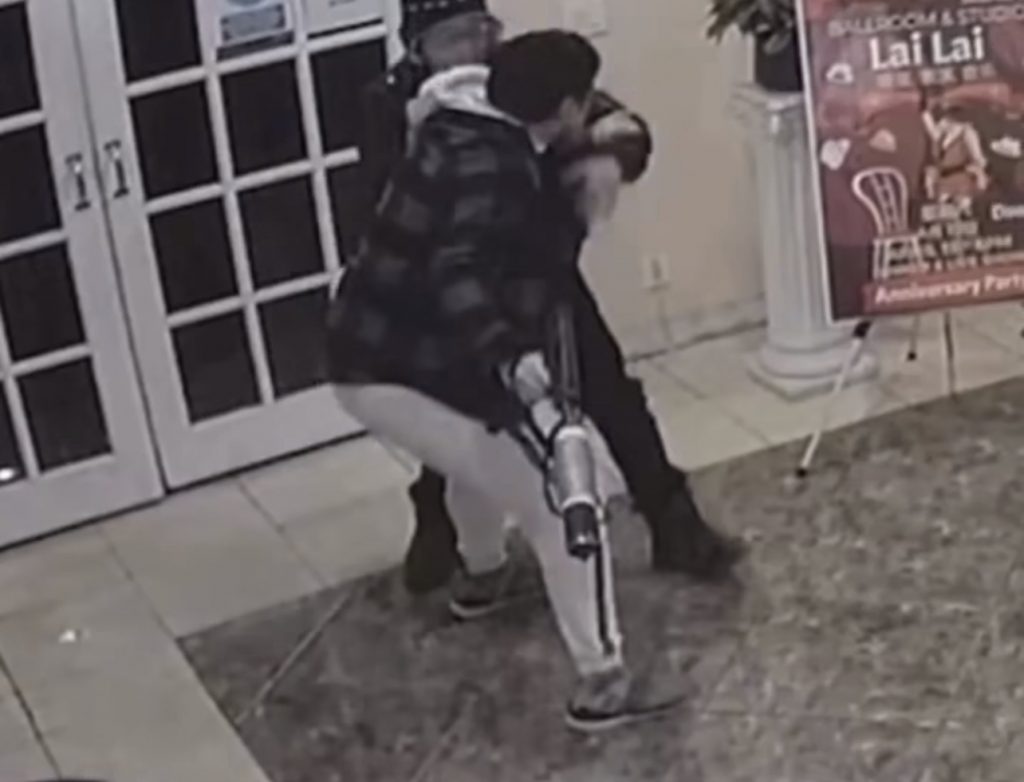
Brandon Tsay (left) wrestled the shooter, eventually getting the gun away from him and pushing him off. The shooter retreated and took his own life
Images are screencaps from a video shared by @FiftyShadesofFDE, who appears to be shadow banned for his trouble.
While the California Governor was crying about the 2nd Amendment being a suicide pact and a 2nd mass shooting occurred in his state as his legislative and regulatory nonsense failed again, resulting in 7 deaths and perpetrated by another elderly Asian male, new details have emerged about the Monterey Park shooting.
The young man in the photo, wearing the white sweatsuit and jacket, has been identified as Brandon Tsay and he wrestled away the shooter’s gun at the 2nd dance studio, Lai Lai Dance Studio in Alhambra, and then fought with the assailant some time more until the much older man gave up and left. The man then took his own life in a vehicle that was being approached by police.
Mr. Tsay showed extraordinary courage. I’m sure a few viewers of the video may be critical of Tsay, wondering why he didn’t shoot back once he had the weapon. To this I will point out a few things. We don’t know if the barrel shrouded MAC10 (or similar) pistol was in a condition to be fired, that Tsay had any notion how to operate the 60ish year old weapon design, and Tsay is fighting a man old enough to be his grandfather. That last part, harming a senior member of your community, is a violation of ancient taboos and not to be considered and judged against lightly. Ultimately what Tsay did worked, he stopped the attack and the last person to die was the attacker.
Still more have started to don their tin foil apparel, and honestly I can’t be too critical of them for it because of the timing, and point out how “obvious” it is that these two attacks were staged to push gun control. This has been a popular conspiracy online, fired by coincidence that is easily explained with detailed analysis and the application of Occam’s Razor, but on the surface look suspicious. Before these latest two shootings in California, moving the conspiracy trope to elderly Asian male perpetrators, it was popular to farcically suggest gun stores should not sell Daniel Defense rifles and EOTech sights to very skinny young white men, as they had been present at more than one recent shooting. Theorists went so far as to publish a whole series of memes suggesting these young men were stoked to violence by the FBI. I don’t believe that, but the Federal government’s record on actions similar to that aren’t exactly spotless either.
Federal enforcement and operations have not shown themselves to be anywhere like beyond reproach. Instead their past actions invite the public and judiciary to use the most extreme scrutiny on all of their actions.
Brandon Tsay wrestles the shooter, eventually getting the gun away from him. Screencap.
Media Response
Now that we’ve given Mr. Tsay his well earned praise, let’s go back to the media, the CA Governor, and all the other fools who’ve contributed to the line “Semi-Automatic Assault Pistol with an Extended High Capacity Magazine.” which would score about a D in any middle school English paper for redundancy. Way to aim for journalist excellence, CNN and friends.
Tsay keeping the attacker away from the MAC10 type pistol. The shooter (dressed in dark clothes and a a hat) continues to try and get it back.
In a time where a large segment of American gun owners are being attacked by the ATF (threatened with felony conviction) over pistol braces, people where terrified the shooter had used a braced gun. Especially with the media description, this seemed like ammunition in gun controllers magazine.
Instead we have an old man shooting an old gun. The MAC10/11 series were designed in 1964, produced in the 70’s, and have been cloned/copied here and there by other companies. They are large, blocky, heavy pistols that came with a barrel shroud to emulate the suppressor they were originally designed with. They had a 30 or 32 round magazine, depending on caliber, cost only $120 at the time, and an effective range of 50 or 70 meters.
I don’t know which model or clone the shooter used (Vox has reported Corbay M11, 9mm), but it is not any variant of a modernized rifle caliber and it wasn’t braced. This firearm could have been purchased any time in the last few decades, there was even a AWB compliant version made during the 94-04 Clinton Assault Weapon Ban called the PM11/9. It had ‘safe’ 10 round magazines and couldn’t accept the super dangerous thread on barrel extender, flash suppressor, handgrip, or a suppressor. None of which material alter the physics of a bullet, many of which make the gun more awkward to carry, and one of which is already NFA controlled (meaning the owner is registered and known to the ATF).
The descriptor tells us it was a semi-auto model. It looks to be a closed bolt model too, making it a post 80’s of some variety as the ATF considers the open bolt ones machine guns, even if semi-auto only (see, making things up is an ATF tradition).
The 72 year old attacker continues to try and retrieve his cold war era pistol.
None of the age or blocky awkwardness of this cold war relic come through in the CNN fearmongery, and that feels deliberate. It probably is deliberate. Never let a good tragedy go to waste. We can’t use any of the usual lines about ‘weapons of today being so power’ since this isn’t a weapon of today, this thing may have been built before I was born. We can’t say modern high power ammunition because all the calibers this thing could be in are about a century old.
It fails all the sniff tests of the scary terms thrown out by the inept and thwarted elites who drive the gun control debate because they refuse to accept that they cannot control human free agency, they cannot remove motive, and therefore there isn’t diddlyshit they can do to stop gun violence.
Vox opines, that is unclear if the elderly shooter acquired his ‘probably illegal’ pistol through legal means. But here’s the kicker, what if he did? What if he bought this when it was legal? What then? What if he didn’t get it through legal means and just bought it from someone who did after the CA or Federal AWB? What then?
Both of these scenarios are equally adept at proving, again, gun control doesn’t work. It requires voluntary compliance that they will not receive and you need only look at the brace ban commentary, the ATF still hasn’t published it to the federal registry by the way, to get an estimate of just how well modern and past compliance are working out. That rule is likely to be stomped out in court like the bumpstock one, the ATF does not possess law making authority and assault weapons bans nationwide are in the line of fire too.
Media sources around the nation are going to elevate this tragedy to something we could have prevented without giving us even the slightest hint how a new rule would have prevented the tragedy. That continues to be a fatal flaw in their logic, [X] rule wouldn’t prevent this or other attacks but we need [X] rule in order to prevent attacks… okay, which ones?
In conclusion, hyperbole, fearmongering, exaggeration, and criminally negligent wishful thinking continue to be the order of the day for gun controllers. Disappointing.
But men and women like Tsay, Fierro, and Dicken give me hope. People willing to step up and act in the moment when the laws have failed, as they will always have the potential to do and will continue to, will continue to save lives through their actions. People who aren’t going to lean upon the ghost of an argument that ‘the thing happening is illegal’ or that ‘these things shouldn’t happen’ and simply deal with the fact that they are happening. Billions of things shouldn’t happen every single day that do, they happen anyway due to nature, negligence, misunderstanding, anger, accident, and occasionally pure cruelty.
We can’t write any of those things out of existence with a law. We should stop trying. Stop believing people who say we can, too. They are only delusional, or lying, and I couldn’t tell you which is more harmful in the end right now.
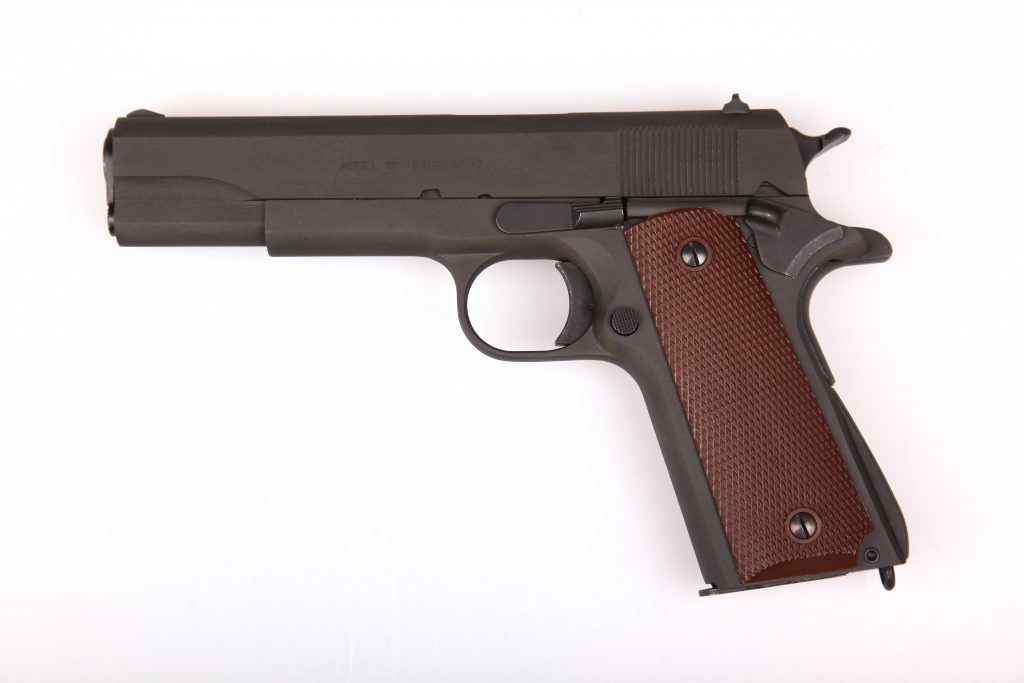
With attention to detail evident the Auto Ordnance is a good shooting 1911.
The 1911 reviewed today is a close copy of the original US Miliary 1911, at least those manufactured after 1924. The early pistols were 1911 handguns the 1911A1 featured certain improvements such as an arched mainspring housing, finger cuts in the frame, improved sights and beavertail safety re-design, and short trigger. The Auto Ordnance 1911A1 is an American made handgun with a dark matte finish, plastic grips, and good fitting and attention to detail. This is a Government Model 1911A1 with a five inch barrel. Overall length is 8.5 inches. The pistol weighs 38 ounces. The pistol is supplied with a single 7 round magazine. Early features such as a lanyard ring and small sights are part of the package. The pistol isn’t difficult to operate. Load the magazine, rack the slide to the rear, insert the magazine, and lower the slide. Place the safety into its notch in the slide. The pistol is then cocked and locked. Some modern pistols claim cocked and locked but they are really only cocked and safety on. The 1911 safety locks the slide in place when applied. A grip safety prevents travel of the trigger unless the grip safety is pressed forward. The Auto Ordnance version releases its hold properly about half way into travel. No matter how hard you pull the trigger the hammer will not fall if the safety is applied. If you drop the pistol the grip safety springs out and prevents hammer movement. The slide serrations are true to the original 1911A1 and the pistol is easily field stripped in true 1911 form. The sights are embryonic fixed units. While we could hit better with larger sights then this would not b a true 1911A1 reproduction, an important point. While such sights are fine for short range use they are difficult to use at extended distances. I am not certain the Army intended them simply for short range combat and shooting enemy horses. Military accuracy standard with 230 grain jacketed service loads were a five inch group at 25 yards and a ten inch group at 100 yards. Most 1911 handguns of the day were more accurate than this. Since the pistol fits most hands well with a good natural heft the small sights are not as great a hinderance as we might think.
The Auto Ordnance 1911 A1 .45 is a solid GI type gun.While there are certain detail changes in the A/O pistol compared to the original 1911 they are beneficial.
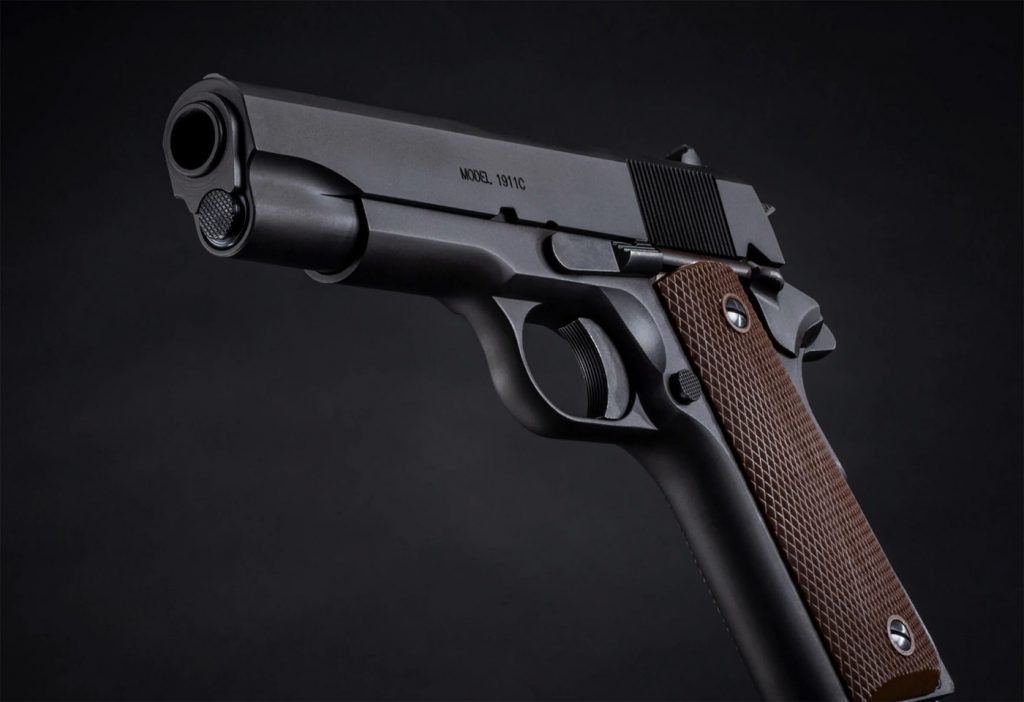
The ejection port – sometimes called slide window in period reports- is small. So was the original. Modern enlarged ejection ports made administrative handling much easier. There are differences between the Auto Ordnance and original as may be expected. The pistol is a little tighter with less lateral play between the slide and the frame than a wartime 1911. We like our pistols to be accurate more so than we need them to come up shooting after a drop in the mud these day. The second addition is a firing pin block. This prevents forward travel of the firing pin if the pistol is dropped, particularly if dropped on the muzzle. This doesn’t affect the trigger action as the Auto Ordnance pistol features a trigger that breaks at a clean 7.2 lbs. Forgings are stronger than steel and the primary action parts of the 1911A1 are steel. A 1911 must have 1/32 inch clearance between the two halves of the feed ramp for proper feeding. The Auto Ordnance neatly accomplishes this. The top of the chamber should also be smooth. This handgun accomplishes this as well. The barrel bushing is snug but only finger tight.
Firing the handgun was pleasant enough. I chose Black Hills Ammunition 230 grain FMJ ammunition for test firing. This is the original ‘hardball’ loading or close enough. At 850 fps this is a formidable load. Powder burn is clean and as a result of this full burn muzzle signature is limited- just a few sparks at best. At 7 yards the pistol was quickly brought to eye level and fired. I chewed up the target center. At longer range you must concentrate on the small sights. With good light and a target of contrasting color good results are possible. At a long 25 yards I destroyed a man sized target. Firing from the MTM Caseguard K zone shooting rest I carefully benchrested two loads. First, the BHA 230 grain FMJ. I added the Black Hills 230 grain JHP as well. The FMJ load put five rounds into three inches and the 230 grain JHP three rounds into 2.9 inch- four of them in 2.2 inches. The pistol is reliable and accurate as far as I can tell from firing 120 rounds.
The author’s personal Auto Ordnance is a good performer.Black Hills 230 grain JHP ammunition provided good results.
If you chose to carry this handgun cocked and locked hammer to the rear and safety on is the preferred carry. This makes for rapid manipulation and a fast first shot hit. Sure you may wish to purchase a modern 1911 with superior sights and a crisp trigger action. If you respect the .45 ACP cartridge as I do then you may deploy a Glock 21. Just the same if you wis to own a 1911A1 that is reliable and functions well this is the one.
If everyone should own a 1911- this is a good choice at a fair price.
Auto-Ordnance 1911A1 Specs
Caliber: .45 ACP
Capacity: 7+1
Barrel Length: 5.0″
Overall Length: 8.5″
Height: 5.5″
Width: 1.34″
Weight: 38 ounces
Slide Material: Steel
Frame Material: Steel
Safeties: Grip safety, thumb safety, firing pin safety
Los Angeles Sheriff's Department Capt. Andrew Meyer briefs the media in Monterey Park, California, on Sunday. Photo: Frederic J. Brown/AFP via Getty Images
Of what?
Several things, actually. That the “typical” shooter doesn’t exist because shootings are atypical behavior. That shooters are not always younger. That shooting motivations are not solely ‘hate’ or racially based, those are simply two powerful motives among the list. That violence within communities is the norm, not across communities.
Most succinctly, not a single one of California’s A+ rated gun control laws stopped this geriatric from shooting around 20 people in Monterey Park, killing 10 of them. Not. A. One.
The copium is already flowing from the usual sources, stating that ‘well.. the laws didn’t work in this instance, and they don’t stop all violence.. but we promise they ‘help’ guys, believe us please’. Instead of acknowledging that their random prohibitions on comfort features for firearms does nothing to police extreme manifestations of violence, they continue to insist that every hole within their logical consistency is ‘outside the norm’. The irony is so deep there.
Gun controllers have built their entire identities on the lie that partial random item prohibitions can curb human behaviors and motivations. We keep stacking events and locations that prove otherwise and the coping continues to get more and more absurd. We have states with very permissive firearms cultures with low violence. We have states with restrictive schemes with high violence, often more than their more permissive neighbors. We have two large states, our nation’s largest population wise, with very different firearm regulation outlooks and nearly identical rates of violence. That should be a clue.
“We don’t know if this is specifically a hate crime defined by law, but who walks into a dance hall and guns down 20 people,” Los Angeles County Sheriff Robert Luna said.
That is a problem. The specific propensity for law enforcement in certain regions of this country to default to ‘Hate Crime’ as a motive instead of waiting until enough facts are in hand to say yes or no has lead to a further complication of mass shooting narratives. It’s easy to say hate crime when its a group event that gets targeted and its hard to recant that afterwards. We have serious issues with narrative honesty in this country’s media circus.
The facts at hand state the 72 year old shooter, who was first described as a 30 something male, used what the Sheriff described as “a magazine-fed semiautomatic assault pistol” that is probably not legal in California. His motives remain under investigation. He was known to at least the first location he attacked, a ballroom dance studio he apparently frequented on the regular.
“Gun violence needs to stop,” Luna said. “There’s too much of it.”
Thanks, Sheriff… very wise. Super helpful. How did that probably illegal ‘assault pistol’ get by all your gun violence laws? That can’t happen if its against the law, right? Or do we need to make it much more illegaler to murder folks with a gun. That strategy has never worked in the past, but that also hasn’t stopped you all from trying anyway.
“This kind of mass shooting has become tragically common in the U.S.; what would be a rare horror in any other developed country is typical here. Yet the cause is no mystery. America has an enormous amount of guns, making it easier for someone to carry out a deadly shooting.” – NYT.
Do we have to play this stupid game again? The US isn’t unique in the world for violence, we are for gun ownership and population. Only two nations have more people than us, both have more people murdered than us. Both have super stringent weapons ownership policies yet still have more people murdered than us. We have, by an order of magnitude, the most privately owned weapons and yet we seem to manage pretty well. If we were then to start hash out where in our society these violent incidents are occurring… well… assumptive conclusions like ‘math is racist’ start getting thrown around.
Weird.
Oh wait, both India and China are ‘uncivilized’ in this version of the gun control argument, nevermind. They can’t be expected to behave.
California’s political and legislative responses to these events should stop being used as an example to emulate.
Accountant turned science-fiction author and well known Internet firearms bon-vivant Larry Correia spent some time last year penning his new book, In Defense Of The Second Amendment, which is due for public release Tuesday, January 24, with preorders arriving tomorrow. This book is Correia’s first non-fiction release, and includes a preface by actor Nick Searcy. Besides the preface, it has a conclusion and 7 different chapters in between for a total of 208 pages. Ten full pages in this book are dedicated to notes, citations and references–all in small print. Correia uses the insights and personal experiences he attained from his participation in several firearms related jobs. Among other things, he worked as a former high end gun dealer/007 FFL SOT, a self-defense/Utah concealed carry instructor, and as a competitive shooter. He uses these experiences in order to argue against the most common anti-gun rhetorical points and other areas of discussion as they pertain to this “national conversation about guns.”
In addition to the various firearms related jobs Correia has held, he has also been spending much of his life arguing for and defending the Second Amendment online–be it social media or his personal website. Tearing down arguments with laser-straight logic and sharp wit is something he has become quite good at, and this book does not hold back on either. Correia also intends for his readers to take advantage of this book and use it as a handy reference guide to help others make coherent and articulate arguments in favor of the Second Amendment. Frankly, the book is also a great read for people wary of firearms and the Second Amendment but are still genuinely curious and open minded about the topic. Ditto for fence sitters: the book would not be a waste of their time either. Be warned however, that Correia’s personal style of writing is one in which he holds nothing back and plenty of jokes and lampoonery are made at the expense of American left leaning politicians. (Correia does claim to be on his best behavior for this book and that “he toned it down”). Everything Correia wrote in this book is concise and easy to understand, but this will not read like a neutral academic paper.
A timely caption concerning one of the main governing agencies at the US Federal level that regulates firearms, the ATF.
In Defense Of The Second Amendment draws readers in with an explanation about the incident-tragedy cycle and all of its moving parts, especially the patterns of sensationalism and reactions by the media, the uninformed public, and politicians. Correia began writing the manuscript for this book during the summer of 2022, in the wake of the awful Uvalde, Texas school shooting in late May 2022. In Defense Of The Second Amendment is current and timely enough that it includes references to the Greenwood, Indiana mall shooting that was thwarted by a lawfully armed concealed carrier and other current events from last year as well. Correia spends a good portion of the book taking apart every classic gun control argument including magazine capacity, background checks, the gun show loophole, microstamping technology, waiting periods, ghost guns, red flag laws and the regulation of “assault weapons” in Chapter 4.
In Chapter 5, Correia also discusses more contemporary topics that entered the conversation within the last five to ten years like liability insurance for gun manufacturers and the practical implications of “literally banning and rounding up every single gun.” Personally, I am grateful that he dedicates several pages addressing the topic of red flag laws, known as Extreme Risk Protection Orders or ERPOs, as red flag laws have extremely dangerous implications for the country and its citizens. The road to hell is paved with good intentions, after all. Seasoned veteran gun control debaters will recognize and appreciate all the points Correia makes in his counter-arguments for gun control. For others (myself included), In Defense Of The Second Amendment is a great refresher. And once again, for those who are open minded, taking a look at Correia’s reasoning is productive; the point of this book is to inform its readers and then have those readers inform the people around them and maybe get them to start thinking about the Second Amendment topic in ways not spoon fed by the mass manipulative and largely hostile media.
The later parts of the book address other topics in the gun space, and it is in these pages where Correia not only provides explanations and background context into how some gun laws came to be, but useful solutions that may alleviate some of these problems as well. For example, Correia calls out the media on how it is dangerous to sensationalize mass shootings because these seem to spark copycat attacks following high profile violent incidents. Correia’s call to action implores readers to get involved and become ambassadors for the Second Amendment in their communities and to their friends and neighbors besides talking or sharing ideas. He wants readers to show those around them how useful and even fun shooting and enjoying firearms can be.
Outside of the courts, the Second Amendment and the topic of guns in our society is very much a cultural issue and a poor, struggling gun culture actually represents a great harm to our Second Amendment rights. This is something else Corriea points out and expands on. Chapter 7 is about the use of deadly force. All of the chapters in this book are important, but perhaps Chapter 7 may be the most important one; most of us carry or keep defensive firearms at home to protect ourselves, after all. I will quote one sentence from one of the paragraphs in Chapter 7.
“Once you have a fundamental understanding of how use of force laws are supposed to work, it is harder to be manipulated by the press.”
The ugly reality is that as Americans, we appear to be at odds with each other and media manipulation is like the bellows that make the fire burn hotter. Mistrust, disinformation and fake news all seem to be the focus today, and it is really taking a toll on our country and distracting us from moving forward and fixing things. Whether one leans left or right, whether they love or hate the author, if this book can at least set some facts straight about the gun topic, then it will have done its job.
[Ed: We have published this piece annually since 2015 for Bill of Rights Day each December 15. The Bill’s Second Amendment is the reason for our being, in more ways than one.]
Today we all should be jubilantly celebrating the 230th anniversary of the ratification of the Bill of Rights, the original 10 amendments to the United States’ federal constitution. Remarkably, it slips by relatively unremarked. Yet our Bill of Rights may actually be the most significant of our republic’s founding documents.
The Declaration of Independence announced our nationhood. The Constitution defined our government. The Bill of Rights confirms our liberty as free people who are not subservient to our government.
There is a lot wrong today that the authors of the Bill of Rights anticipated and meant to preclude. But the Framers knew that natural and civil rights, including these broad and individual ones that were defined so early on, are actually not worth the parchment they’re inked on. They’re worth what each generation holds they mean regardless of original intent. That’s how they’ve often become too loosely interpreted.
There was strong agreement among the Founders about the importance of these principles to a civil, democratic society and in their belief that they were codifying rights that were mostly pre-existent and inherent to the dignity of human beings. The conflict between Federalists and Anti-Federalists over whether to formalize these was about the impact of leaving unstated other rights “retained by the people” or “reserved to the states”. There was no disagreement about the importance of any of the rights for which the colonists had fought and died for.
Federalists worried that documenting any rights implied disregard for those not enumerated. Anti-Federalists feared that not including these in the Constitution would eventually make it easier to ignore them. Over 200 years later, it appears the Anti-Federalists showed the greater foresight on this question.
The Second Amendment (in James Madison’s original draft, beginning with “The right of the people to keep and bear arms shall not be infringed”) is our particular concern here at Doctors for Responsible Gun Ownership. Not just to protect the Right to Keep and Bear Arms, but also because this individual right is so basic to all other rights of Americans. It is, in St. George Tucker’s words, our “palladium of liberty”. Just having this enumerated right for individuals to own and use weapons makes us unique among nations.
One reason Americans have always seen ourselves as exceptional is because of the individual obligation for self-responsibility that is required by minimizing dependence on government. We’ve been realists since the first boots trod the Atlantic coast, taught by the frontier experience that we have to take care of ourselves.
We discovered that people have the right “to the pursuit of Happiness”, not to be made happy. We learned that we have the right, and therefore the duty, to protect ourselves because there is no right to be free from harm. If we do not comprehend these core truths, we become dependent on government for happiness and protection— according to others’ standards, not our own.
As Americans moved westward, they outpaced the advance of existing government, an unusual pattern throughout the hemisphere. Sometimes alone, often in scattered clusters of neighboring settlers, they had to meet their own needs. They were guided in establishing their own local authorities by the same traditions we look to today to understand our relationship to government that now envelops us.
That historical ethic of self-reliance without a safety net is a recent enough phenomenon to continue influencing our psyches. That’s good because this world, and too often our own part of it, is an unpredictable and dangerous place.
Accepting the responsibility to care for oneself, one’s families and fellow citizens must be at the heart of any successful society. A hard-nosed, far-sighted understanding of that reality is central to American history, coupled with our optimism and generosity.
This is why DRGO speaks out on behalf of our fellow citizens. We oppose professional and cultural group-think that would have us ask more what our country can do for us, than what we can do for ourselves and our country.
DRGO vouches for the capacity of people to do the right things for themselves and each other, even with powerful tools like firearms. If we don’t, we’ll lose our history, our liberty, and each other.
.
.
— DRGO Editor Robert B. Young, MD is a psychiatrist practicing in Pittsford, NY, an associate clinical professor at the University of Rochester School of Medicine, and a Distinguished Life Fellow of the American Psychiatric Association.
On this episode of the Brunch, New York Times Best Selling author Larry Correia joins the guys to talk about his upcoming book and whatever else strikes his fancy! Yes, the graphic says 83, Caleb is tired.
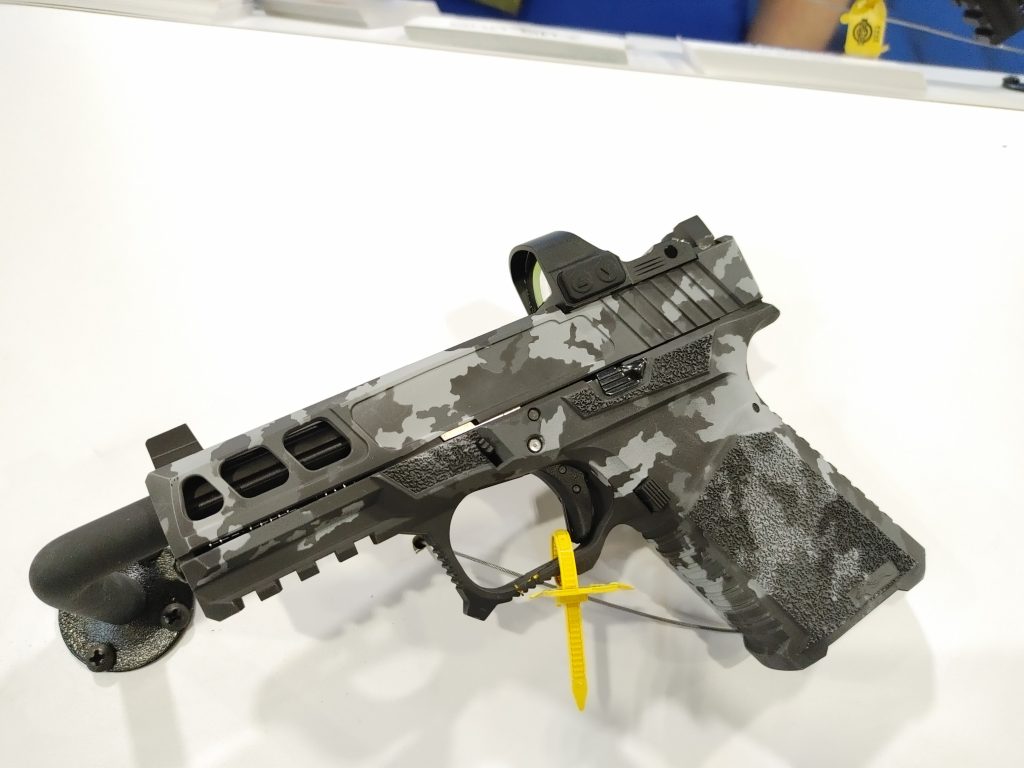
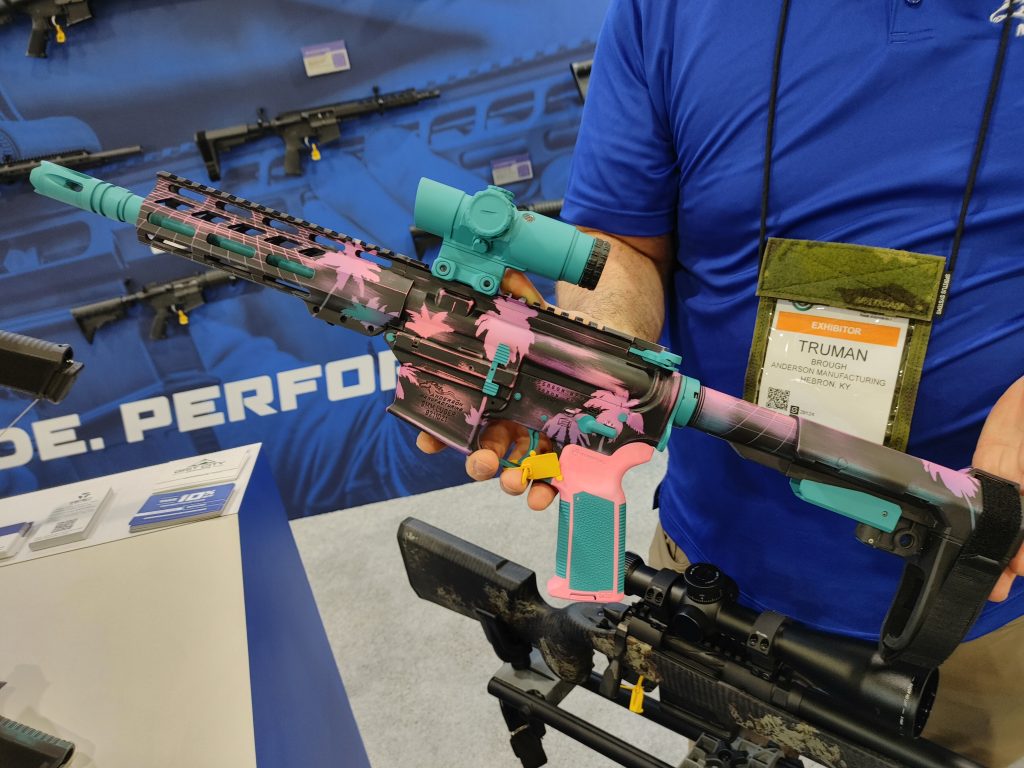
Anderson, a company mostly known for ARs, has gotten into the polymer pistol game. The Kiger 9C series takes the Glock approach to combat pistols and basically cloned the Gen 3 Glock series with a few noticeable changes. The first is some modifications to the frame, which include the removal of the famed finger grooves. Anderson went with a standard Picatinny rail and a very aggressive grip texture. The grip frame seems to be a hair longer to better fit larger hands. It’s just a hair longer and stops my pinky from pinning in the magazine.
The Kiger 9C Gets A Facelift
The Kiger 9C has been out for a bit, but SHOT Show gave Anderson a chance to display several new models of the gun as well as some fancy cerakoted designs. The gun looks like it uses a P80 frame. Anderson has optic-ready models, lightened slides, and a few fancy finishes. I asked if the finishes would be available, and the folks at Anderson advised yes.
In fact, they were looking to make special editions a regular thing. They would produce maybe one a month or so with a specialized finish. Models shown at SHOT include the Miami Vice model that has got my eye, as well as a specialized camouflage. There was also a Nintendo Zapper design, but I was assured this wouldn’t be produced for the general market. I’m sure that was a relief to Nintendo’s and Anderson’s lawyers.
The same folks also advised that shooters may begin seeing special edition receiver sets for their rifles. Either way, who hates a little color? In a world where everything is black and boring, it helps to be different. A lot of companies are making very similar weapons, and Glock clones are quickly becoming kind of like 1911 clones. They are everywhere, and if you want to stand out, you have to do something different. Hats off to Anderson for being a little different.
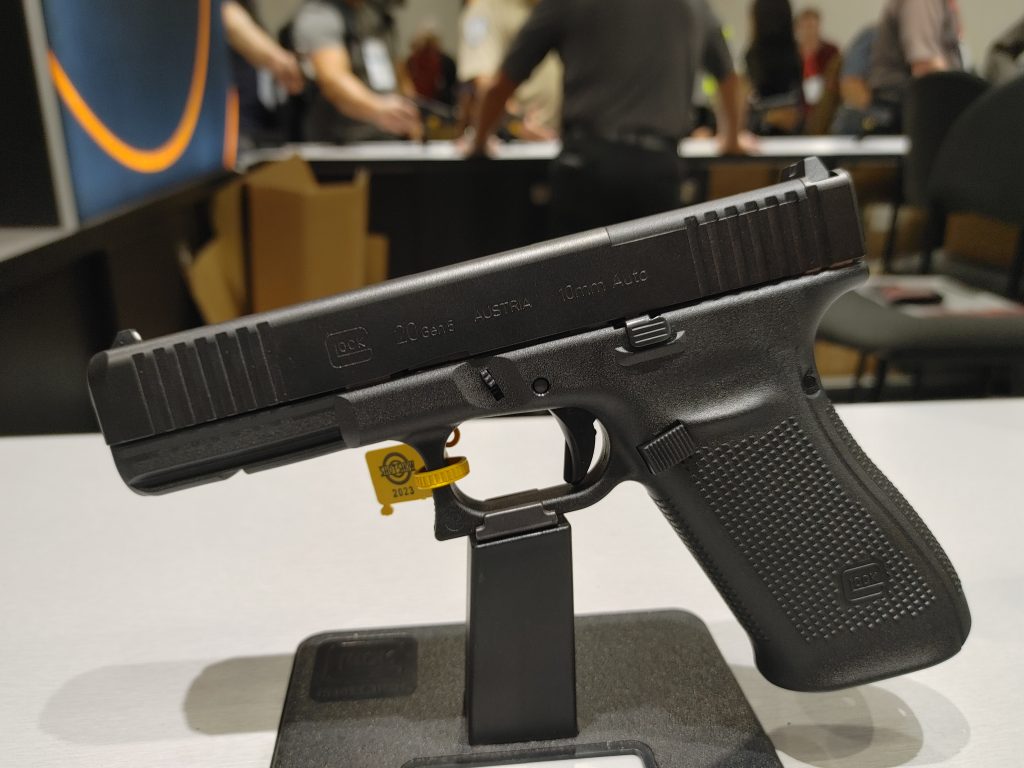
Glock moves really slowly to do new stuff. How long ago was the Glock 46 announced for a particular German contract? Heck, only this year did Glock release the Glock 47, which has served Customs and Border Patrol since 2019. Alongside that slow movement was the bringing of new guns to the Gen 5 world. In fact, Glock seems to be trimming the fat in terms of the models produced, and it’s unlikely we’ll see a 5th Gen 45 GAP Glock. What we did see at SHOT Show is the 5th Generation of the .45 ACP and 10mm Glock 21 and Glock 20.
Welcome the Glock 20 and 21 to the Next Generation
I like to imagine Glock is like a street gang that you get jumped into. I wouldn’t want to be part of the crew that jumped the big, hefty Glock 20 and Glock 21 in. These large-frame Glocks are the big boys of the Glock lineup. They’ve been fairly famous throughout their tenure. Glock as a company never gave up on the 10mm, and the Glock 21 is one of the more efficient doublestack Glocks with a capacity of 13 rounds in a flush-fitting mag.
The Gen 5 models bring all the Gen 5 features that shooters seem to love. They abandoned the finger grooves and used a better trigger, ambidextrous slide lock, the Glock Marksman barrel, and more. These guns will also be in the MOS configuration, which makes mounting optics easy. Although, make sure you use Loc Tite or even maybe an aftermarket plate. Especially with the Glock 20. I imagine the extra recoil might be hell on the MOS plates.
As usual, these guns are simple, easy to use, and the bigger bores pack a punch. While the ole 45 AC is fine, the 10mm packs a real punch and can be a very versatile round for multiple purposes. I’m excited to see the Gen 5 Glock 20. How about a quasi-single to double stack 10mm that holds ten rounds and is Glock 19-sized? A Man can dream.
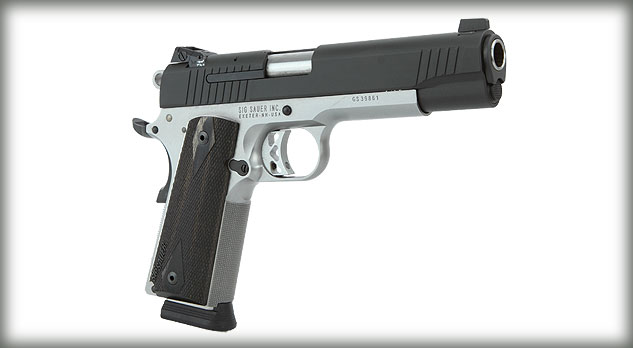
SIG Sauer firearms need little introduction. Quality and reliability are hallmarks of these pistols. Lets look at one of my favorites. The original SIG 1911 featured a slide similar in profile to the P series. While resemblance to the P220/P226 is fine other shooters wanted a traditional 1911 from SIG. The Traditional pistol is the result.
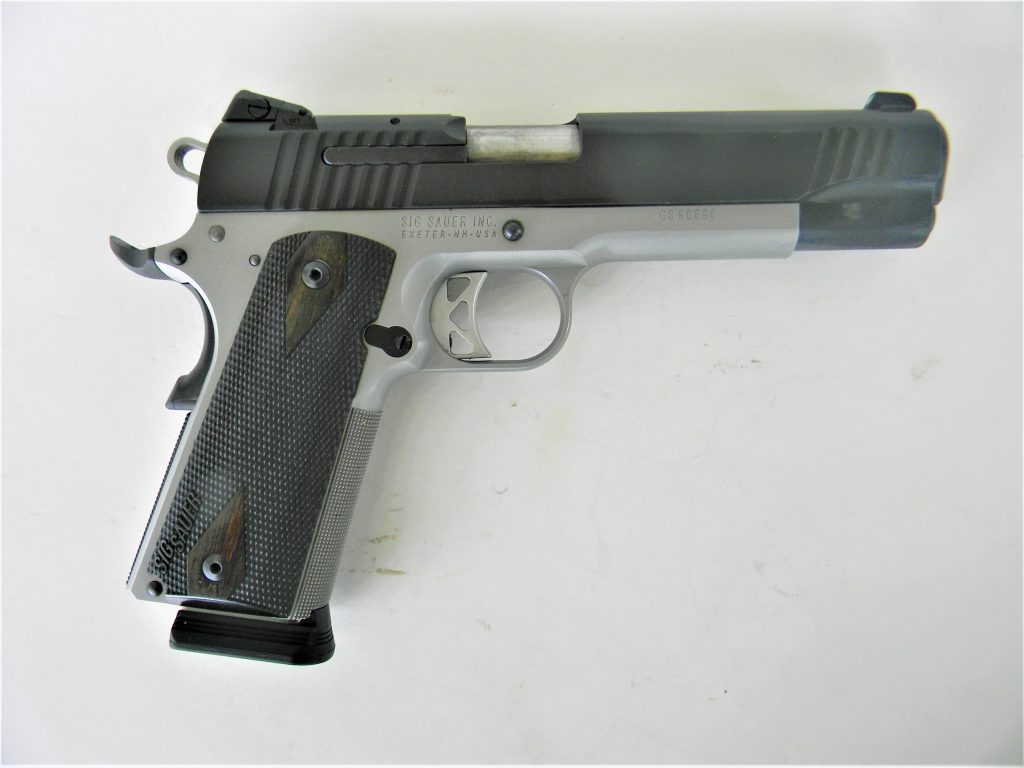
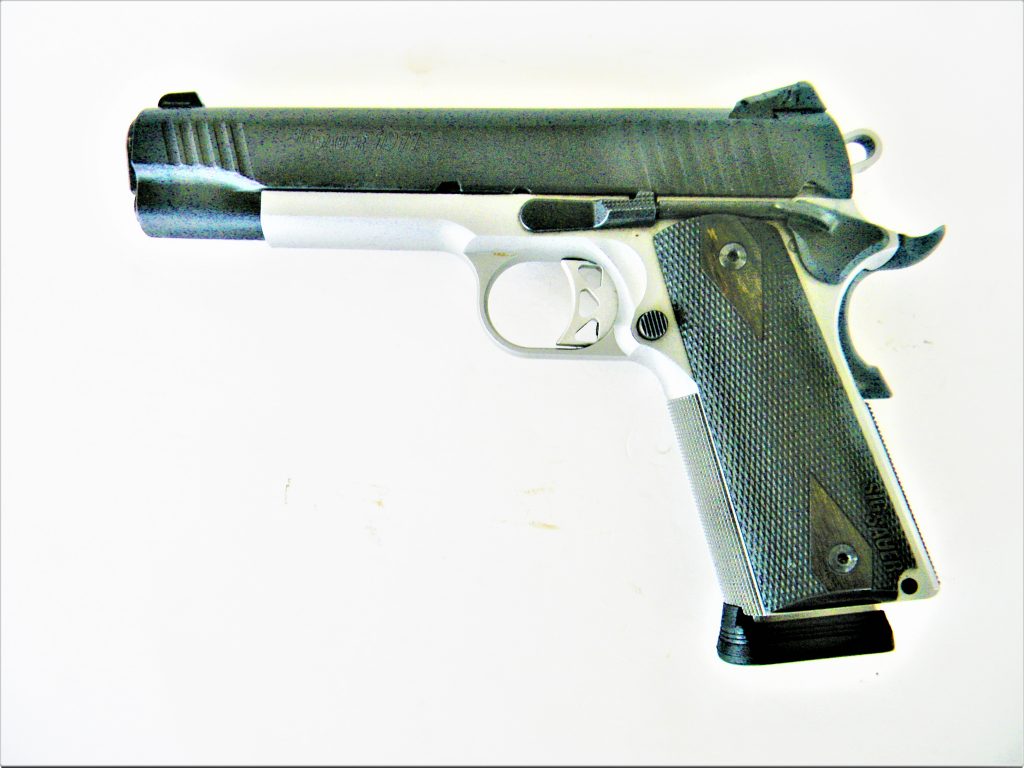
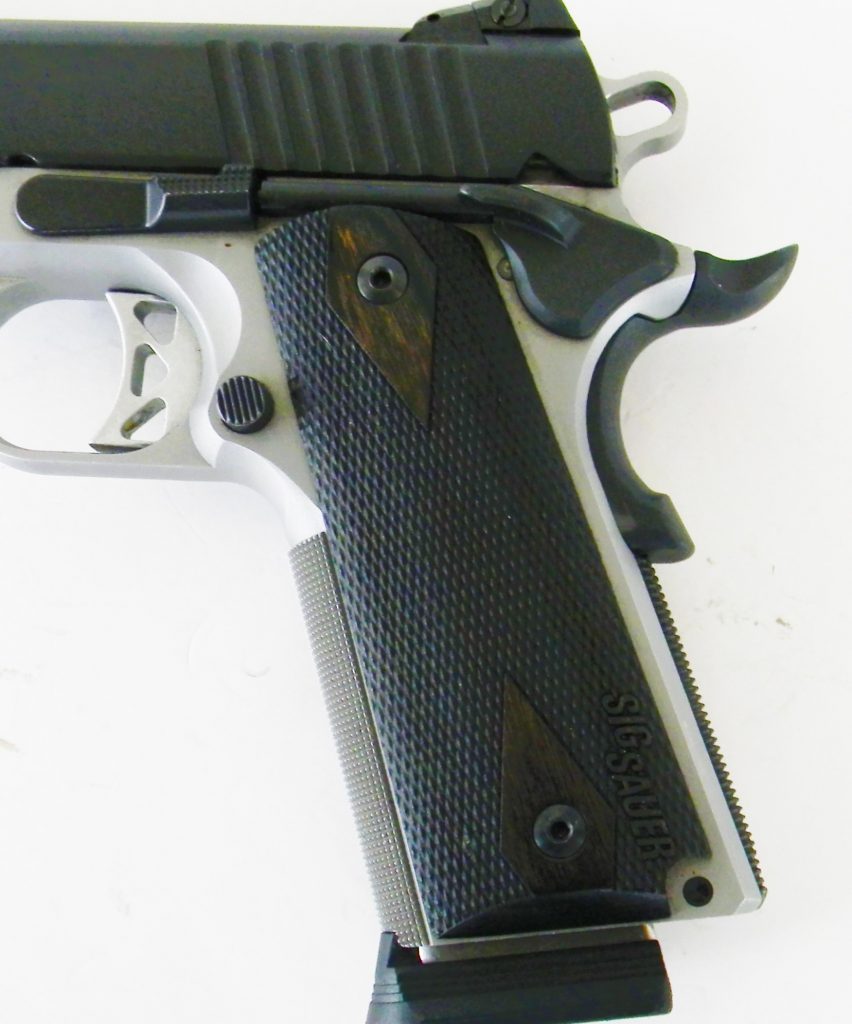
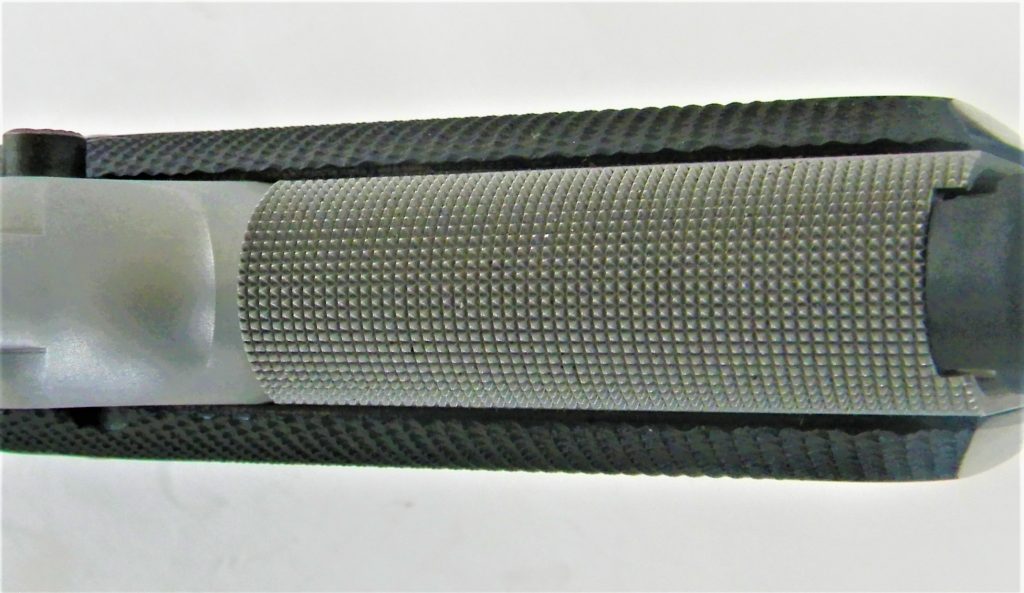
The Traditional Reverse Two Tone is a full size Government Model 1911. It is a general purpose .45 ACP pistol for target shooting, concealed carry, home defense, and some types of competetion. This pistol features a round top slide of the traditional outline. The slide features forward cocking serrations. The SIG Reverse Two Tone features a skeletonized hammer, upswept custom grade grip safety, target style trigger, extended slide lock safety, flat mainspring housing, and a well fitted barrel with a snug but finger tight barrel bushing. The pistol is the traditional Government Model height at 5.5 inches tall with an overall length of 8.7 inches. Weight is just under forty ounces. The barrel is a five inch type. The slide is stainless steel but coated in black nitron. This is as corrosion resistant as possible. The frame is forged stainless steel. The grips are nicely checkered distinctive blackwood. The front strap features 25 line per inch checkering. This is a requirement for a true hard service 1911 making for practically a non slip gripping surface. The pistol is supplied with two eight round SIG magazines. These magazines have proven reliable in service. The pistol features a beveled magazine well that makes for rapid magazine changes, simply funnel the magazine into the grip well.
The sights are the popular low profile type similar to the famous Novak Lo Mount sight. The SIG sight, however, if adjustable for windage and elevation. Since this is a 24 hour service pistol the SIG features tritium sight inserts. These miniature nuclear furnaces feature a glowing point of reference in dim to dark conditions. Most SIG night sights are the three dot type. I was lucky enough to obtain a SIG Traditional Reverse Two Tone pistol with bar dot type sights. These are the minority in preference among shooters but a configuration I appreciate. The rear sight features a horizontal bar while the front sight features a single dot. This makes for an accurate sight picture, fast to pick up in dim light, and with good speed potential. Just the same everyone doesn’t like this set up and that is why the three dot is more popular.
The pistol was lubricated along the slide rails, barrel hood, barrel bushing and cocking block before firing. Initial inspection showed good fit and finish. The barrel and frame feed ramp feature the requisite 1/32nd inch gap between the two halves of the feed ramp. This insures feed reliability especially if you adhere to the original specification of an overall loaded cartridge length of 1.250 inch. All controls are crisp and sharp in operation. Trigger compression is a smooth 5.1 pounds with rapid reset. This is a controllable trigger that makes for good practical accuracy. I loaded SIG magazines with Black Hills Ammunition 230 grain FMJ for the initial test and also added a good supply of Wilson Combat Magazines. While SIG magazines work fine Wilson Combat Magazines are in my experience the single most reliable 1911 magazines, especially if you experiment with shorter overall length cartridges and wide mouth hollow point bullets.
The pistol comes on target quickly from leather and offers a high probability of a first shot hit. There really isn’t anything faster to an accurate first shot hit at close range than a cocked and locked 1911 handgun. Draw get on target press the trigger to the rear and you have a hit. Muzzle flip is limited due to a low bore axis and the pistol’s weight. I enjoyed the range workout as I extended off hand fire from 7 to 35 yards. As for absolute accuracy the pistol is plenty accurate. I fired from the MTM Caseguard K Zone shooting rest, firing five shot groups for accuracy. The results follow. The SIG 1911 in general and the pistol reviewed in particular are good examples of the 1911 breed well suited to personal defense.
Five shot groups, 25 yards
Black Hills 230 grain FMJ: 2.5 in.
Black Hills 135 grain Honey Badger: 2.0 in.
Black Hills 200 grain Lead semi wadcutter: 2.2 in.
When all is said and done the SIG 1911 is as reliable a handgun of the type as you are likely to purchase, and more accurate than most.The SIG 1911 has proven reliable, accurate, and fast handling.This is a nice looking 1911 with much to recommend.The pistol features nicely checkered stocks.This SIG features the unusual Bar/dot night sight arrangement.The SIG .45 features a tritium front insert.Front strap checkering is very well don’t and adds greatly to the firing grip.
Huh? Sure, they are talking about somewhat different things (“violent crimes” versus “homicides”) yet these typically track each other. And constitutional carry (no permit required) is the ultimate “relaxed concealed carry law”.
According to another study published November 16 by the American Journal of Public Health (of all places) over 6 million gun owners in 2019 were carrying legally daily (and 31 million at least monthly)—twice as many as in 2015. And even more were carrying without permits where they are required than where they “shall be” issued on request. The whole issue has gotten confused, which benefits those who would restrict our right to “bear arms”. (Credit to John Falkenberg at ConcealedNation.org for picking this up.)
The first study, published September 20 by the Johns Hopkins Bloomberg School of Public Health, reviewed 36 states with their definition of loosened carry laws anytime between 1980 and 2019. Their data came from the Federal Bureau of Investigation Uniform Crime Reports and the Centers for Disease Control and Prevention National Center for Health Statistics. They report that in 34 of those states, assaults using firearms increased almost 10%. The finding is specific to whether gun purchases became allowed for those convicted of violent misdemeanors, not all other measures of “looser” carry laws. These states (excluding Kansas and Missouri “due to other significant firearm laws changing around the same time)”. And their “advanced statistical” controls were “synthetic”, i.e., constructed by the researchers who “predicted crime rates derived from data from eight states that had restrictive permitting requirements”. Interestingly, homicides not using firearms increased nearly 9% by the same measures during the same period.
What’s wrong with this picture? It sounds impressive, and the data should be authoritative.
There were 4 shall-issue states in 1980, only 1 permitless state, 24 may-issue and 21 no-issue states in 1980; the rest did not allow concealed carry, and many of the may-issue states did not in practice. By 2019, there were 42 shall-issue or permitless states. So, by that standard, 20 states loosened their laws during that time period. So the major changes occurred in 17 states, with more minor changes elsewhere.
Lots of changes in firearm laws, not to mention policing and justice practices, social and economic forces occur through time in all states. That’s why it is so hard to pin down any significant change in consequences from certain kinds of law variables.
“Advanced” or not, “synthetic controls” based on “eight states that had restrictive permitting requirements in place throughout the study period” means the authors were free to define the standards against which they measure results artificially. The best controls are the same places being studied, before and after the changes.
Their finding that homicides by firearm increased only about 1% compared to other methods of homicide shows a minimal at best difference made by the “loosened” carry laws because they should affect only crimes committed with firearms. That tiny difference is the only finding, assuming everything else stands up to scrutiny, which we can’t.
The second report is the kind of thing anyone who’s sufficiently interested can do. DRGO writers look up CDC (and FBI) statistics all the time, just as Konstandinos Moros, an attorney who works with the California Rifle & Pistol Association recently did. Now in 2022, 25 states offer permitless carry, and all the others are required to shall-issue permits, though some are fighting back against the Supreme Court’s Bruen ruling on this. So a lot has changed in “relaxing” carry laws to date.
Moros was able to find near-complete national data for 2020, when our tragic violent crime and homicide trends began rising. He looked at the rates of homicides and specifically those involving firearms in the 16 states that then allowed permitless carry. These states had an average overall homicide rate of 6.9 per 100,000 people compared to the national average then of 7.5. That’s despite several high outliers for violence, Mississippi, Missouri and Arkansas with rates of 19.4, 13.1 and 12.2. And, not to our surprise, the average rate of homicide using guns was 5.3 compared to the national average of 5.9. One might even conclude that making guns easier to acquire legally made society more secure!
This is a cross-sectional study, comparing states with varying gun laws at a single time. The first study was longitudinal, looking at states through time. Normally, the latter approach is most meaningful, comparing a single geographic area to its history. But the “synthetic control” did not.
The differences Moros found of .6 per 100,000 in each case are not dramatic, and as always it is most certain to conclude that the spread of permitless carry has not caused any increase in homicide rates, either with or without firearms. But this is a simpler, more straightforward look at reality, not dependent on confusing statistical analysis and his results are clear—freer carry rights do not produce anything resembling bloodbaths and may actually improve citizens’ safety.
Incidentally, Carl Moody of the College of William and Mary in Williamsburg found in 2021 that in the 13 states adopting permitless carry from 2003 through 2019, there was a statistically significant drop in overall murder rate, and a drop (though statistically insignificant) in overall violent crime rates. He evaluated violent crimes, police officer killings, and firearm homicides along with overall murder rates. Maybe American citizens can be trusted to do the right thing with the guns an ever-increasing number cling to.
.
.
— DRGO Editor Robert B. Young, MD is a psychiatrist practicing in Pittsford, NY, an associate clinical professor at the University of Rochester School of Medicine, and a Distinguished Life Fellow of the American Psychiatric Association.
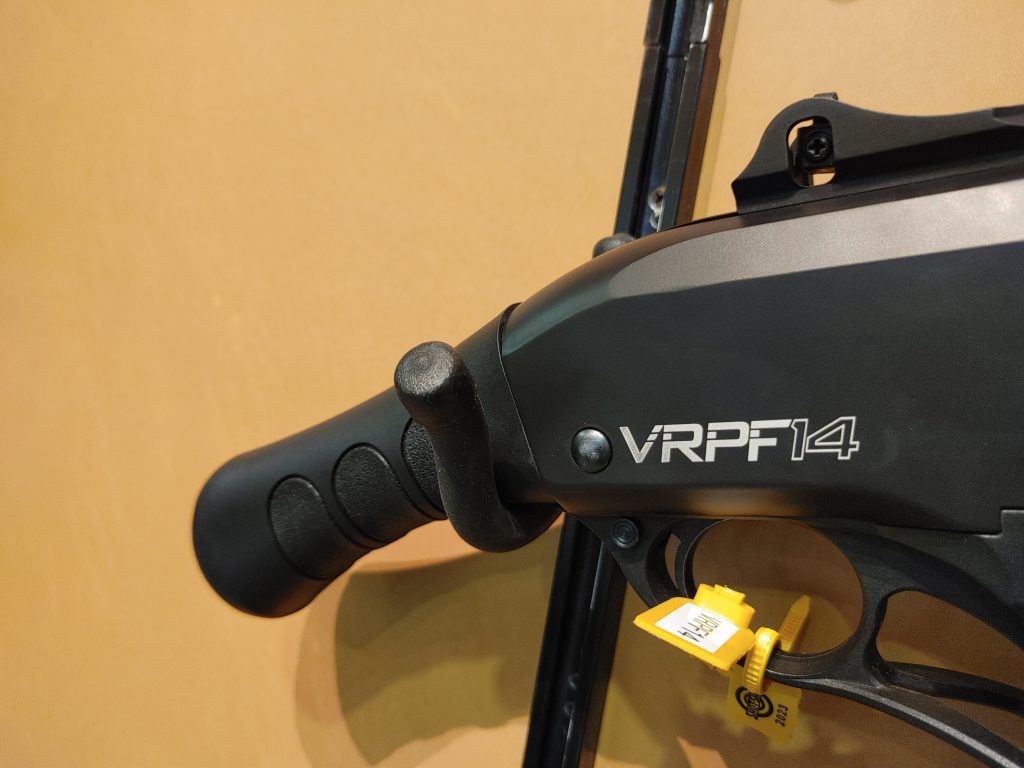
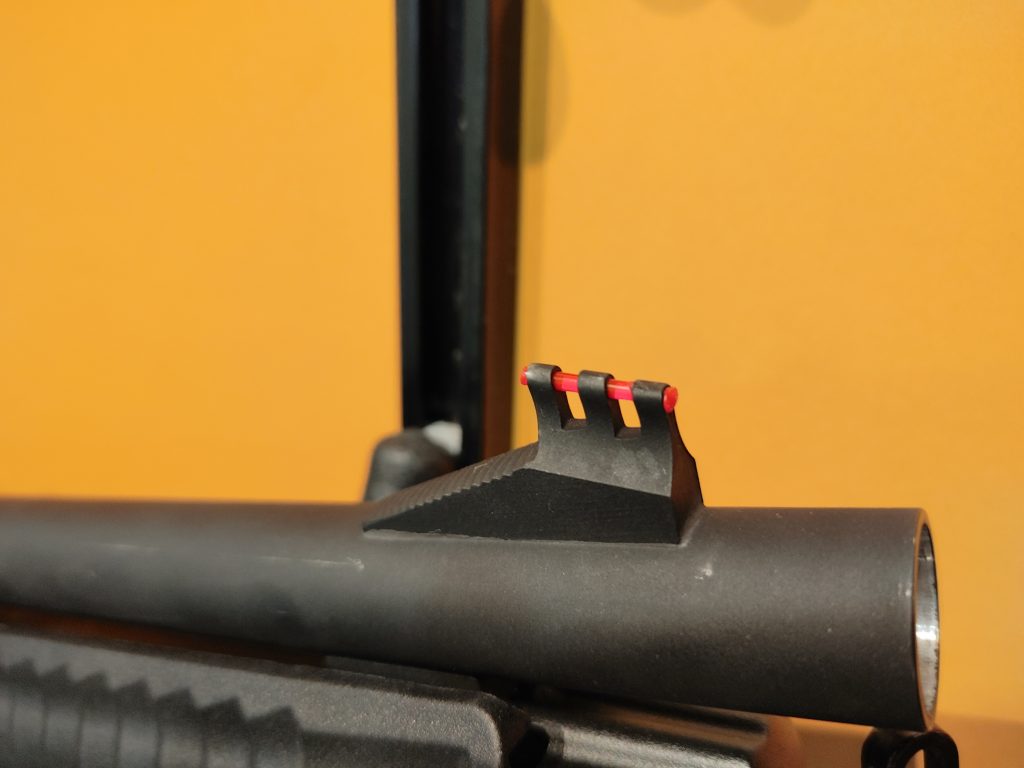
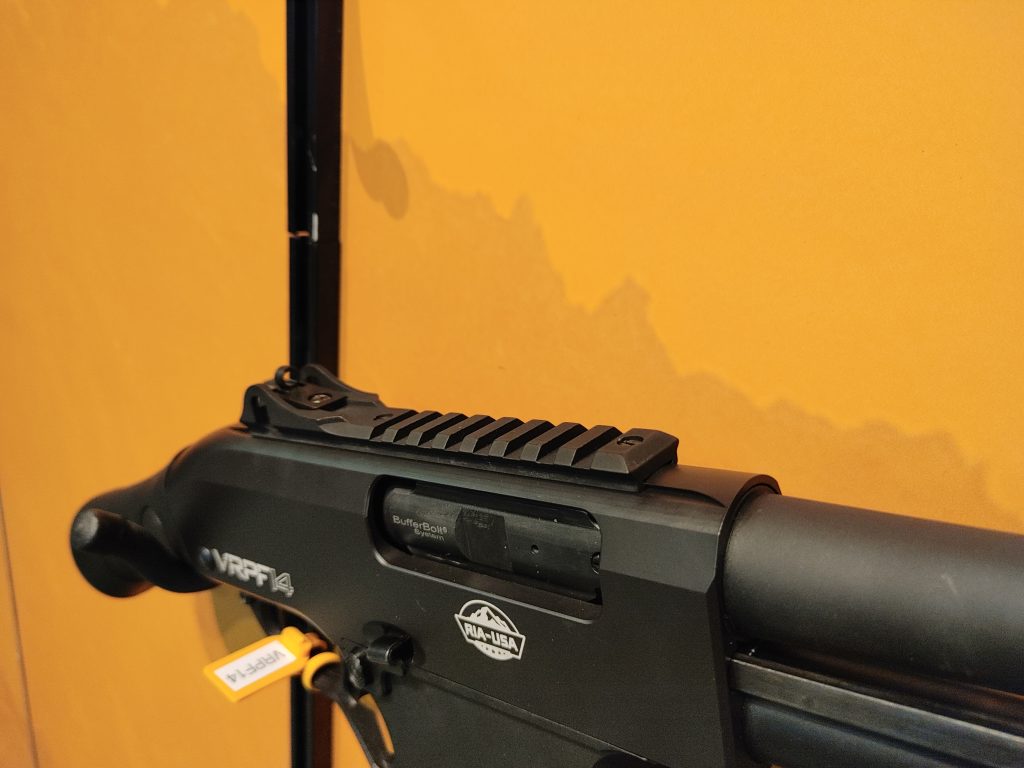
I’m a fan of the gauge, be it in the form of a shotgun or the gauge in the form of a firearm. These pistol grip-only firearms defy normal expectations and offer you twelve-gauge firepower in the form of a compact and very portable package. The Rock Island Armory VRPF-14 is one of the latest firearms in this genre. The VRPF-14 is a modification of the VRPA-40. The VRPA-40 was a full-sized pump action shotgun, and the VRPF-14 takes that gun and trims the barrel to 14 inches, lops off the stock, but keeps the rest.
The VRPF-14 – A New Kind of Firearm
This includes the ability to use magazines ranging from five to 19 rounds! The 19-round magazine is boomerang shaped and absolutely a unit of a magazine. In this gun, it would be ridiculous and just perfect for such a fun firearm. Mag-fed shotguns are an odd bunch, and mag-fed firearms are even odder. Although the short barrel certainly doesn’t serve as a restriction to the magazine capacity like a traditional tube-fed shotgun.
The ergonomics of the magazine well are odd but easy to learn. The magazine inserts into the weapon straight, much like an AR-15. A very AR-15-like button releases the magazine, and it often falls out freely, but not always. Across the top sits a peep sight and a high-visibility front sight. An optics rail also provides a place to toss a red dot on. As you’d imagine, a red dot makes a lot more sense on a firearm than peep sights.
These types of weapons are typically fun guns, and fun guns shouldn’t break the bank. While the price wasn’t evident, but these guns tend to be fairly affordable. Rock Island Armory and Armscor import these firearms, but the entire VR series has always been well-made as far as my experiences go. These aren’t necessarily duty-ready guns, but they are a ton of fun. I’m excited to get a little more range time with the VRPF-14.