Courtesy of Tom Givens, the Shotgun Casino Drill is a nifty exercise involving four different targets set up at a distance of seven yards. The first target requires one shot, the second target requires two, the third three, and the fourth four in this exact order. The drill is set up so that shooters will have to intentionally reload at some point in between addressing all targets. Targets must be engaged the requisite number of times and in the correct order to shoot this drill cleanly. A total of ten shotshells are required and the par time for the Shotgun Casino Drill is 30 seconds. Any standard IPSC classic or metric target or IDPA paper target will suffice. However, 8-inch steel plates would be ideal as shotgun ammunition destroys paper and cardboard in short order. (Steel targets become especially handy if you are planning to run this drill several times or if you are shooting this drill with multiple training partners or maybe as part of a shotgun course).
To shoot the Shotgun Casino Drill, shooters must start at the firing line with four shells loaded in their shotgun’s magazine tube. Upon the timer’s start sound, the shooter will engage each of the four targets in the correct order and will have to reload their shotgun as needed in any order they deem appropriate. Once again a clean run means that each target received the correct amount of shots in the correct order and with no misses. The array of targets can be placed in any order down range but each target should be visibly marked with its specific number. To mix things up, targets may also be shuffled around as desired.
Nate from That Shotgun Blog shows us how to execute the Shotgun Casino Drill properly.
This skill building drill is useful due to the fact that it does not require a large amount of ammunition nor is it too complex to set up. Only four targets are needed either at a pistol bay or in front of any suitable backstop. The Shotgun Casino Drill is useful in that in order to efficiently negotiate it, it requires a solid shooting mount in addition to proper recoil control and loading technique. After all, there are two main categories of skills needed to successfully employ a shotgun. One category pertains to the mental aspect of thinking while holding a shotgun, and the other category pertains to the mechanical skills required to shoot a shotgun proficiently. Incidentally, the Shotgun Casino Drill calls on these same skills: proper shotgun mounting, recoil control, and efficient loading. Give it a try next time you hit the range, as running a shotgun as fast as you safely can is a ton of fun!
Good information is often worth the money to obtain, and that’s why instructors don’t teach classes for free. Sometimes you can get a little lucky, and I felt a little lucky when I stumbled across the Idaho POST Shotgun Manual. I constantly like to try my hands at various drills and firearm qualifications from police and military forces. That’s when I stumbled onto the Idaho Post Shotgun Manual.
I’m not an expert on police manuals by any means and have never been in law enforcement. However, I know a fair bit about shotguns, and as I read this manual, I realized just how full of information it was. It’s an awesome guide and is perfect for the first-time shotgun owner. The manual isn’t perfect but covers a ton of ground in regards to the martial application of shotguns.
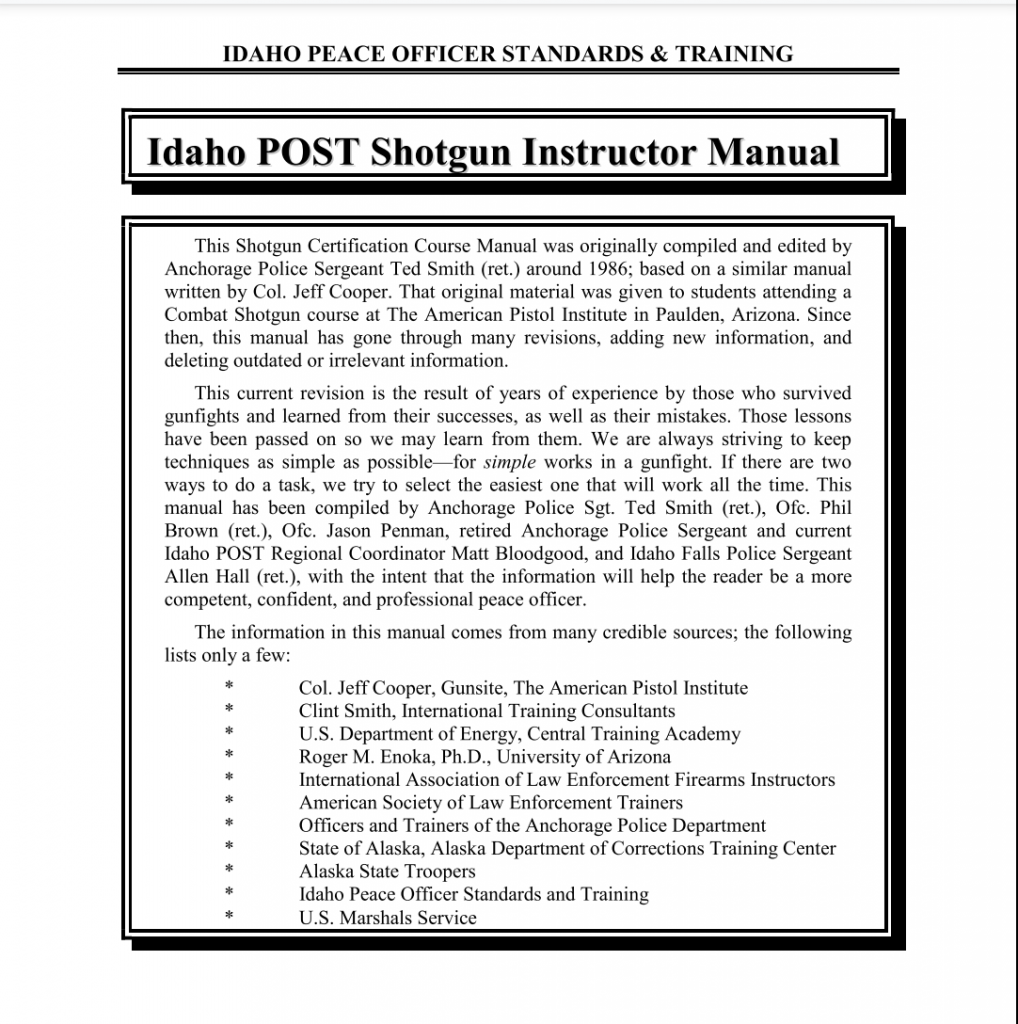
The Idaho POST Shotgun Manual – Origin Story
The origin story starts on the first page, which tells a brief history of the manual. It was started in 1986 by a retired Police Sergeant. The manual is based on a manual written by Jeff Cooper and passed out to students at a Combat Shotgun course at the American Pistol Institute. Over time the manual evolved and adapted with the times and features work from various local, state, and federal police agencies and men like Clint Smith and Jeff Cooper.
The Idaho POST Shotgun Manual is a very dense forty pages. It’s chock full of awesome information that relates to using the shotgun effectively. I was continually surprised as I read the manual and saw how much information they packed into those 40 pages. The information is easy to understand and well illustrated by pictures of the actions described.
I found myself learning a few things that I had never considered. It’s not that I see myself as a shogun guru, but I’m surprised a beginner’s shotgun manual goes this far in-depth and does it so efficiently. I want to reiterate this is on the tactile use of a shotgun. Bird hunters aren’t likely to find much to use in this manual.
What the Idaho POST Shotgun Manual Covers
We dive right into information with facts and myths about shotguns, and then we get into how to use the shotgun. This includes how to carry the gun, how to store the gun, its various conditions, and more. By page eight, we are digging into the hands-on portion of the manual.
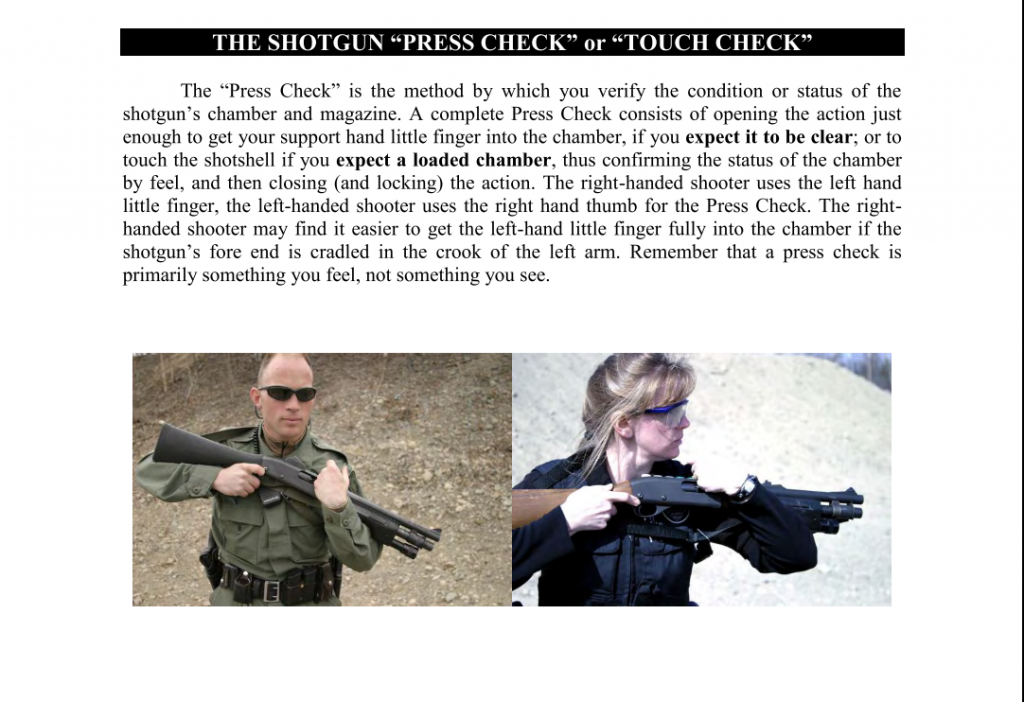
Here we cover a press check method I was unfamiliar with that wisely relies more on top than looking. While visual checks work, you might not always have the lighting to conduct a visual check. In that situation, this tactile check is easy to do and a sure way to know the status of your shotgun.
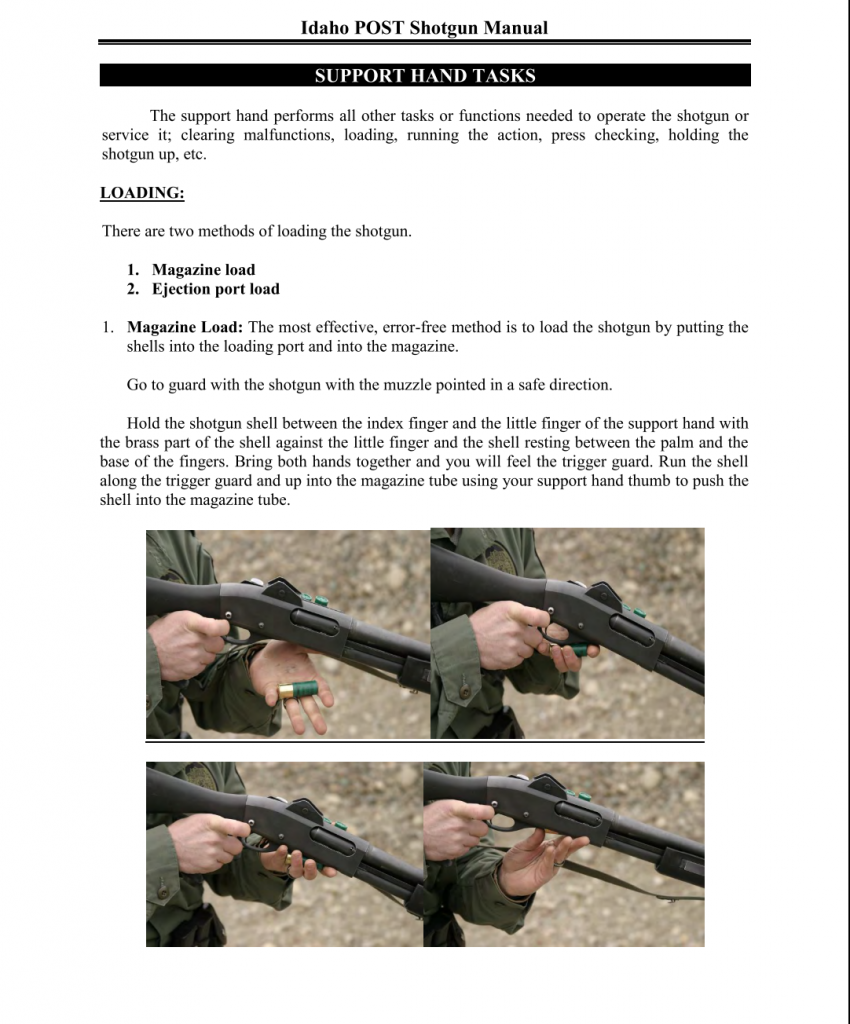
We dig into how to use the gun and what each hand is responsible for, as well as how to load the weapon. This includes how to port load and tube laid the gun. The focus is on loading the gun in a tactical manner.
The Idaho POST Shotgun Manual goes on to cover malfunctions, stance, ready positions, patterning, and even a multitude of sling carry methods. It’s full of great information. Some feel a little silly. When am I ever going to use the Safari method of aligning in 2022? Especially on a tactical shotgun? The same goes for a portion on the Olympic Offhand shooting position with a tactical shotgun.
Other information that changed my attitude is the portion on double kneeling. I never considered how much easier it is to peak around cover from a double kneeling position. I know how to pattern, but the manual provides a simple but detailed means to do, so that explains patterning very well.
Where I Found It Lacking
The Idaho POST Shotgun Manual is very much worth a read. The main thing the manual didn’t cover enough of, at least to me, is recoil mitigation. It’s mentioned, but the Push/Pull technique is never even brought up. It’s one of the most effective ways to control a shotgun.
The manual also advises shooters to use a chicken wing-like technique. I’m not the type to immediately lose their mind about someone using a chicken wing technique, especially with older guns. However, with modern shotguns and tactical gear, the chicken can be difficult to accomplish. Doing so with armor and a reduced LOP stock is likely to feel fairly awkward.
Other than that, the manual is robust and chock full of great information. It’s a PDF and completely free. Click here to access it. (PDF Warning.)
Our favorite Brit service member turned Canuck service member, who usually talks tanks and planes and stuff, is talking about the L85A1 and A2 that he legitimately used.
And… he liked it.
Now the original had its issues, many many issues, BUT after H&K tightened it back up to a working project… it was, a working project. Essentially an AR-18, which literally everyone is building around now including the M5. So, is the modern L85A3 a mistake? Probably not, it could still use some changes to the controls especially, but probably not a mistake.
Why I am sharing this is Matsimus points out the space advantages that bullpups give in both room clearing and a vehicle, which he deployed inside. He’s also giving the point of view of a soldier, just a regular soldier and not a multi-platform expert shooter, and how well being handed and drilled on a service rifle was. This point of view can be felt on the M4 also, our domestic bias for the M4 is strong and we attribute things to the basic M4 that are actually only features on well tuned up models with good ammunition. But we still love our M4’s even our M16’s, just because we do.
He describes the same problems (in reverse) going from the L85 to the C7A2 as most people describe, and disliking, going from AR’s to bullpups. They really are two different ergonomic animals. From a service rifle user, a normalized user perspective, seeing that he was handed and told to use both platforms in the same fashion (as in not getting a choice) the perspective feels grounded in that what does it really mean when this rifle is what you get.
So no, I won’t be recommending the L85A3 to anyone as a premier 21st century service rifle without peer. I don’t think many folks out there are going to disagree with me either. But I am of the opinion on this day in 2022 that if I were to pick up or be handed an L85 I’d make it work. Just like an AK, or an AR that wasn’t kitted my way, or a G3 or FAL. It works as long as I work and it beats a sharp stick, the better I work with it the better it works.
So shelve the internet lore next to the many grains of salt and until I get to work with one I’ll reserve final judgement. Kind of like VHS-2 now that we’re thinking about it.
Mantis has been a leader in motion dry fire and livefire tech for the shooting world. Their products are practical, innovative, and accessible. With the release of the Blackbeard laser and trigger reset system for the AR platforms they aggressively expanded their firearm coverage for dry fire and assisted drills. With two screens you could run both a Mantis X and Laser Academy. But the Mantis X was, even with some tuned settings, optimized for a handgun.
The Blackbeard X is optimized for the carbine and removes a hardware installation step. The new Blackbeard X magazine system powers the trigger reset and laser like the legacy system and now talks with the Mantis X training app via Bluetooth to capture that motion data. It also comes with several new carbine drills, accessible when the magazine talks with your phone or tablet.
Upgrade
Yes, the title said upgrade. The laser blasting and trigger resetting carrier system hasn’t changed. The magazine did.
Mantis will be offering an upgrade program for those who want to change their magazine to the new X enabled system.
Simplification is the key to success
Mantis recognizes human nature. The more steps to do a thing the less likely we are to do it, or to do it as much as we should.
The Mantis X app and Laser Academy both operate on phones, and do so well, because we keep our phones around us all the time. This vastly simplifies the logistics of assisted dry fire or data gathering live fire.
The Blackbeard X is that same theory, consolidating the resources of the Mantis X and Laser Academy into a single assembly. You will still need two screens if you want to run both programs, but I tend to use the laser as a simple POI more often than with the interactive targets of the Laser Academy system. Again, I do the simply thing more often.
I don’t have to attach the Mantis X censor to my carbine to run it now, it is the powerpack. Mantis has removed a setup step from my dry fire routine, consequently I’m more likely to use the systems when I dry fire because they made it easier. Using social sciences for good! The more tasks we stack the more people drop off from doing them, so ask less and deliver more. We build websites this way for a reason, we should absolutely be taking advantage of that for skill building.
There are no substitute or short cuts in skill building, but we do many unnecessary extraneous items that are not skill building. They waste time, effort, and do not contribute to the skill honing activity. Setup and teardown.
Blackbeard X vastly simplifies setup and teardown while providing carbine specific benefits in the program. You get more for the same effort.
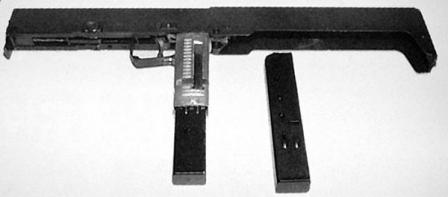
Ever since Magpul showed the FMG-9 at SHOT Show 2008, there has been quite a bit of hoopla built around the folding submachine gun. It’s covert, futuristic, and looks like something James Bong would approve of. This was revitalized recently, with Magpul announcing the FDP and FDC 9 and now B&T showing off their P320-based BCW folding platform. For a lot of people, the folding SMFG is new, but for me, it’s an old hat because of the Ares SMG and Syphon Filter 3.
I was a huge Syphon Filter fan, and it’s actually one of the games that got me interested in firearms. The third game had the Marz FMG, which I later found out was, in reality, the Ares FMG. You see, Magpul didn’t invent the idea of a folding PDW-style SMG. It dates back to the 1980s and would continue through the 90s and even become an international niche weapon. It all starts with the Ares FMG.
Early Origins of the Ares FMG
Who exactly is Ares? A few companies have used the name in the firearms industry. Ares being the god of war, seems to attract arms manufacturers. Ares Inc was a small company founded by Robert Bihun and Eugene Stoner in 1971. They were an innovative company and way ahead of their time.
In 1984 they were the first to attempt to develop lighter ammunition and cut the weight of 50 BMG rounds by 33% by using plastic-cased telescoped ammunition. They designed guns, ammo, and even internal parts to improve existing systems. In 1985 they developed the Ares FMG, FMG standing for Folding Machine Gun. A man named Francis Warin of Oak Harbor designed the gun.
The idea was simple. Provide a concealable, covert weapon that delivers more firepower than a pistol. The weapon would be discrete and not appear to be a gun until it was ready to fire. It was designed to be a businessman’s defensive weapon and was inspired by a number of kidnappings that occurred in South America at the time.
The Ares FMG folded in half, with a hollow stock encapsulating the grip and magazine when the weapon folded. It was a little larger than a carton of cigarettes and designed to resemble radios of the time.
Breaking down the Ares FMG
There were only ever two Ares FMGs ever made. Both are considered prototypes. The first used an MP28 magazine that had been trimmed to allow the weapon to fold. The second utilized Uzi magazines that made folding a nonissue. The first prototype lacked a trigger guard and placed the charging handle on top of the weapon. The second had a trigger guard and used a charging handle at the bottom of the gun that doubled as a finger guard.
The weapons lacked sights and were selective fire. These guns personified spray and pray. The Ares FMG was a 9mm weapon with a 6.75-inch long barrel, an unfolded length of 20.6 inches, and a folded length of 10.6 inches. The weapon weighed four pounds and dispersed 9mm rounds at 650 rounds per minute.
It’s a very simple blowback-operated SMG. The design isn’t complicated, even though it does admittedly fold in half.
The Fate of the FMG
While the weapon was shown to some government officials who expressed interest, they seemingly didn’t express enough interest. The design languished, and Ares only ever produced two prototypes. The Hughes Amendment killed any idea of civilian sales, and the NFA world of SBRs wasn’t nearly as big as it is now, and large format pistols weren’t a thing. The Ares FMG might have been a little too early to succeed.
At least that is how I am choosing to believe the conversation went inside Glock HQ as they began producing the Glock GR-115, which is an AR-15. I modernized and well laid out AR-15 with an intriguing optic upon it, to be sure, but an AR-15.
We’ve been hearing rumors of a Glock rifle for years, it appears that someone finally solicited Glock to do their carbine and the result is a very modern AR-15. Ambidextrous lower, LPVO and red dot, suppressor, I believe an adjustable gas system, and all in the modern tan low vis finished that do better both visibly and under alternative spectrum observation devices, thermals and NODS, ended capped with a can.
Glock perfection is apparently Stoner and Sullivan inspired.
I don’t know if this one is a piston or DI design, I am also not particularly bothered knowing until and unless this becomes a contract gun somewhere neat with more details or we get a domestic launch here in the US at SHOT or NRAAM.
I am very intrigued by the scope, the rumor mill around that piece of glass is that it really is something hot in the LPVOsphere and I have been intrigued by challengers to the Razor III’s current top seat every time I hear about them. So of all things I want to know about this carbine, the carbine itself really isn’t the priority compared to whatever is riding in that AUS from Reptilia.
Anyway, Glock confirmed makes an AR now. So we’ve got that going for us. Which is nice.
Above: Shooting my Beretta 92FS Inox with a particularly good seven yard group on an index card that was part of the 3×5 Card Drill.
The 3×5 Card Drill is something I first came across at Pistol-Training.com many years ago. This is a very simple drill that with no time limit or real score that involves shooting a group at index cards on the 3, 5, 7, 10, and 15 yard lines. The official description at Pistol-Training asks that shooters fire a six round group at each index card. However, I always preferred shooting a five round group in order to be able to shoot this drill twice with the standard box of 50 pistol rounds. In the case of TDA pistols, I fired three double action shots and only two in single action. The description also mentions only moving on to the next distance if you group all previous shots in the corresponding index card, but I like to shoot the drill at each successive distance to help get used to shooting at smaller targets further away. I also liked to score it my own way in a similar style to IDPA (down 0, down 1, down 2 and so on).
Shooting the 3×5 Card Drill at an indoor range in California with a CZ-75 SAO.
Because this drill does not require starting from a holster, a large amount of ammunition, crazy reloads or a shot timer, I found it ideal as a new shooter who had limited time and money. In those days my access to a “competition” or “training” style pistol bay was limited and I shot pistols mostly at indoor ranges. Therefore, the 3×5 Card Drill became staple of my early days. Ironically, it is probably one of the most convenient drills to run on a lane at an indoor range, since you can tape five index cards to a piece of paper or target and just move the pulley after shooting the previous group. Shooting this drill at a public indoor range also will not attract any negative attention to get you kicked out. Since the drill uses only a handful of rounds each time, using ban-state compliant low capacity magazines is also not a problem.
The best aspect of the 3×5 Card Drill is that it is a self-paced and self-directed drill and can therefore be extremely beneficial to new shooters. Moreover, it is a good way to get exposure to taking slightly longer distance shots at relatively small 3×5-inch index cards—not impossible to hit but easy to miss if you don’t clamp down on your handgun fundamentals. If you’re a new shooter or rusty in your fundamentals, go get some cheap index cards and some masking tape and give the 3×5 Card Drill a try at your indoor range! Remember, shooting it my way with a box of 50 rounds gives you two full runs.
An old target of mine I most likely shot with my gen 3 Glock 19 with five different 3×5 index cards meant to be shot at certain distances. The top cards were always shot at 3 and 5 yards respectively, while the middle one was shot at 7 yards and the bottom two were shot at 10 and 15 yards. You’ll notice that there are plenty of misses, but that’s the point, eh?
As a shotgun and small arms history nerd, books like Osprey Publishing’s US Combat Shotguns strike me just right. US Combat Shotguns is a quick read. It delivers a ton of information on the United States’ use of combat shotguns. The title literally says it all, and it’s one of the few books you can judge from its cover.
US Combat Shotguns is written by Leroy Thompson, who has been writing about guns for decades. He has several books to his name, with many published by Osprey Publishing. Personally, I’m adding a number of them to my list because I enjoy the format and information provided.
The book is a quick read at only about 80 pages. It’s a solid book that tracks US Combat shotguns throughout their inception in the United States. The book specifically focuses on the military use of shotguns and barely mentions police use, but that’s fine with me.
The book goes from the early days of buck and ball loads all the way to the Global War on Terror. Admittedly the front half of the book is a bit more loaded than the last half. The use of shotguns in the United States military has shrunk considerably. War has changed and the carbine has taken over.
US Combat Shotguns – Informative and Entertaining
US Combat Shotguns predictably start at the beginning. The beginning of what exactly? Well, the development of fighting shotguns. We get a fairly short few pages on muskets loaded with shot and early repeating shotguns. Once we get into the 1900s, the book really begins to flesh out US Combat Shotguns and their use.
From here, the book goes from era to era and discusses the type of shotguns and how they were used in that genre. They discuss advantages and issues based on the environment and situations soldiers and Marines found themselves in.
We get a great mix of both purely informative data and narrative from the men armed with shotguns in war. These include reports, excerpts from books, and many more that really flesh out the historical information with on-the-ground analysis.
In between learning that the Army ordered 22,000 Ithaca shotguns for Vietnam, you also read about a SEAL armed with an Ithaca 37 and another wielding the short-lived Remington 7188 and their impressions of the guns.
This mix of dates, quantities, and model numbers beside user-operated tales form an interesting, educational, and, yes, entertaining book. We can also see how shotguns have evolved for combat use and how much they’ve remained the same.
Along the way, there are discussions on ammunition, its evolution, and sidenotes into guns like the USAF M6 Aircrew Survival Weapon. These break up the focus on US Combat Shotguns and keep things interesting without getting distracted.
There are also some awesome pictures and diagrams that range from informational to historical.
US Combat Shotguns – My Complaints
The information provided is fairly high level. If you want an in-depth discussion of why the Mossberg 500 and Remington 870 replaced the M12, Ithaca 37, and similar shotguns, you won’t find it here. The terms trench and riot gun are thrown around a fair bit, but neither is defined very well. What makes a trench gun a trench gun? You don’t get that detailed here.
I’d love to see more information or even sidebars talking about the benefits of a gun with dual action bars versus a gun with a single bar. I’d like to have seen more on the shotguns used during the GWOT as well. It’s a bit glossed over, and while carbines rule, shotguns were used a fair bit during Fallujah and similar urban battles in Iraq.
Those are small complaints, and this is a great place to start if you have an interest in US Combat Shotguns. It’s less than 16 bucks and is available on Amazon. I’m about to grab the M16 book by Osprey Publishing as well since the Black Rifle is out of print. Sometimes we can take some time off from the range to learn a thing or two about our favorite firearms, and Osprey Publishing and their books seem to make that an affordable proposition.
Today the boys start off by immediately going off the rails and talking about dinosaurs and special effects. Eventually, Jack saves the episode by bringing it around to the original topic, which is the most amazing loot drop in history, where a couple found some legit M16s in milsurp crates. Oh also we talk about Battletech.
It is no secret whatsoever that I like IWI products. Their catalog of firearms, their training program for those firearms, and the ways in which IWI has developed their recent catalog of offerings.
TheFirearmBlog, good ole TFB, also houses bullpup converts, and they have just released their ‘6 Reasons’ video on the Tavor X95 and why it is better than the M4. Linked and playable above.
I happen to agree. Not in all aspects or for all purposes, but in the role the X95 was envisioned I believe it serves better than the M4.
What is that role?
A carbine optimized for limited space.
Interior structure CQB and vehicles present very real challenges to anyone using a long gun. Space is at a premium. Rifles get their staying power from their muzzle velocity, primarily, and the shorter we make a rifle to make it easier to handle in small spaces the more velocity we give away. That is a topic that has been written about, rewritten about, co-written about, caveated off of, hyperlinked, sub-headed, and just about any other variation of communicated about. Shortening a rifle gives up efficacy. The ‘window’ in which the 5.56 rounds will have their optimal terminal effects gets shorter as barrels do.
The M4 gives up speed from the M16. The MK18 gives up even more speed from the M4. The X95 in its short 13″ configuration is smaller than the MK18, about the length of an MP5k with the stock out, but is retaining the more effective M4 muzzle velocities.
The 16″ and 18.5″ varieties of X95 retain size advantages too, the 18.5″ barreled X95 is an inch and a half shorter than an M4 with the stock fully collapsed.
Velocity retained.
I will continue to give both overall weight and overall accuracy, in modernized configurations, to the AR-15’s. It is easier to get an AR tuned to a sub 2 MOA, and especially a sub 1 MOA rifle than it is an X95. This is due to how the barrel and receiver interface on the two rifles. We aren’t talking drastic accuracy improvements, just notable ones and perhaps need specific ones. Neither an X95 or a 1:7 twist AR, nonfloated, are going to shoot 55gr rounds into a spectacular group. This is one of the reasons there are a great many 1:8 AR barrels on the market. Cheap training grade ammo will be especially inconsistent as it isn’t loaded to the exacting velocity standards of match rounds. Both rifles are going to tighten up their groupings significantly when shooting high quality match ammo, but the AR in an accurized configuration is going to edge out the X95.
The most influential factor is the barrel and receiver lockup, as I mentioned above, which was designed with reliability and ease of maintenance as the priorities. A 1 MOA accuracy standard was not a priority in the design.
However the factor that causes most of the poor performance with the X95, and bullpups in general, isn’t this barrel/receiver design. The challenge people don’t get past is interfacing with the rifle. They don’t learn how to shoot it, even though it is shaped and weighted differently. This is the one most people miss, it is the trade off for shortening the rifle. The short rifle often translates to some more muzzle movement if you don’t account for the fact that everything has moved closer to you, that combined with the different feeling trigger, weight distribution, and viola! Initial poor performance with a bullpup when you’ve been trained on the M16 series. Initial poor performance equates to poor opinion of bullpups. The X95 is different enough, but also similar enough, to attribute the performance shift to the rifle and not the operator when in fact it is mostly the operator. Some of the very nice features on the M16 series are babying the shooter, the familiarity with the rifle is babying the shooter too, we tend to cling to the item we are comfortable with. My hesitation to run anything that wasn’t an ACOG, especially LPVOS, or to put dots on handguns are perfectly in alignment with that ‘liking what I have an know’ sentiment.
However…
Once operating operationally and running the controls and trigger the way they should be on the X95, a short learning curve from an AR but it does exist, the performance gap shrinks to an inappreciably different margin for practical accuracy and you get two rifles that can do their jobs very well, one may be more generally comfortable and come with a few small edges in accuracy and familiarity, but the other is a powerhouse when space gets tight. Instead of a rifle you like and a rifle you don’t, you have two rifles with similar performance envelopes optimized for different environments.
We live tight spaced lives
We live indoors. We venture outdoors. We live in houses, apartments, vehicles, and we use them to keep ourselves in the flow of society and to keep comfortable our lives and property. This makes the X95 stand out as an exceptional rifle for the lives we live, because it is a rifle optimized to move within the spaces we live while giving up nothing of what makes the 5.56 and the M4 so effective. It is a rifle for tight spaces. Tell me I’m going to be in a structure or in and out of a vehicle and the X95 is an option, I’m taking the X95.
To be fair, having any reliable 5.56 rifle is probably ‘enough’. An AR user need not rush to pick up an X95 just because you understand the space better. To open that envelope further, having a relatively modern carbine in any pistol or rifle caliber, using 20+ round magazines, mounting a light and preferably an optic, and that you are familiar with operating, is enough. They can be made to work.
But I don’t like having a tool that can be made to work, I like having the tool that fits the job. If a vice grip would make my life easier, I want a vice grip. So I use and recommend the use of the X95 for a limited possible/probable space (home) knowing that it can also reach out into the normal ranges of a 5.56 rifle.
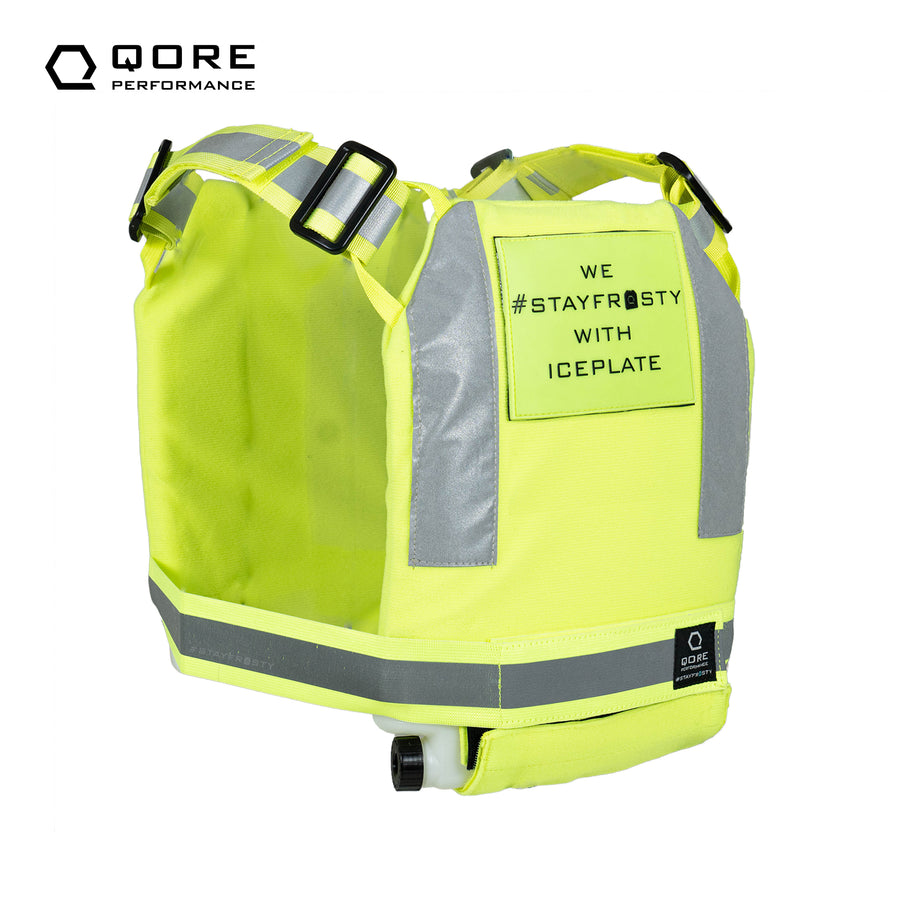
We’ve all seen that Chik-fil-A AR-15, but whatchu know about the Chik-fil-A plate carrier? Not a Chil-fil-A-themed plate, but the one we’ve seen their employees wearing on these hot summer days. These things look far from tactical and are a high visibility yellow. They are worn by employees who are standing outside and taking orders and seem quite odd.
The only chicken place that seems to need plate carriers is Pop Eyes after the great chicken sandwich debacle of 2019. Let’s face it. No one is getting riled up and fighting at Chil-fil-A for some unseasoned, dry chicken. Yet, their employees are rocking plate carriers, so what’s the story?
The Chik-fil-A Plate Carrier – The Truth Behind the Plates
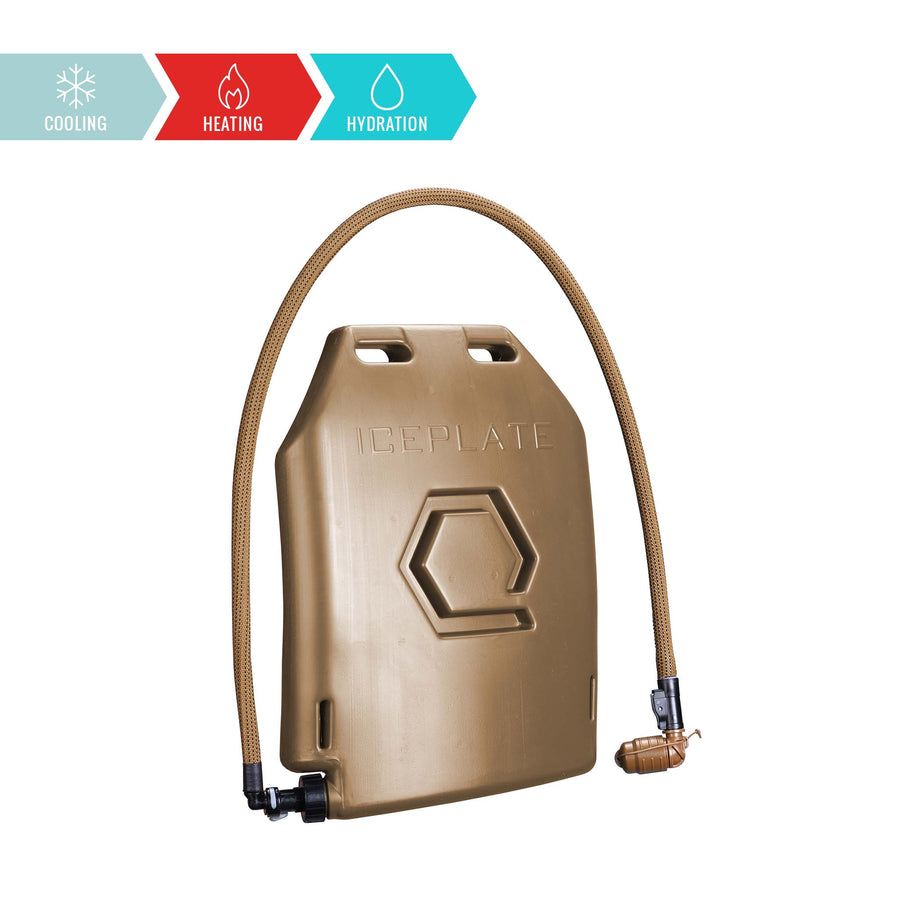
These aren’t plate carriers, well, not in the traditional sense. They do carry plates, but those plates aren’t designed to stop bullets. Those plates are designed to cool down the employees wearing them. A company called Qore Performance produces both the carrier and the ‘plates,’ and it’s a company I’m fairly familiar with.
Way back at my first SHOT Show, I met with the guys from Qore. At the time, it was a fairly small company, and they hosted a micro event at their hotel room outside of SHOT. They showed off the earliest versions of the Iceplate. The Iceplate is the plate sitting inside the Chik-Fil-A plate carriers.
These Iceplates are filled with 50 ounces of water, then placed in the freezer overnight. It’s a fairly simple idea that relies on the sun being more dangerous than bullets. Obviously, some missions dictate one danger over the other, and the Chik-fil-A employee working outside in the summer height ain’t breaching a room.
These frozen plates keep employees cool and keep them from passing out. The carrier is also produced by Qore and is a simple high-visibility setup designed to support the Iceplates. These things aren’t designed for real plates or protection but for these exact situations. It’s a simple idea that works. As a guy in Florida, I’m thinking about grabbing one of these plates to keep things cool at the day job.
The Qore Iceplate
The Iceplate itself costs 45 bucks for a single plate, and you can rig up a system with two plates or a single plate. It’s shaped and sized like a medium ESAPI plate. The plates are 9.5 inches wide, 12.5 inches tall, and only 1 inch thick. They are curved for comfort and would drop in nearly any other plate carrier.
The 50 ounces of water can be frozen, but a user could also add hot water to keep their body warmer. While these plates are popular with Chik-fil-A employees in Texas, Florida, etc., when winter arrives, employees in the Dakotas, Michigan, and similar frozen hell holes can get some use out of them.
The Iceplates can be rigged with a tube and mouthpiece so you can sip at them and drink a little water throughout the day as well.
Beyond Chik-fil-A and Iceplates
Qore makes several products that encourage cooling. I haven’t followed Qore for some time, and that’s a mistake as a Floridian. They make a number of accessories for the Iceplates, including a Camelback-like rig for those who want a sportier look.
They also make a number of pads for holsters, gear belts, and plate carriers to improve comfort and create greater ventilation. Let me tell ya. Your boy is about to be cooling down this summer. The ideas seem sound and are simple additions to most of your basic gear to improve gear and comfort.
It’s easy to get lost in the hustle and bustle of new guns that you might forget to shoot the guns you love. We buy firearms with the purpose of shooting them, and let’s face it, we don’t have a cheap hobby. Guns are expensive, ammo is expensive, and if you’re looking for a way to pinch a few pennies, then I’ve got five free targets you can print at home to save some dinero. (Or to really save some money, print at work….I take no responsibility for you getting fired for chewing through 500 sheets of paper.)
There are tons of free targets out there, and lots of them are fairly silly. Silly targets are fun for plinking, and I even included one, but I really want to focus on targets to help shape your skills. I wanted useful and effective targets for defensive firearm training. With that in mind, let’s dive into my five favorite free targets.
Sage Dynamics Targets Vital Anatomy Targets
Aaron Cowan of Sage Dynamics has done a lot to advance the firearm community. His white paper on pistol-mounted red dots changed the firearm’s world. He runs one of my favorite Youtube channels, especially when it comes to optics reviews. He also produced and provided a set of free targets called the Vital Anatomy Targets. The two targets consist of a headshot target and a center portion of the torso that exposes the heart and lungs of a target.
I use these targets for everything, and they are some of my all-time favorite targets for defensive firearm training. I even use them for patterning shotguns to get a real visual indicator of where my buckshot is going. These targets outline the vital portions of the body and allow you to effortlessly train shot placement with a handgun, rifle, or shotgun. You can run tons of drills on these targets, and they are adaptable for various uses.
Kit Badger Ambush Targets
Kit Badger was inspired by Sage Dynamics to create his own set of free targets. These are similar to the Vital Anatomy targets, but instead of having the threat facing you dead on, they are facing to the side. This allows you to practice your shot placement at an angle most of us don’t practice enough with. Assuming a threat will always face you head-on seems like a disastrous affair.
These targets are detailed and very nice. They include a light skeletal design to allow you to further examine where your shots are hitting inside the body. Mixing these with the Sage Dynamic’s targets offers you a fairly versatile system to train with.
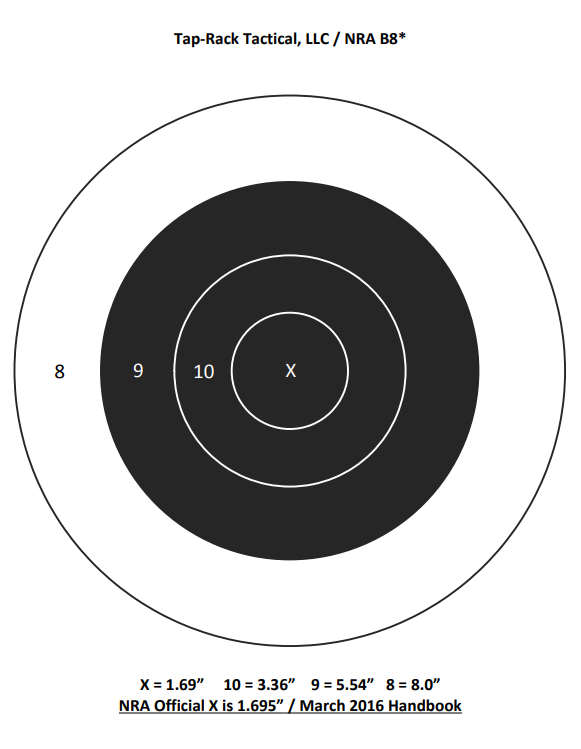
Bill Blowers Tap Rack Tactical B8
I know that B8s has become a lot of people’s personalities on the internet, but they are still very versatile targets for training purposes. They offer a uniform standard and are very simple; plus, when your fudd range doesn’t let you use silhouette targets, the B8 is a great option. The B8 has a very long history, and there are plenty of people who offer them for free online, but a lot of times, the dimensions are wrong.
Big Tex Ordnance hosts a B8 from Bill Blowers of Tap Rack Tactical that is made to the proper dimensions. It’s simple, easy to print, and provides you with B8s on demand. The B8 makes up the standard for a number of different drills and allows you to practice speed and precision and easily see how one affects the other.
Dot Torture
Dot Torture is both a free target and a drill that is a healthy piece of training. This is a simple target made up of 10 small dots, and each dot has a specific drill assigned to it. This includes drawing, reloads, one-handed shooting, and more. The target requires fifty rounds of ammo and is an all-in-one target.
The Dot Torture target was designed by the late Todd Green but has early origins that go back to pro shooter John Shaw. It’s great for all skill levels and is versatile. It can be shot with a timer at a variety of distances, and you can add and adapt the drill as you see fit. There are other variants, including a DA/SA version, a rifle version, and more.
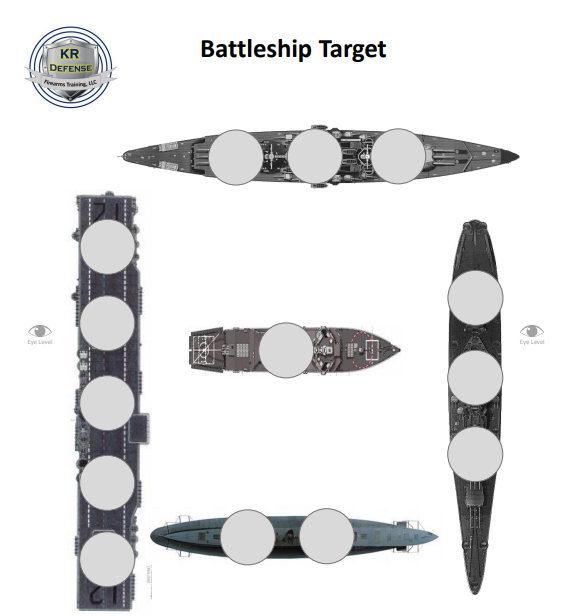
KR Defense Battleship Target
Finally, let’s end with a fun one. Plinking is still a joy, and plinking with others makes the basis for a great day. KR Defense hosts a target designed to replicate the classic game Battleship. Print two of these targets, and you can have some fun with a friend and be fairly competitive. You can even mix it up and challenge the shooter to shoot with one hand from the draw or assign each circle a certain number of hits.
It’s simple, but a ton of ton. My son and I enjoyed the game, and it made him want to shoot more, so why not? I don’t mind a little competition. It exercises basic skills and does require some marksmanship fundamentals.
Free Targets Forever?
Who doesn’t love free stuff? In the gun world, it’s rare beyond a pin and sticker. A few free targets can hopefully get you out there and on the range a little more. With that said, let me offer a tip. If the target doesn’t print correctly, set the scale to 100 and try. That usually resolves issues. Second, download them, and save them somewhere.
I’ve had a few of my favorites just disappear after years of use. If you want them forever, download them and save them. Free targets out there, and hopefully, I’ve helped you find a few great ones for practical training purposes.
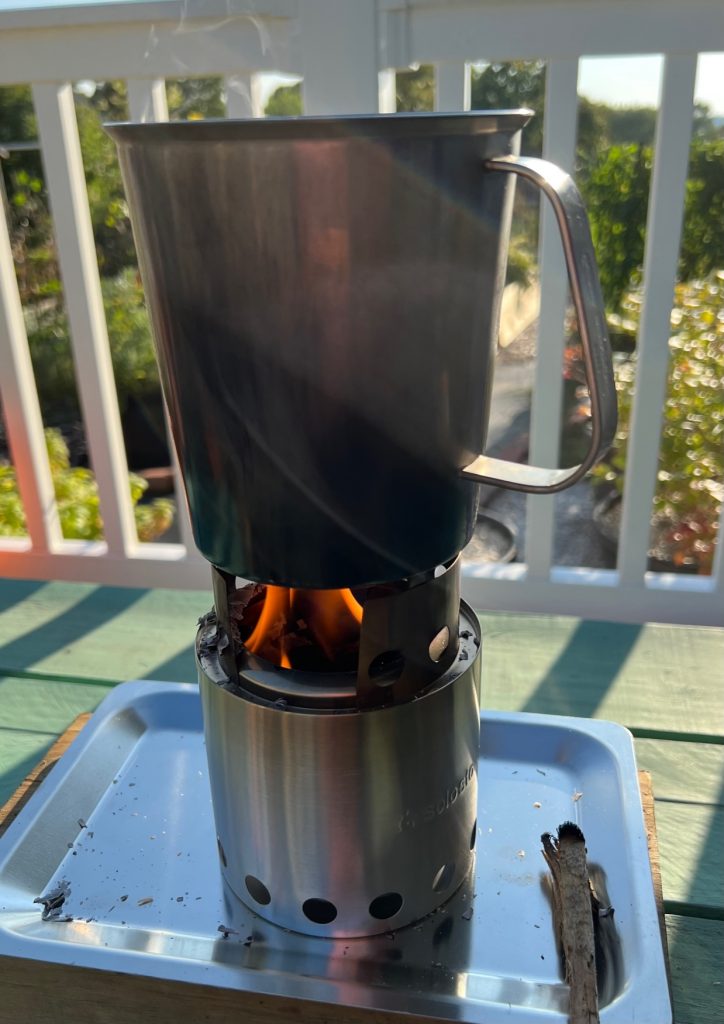
In the interest of observing National Preparedness Month, I made a new purchase. Admittedly I already have several alternate sources of cooking in my emergency supplies. I have a gas stove/oven in my kitchen, but I also have a small propane camp stove, a sterno-type stove, and a rocket stove which I have written about before which is about the size of a scrub bucket or one of those holiday popcorn tins.
But did I recently buy another smaller size rocket stove? Of course I did! My purpose in doing so was to have something which would use even less fuel (sticks and yard waste) if I only wanted to do a quick heat up job. Like say – heat some water for tea or make a single bowl of soup. This size stove would also work for backpacking or bug out, but that is the option of absolute last resort for me. I’m getting too old and cranky to carry everything I own on my back – if I can help it that is.
This Solo stove runs on “biomass” – sticks, pine cones, corn stalks, etc. And because of its smaller size, uses an even smaller volume of such biomass than my bigger rocket stove by Silverfire. This potentially conserves fuel during an emergency – especially if I am only cooking for myself.
When cleaning up my yard/garden every spring and fall I have taken to tossing the random pieces of broken up stick into a tub in my garage to save for emergency fuel. Thus I have a backlog of dry “biomass” to use in case of – gawd knows what.
But what if you live in an apartment or townhouse with a patio to have a small fire on, but don’t have a yard? What if your owners association or city maintenance dept are so on the ball that there are never sticks to gather even in the public spaces?
Experiment
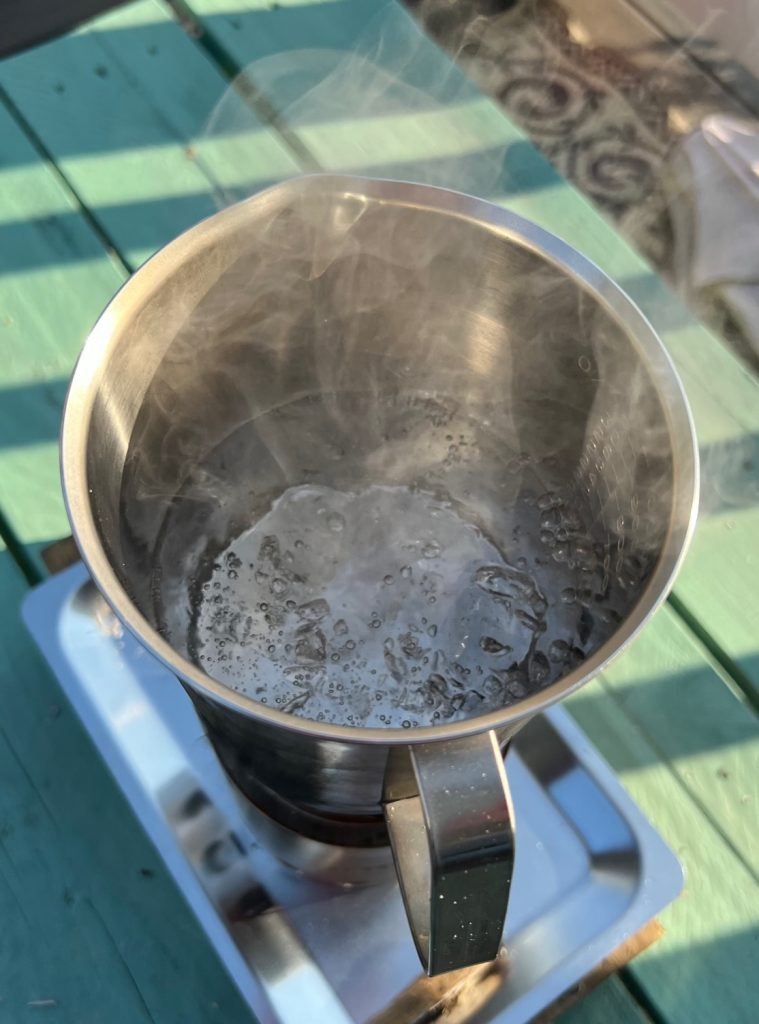
I wanted to try an experiment. I wanted to see if this little stove would burn bigger chips of MULCH. Yes, the purpose of mulch is to suppress weeds and retain moisture, thus the mulch is almost always damp. But what if you gather big pieces when it is dry or what if you buy a bag of it to store for fuel? Fancy-schmancy mulch can be expensive. But I found stuff at Menards that looks like it is merely chipped up construction waste for 2 bucks a bag. This is what I spread between my garden raised beds, so I started picking up some of the bigger drier pieces for my experiment.
A paper lunch sack of dry mulch pieces.
I did this experiment on my deck, on a coffee table I made out of pallet scraps. I used a hunk of wood and a metal tray to protect the table from excessive heat – just in case. It took only 13 minutes and literally a handful of dry wood chip mulch to boil 2 cups of water. And most of that time was spent in getting the fire really going. Within about 7 more minutes the fire had burned down/out and the stove was only warm to the touch. This was GREAT!
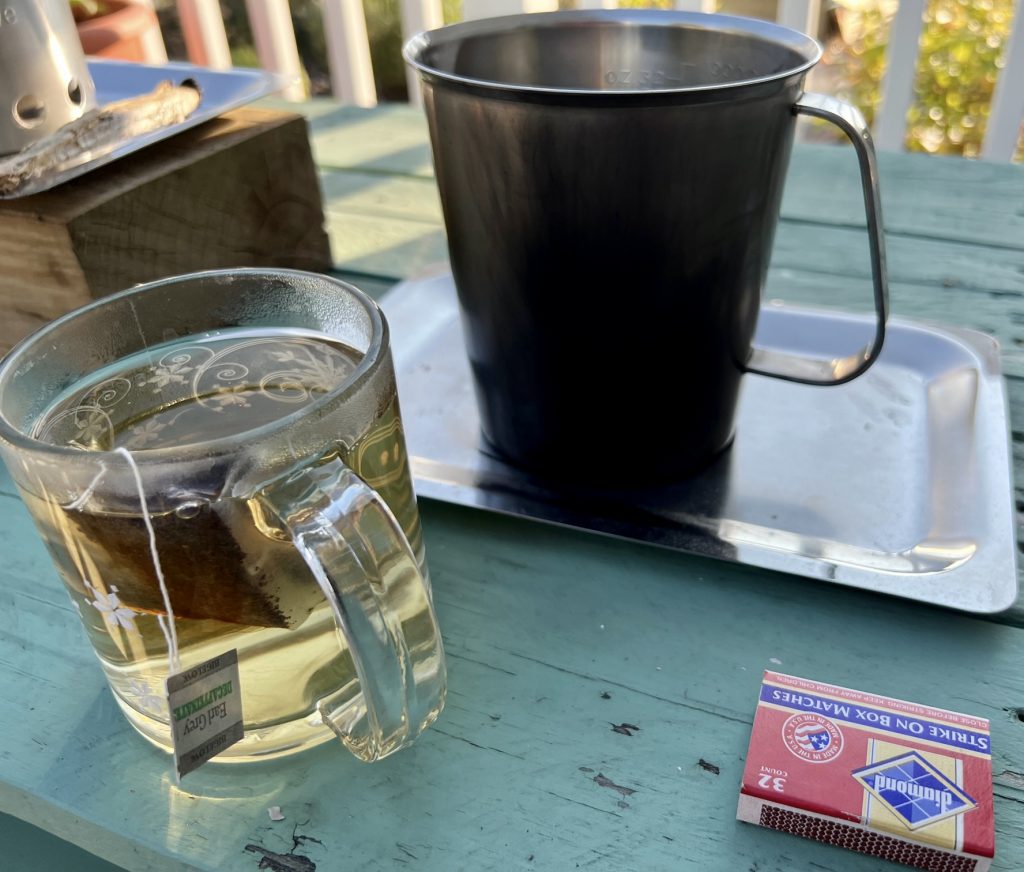
Fire in a jiffy.Water on to heat.Boiling water in about 13 minutes.Tea for one.
Met My Needs
This little stove met all my needs. I wanted something that would not require commercial fuel, that wouldn’t take an hour to produce hot coals, and that wouldn’t then need to be monitored for another hour while it burned back down. This little Solo Lite Stove was so quick and easy! The size is perfect for a get home bag and it cools off quickly enough to be stowed for getting back on the road in a reasonable time.
Fuel on Hand
Apartment/patio dwellers who don’t have a yard with sticks could consider buying a bag of big chunk mulch like this and keeping it in a Rubbermaid tote in a closet. Keeping emergency fuel on hand for a small stove like this would be a wise idea. And sticks are perfectly safe to store indoors – unlike some other fuels. For a stove this small you don’t need big wood or tree limbs – just sticks. You aren’t cooking a three course meal, you’re heating soup or boiling water to rehydrate your freeze dried Mountain House dinner. Keeping it simple is the best strategy. (Caveat that you should use this stove at your own risk. It is not recommended for use in an enclosed space or under a flammable overhang.)
Little pot(s)
One thing with using a very small stove like this is that the usual household pots/pan are often too big. Thus in the interests of preparedness I also bought a small pot from Solo into which the stove fits for storage.
I do (believe it or not) still possess my fifty year-old Girl Scout mess kit, but it is aluminum. (Do Girl Scouts even camp or cook over fire anymore? Or is that an anti-feminist global warming sin or something nowadays?) In a pinch the aluminum would be fine, but over the years I have moved away from using aluminum cookware and prefer stainless steel or cast iron if I can help it.
In addition to the pot that I bought, I also found a small stainless pitcher/pot in my gear which fits perfectly so that’s what I used for the experiment. As the saying goes, “Two is one, one is none.” So now I have two pots to fit my little Solo Lite Stove and I can have tea AND soup when the grid goes down.
This stove passed my test and did what I bought it for. If you are looking for a small camp stove for small jobs which runs on random fuel you find lying around, consider the Solo Lite. Even if you only need it once – it’s worth the cost if it saves your butt in an emergency.
Featured Image: A Remington 870 Police Magnum with Vang Comp’s Stainless Steel follower.
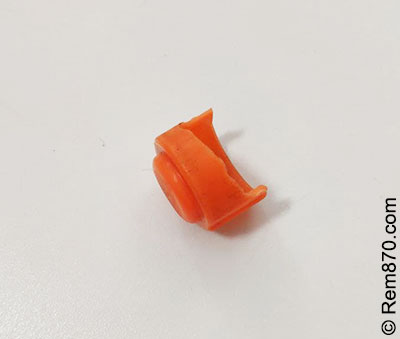
Most shotguns use a tubular magazine to hold and feed shells into their breech. Tubular magazines are typically underneath the shotgun’s barrel and have a capped end, a very long and thin coil spring, and a follower. When fully assembled, the coil spring provides enough tension to push shells towards the breech via the follower. The follower’s job consists of sliding up and down the magazine tube under the coil spring’s tension is simple but vital. Critical wear or damage to the follower can put the entire shotgun’s reliability in jeopardy.
Most OEM followers found in shotguns are simple inexpensive metal or plastic parts. While these may work fine, it is a good idea to periodically keep an eye on them to ensure that they have not cracked or lost their shape as they are subjected to tension and pressure between the coil spring and shotshell column. In some cases, followers can be victims of cost-cutting and some shotguns may ship with less than adequate followers as well. The last thing anyone needs in a defensive shotgun is a compromised follower that will not feed shells properly or create some other type of blockage.
Inexpensive broken OEM plastic factory follower taken off a Remington 870 shotgun. Image credit: Rem870.com
Fortunately there are many aftermarket follower options that cater to shotgun shooters for both the tactical/duty space and the competition world. For the most part, these aftermarket followers have a few things in common such a robust and thicker construction. Some are engineered with less bearing surface so they can easily travel through the magazine tube without grinding and binding with dust or debris. These followers will also have some type of texturing or void, as texturing allows shooters to tactilely feel something uniquely different than the back of a shotshell. Naturally, any well thought out follower will also be made of a different material and color to make it distinguishable from shotshells. Though shotgun followers are simple parts, the fact of the matter is that when a defensive shotgun is needed, nothing can be left up to chance. (This is why it is also a good idea to periodically replace the magazine tube coil spring as well).
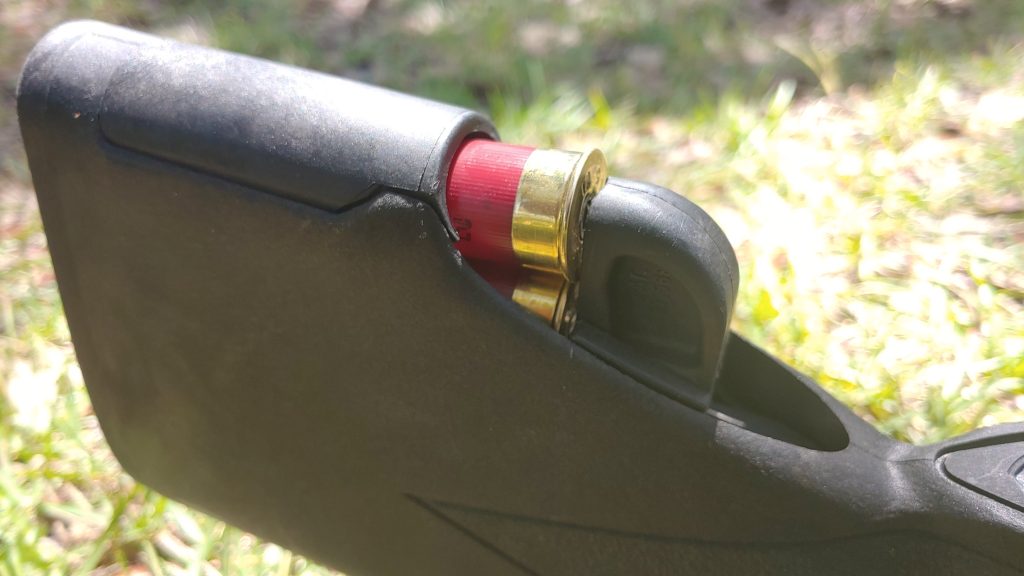
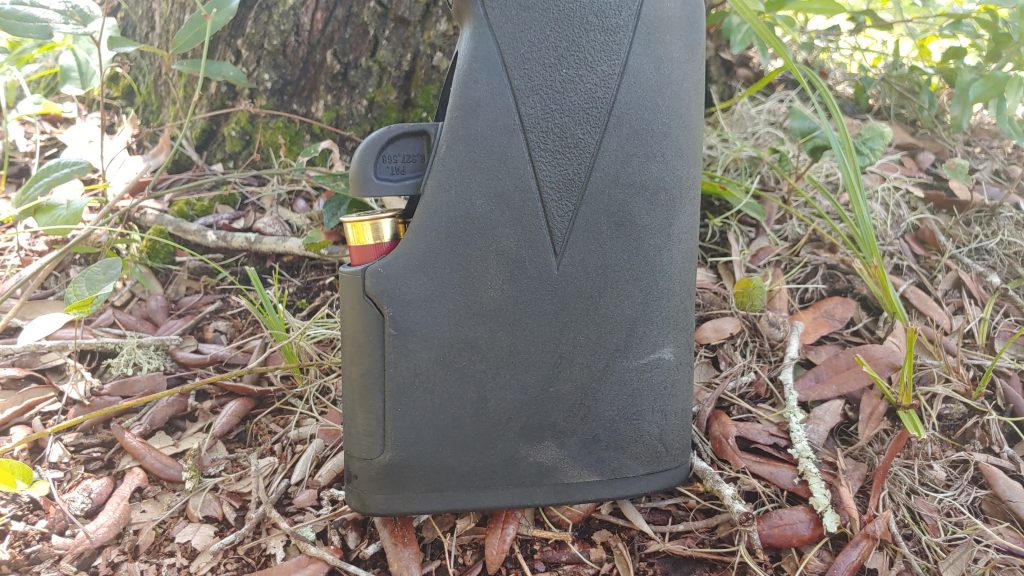
Carrying spare ammo with a shotgun isn’t the easiest task out there. One of the often proclaimed problems with the shotgun is its lack of capacity. This has led to things like side saddles and the original Speed Feed stock. The Flash 5 takes a little inspiration from the old Speed Feed stocks, but the comparisons would be limited to the idea of keeping ammo in the stock.
The Flash 5 might keep ammo in the stock, but it does it in a means that’s much better than the Speed Feed stocks. Instead of shoving two rounds into two tubular magazines, the Flash 5 keeps five rounds in what’s essentially a magazine loaded into the stock. As the name implies, the stock holds five rounds of ammunition and feeds out of the bottom of the stock. The stock is available for Mossberg 500 series shotguns and Remington 870 shotguns.
The Flash 5 Breakdown
The Flash 5 is an interesting design because it not only has to be a good source of extra ammo but a solid stock. Tactaload designed the stock to accommodate the three most common 12 gauge shell sizes, 2.75, 3, and 3.5 inches. To accommodate the long boi 3.5-inch shells, you’ll need to remove an internal spacer.
That wasn’t a concern for me. I’m a 2.75-inch fella myself. The stock uses a spring with a follower as well as a spring-loaded gate to keep the rounds from popping out before they are needed.
This setup does offer a few benefits over the side saddle. Most obviously, this setup makes the ammo source for spare rounds ambidextrous. Side saddles are distinctively set up for right-handed shooters 99% of the time.
Your spare shells are also protected from the environment and shielded within the stock. This prevents them from getting beaten up, rusting, or deformed by environmental exposure. The shotgun also remains streamlined with something hanging off the side.
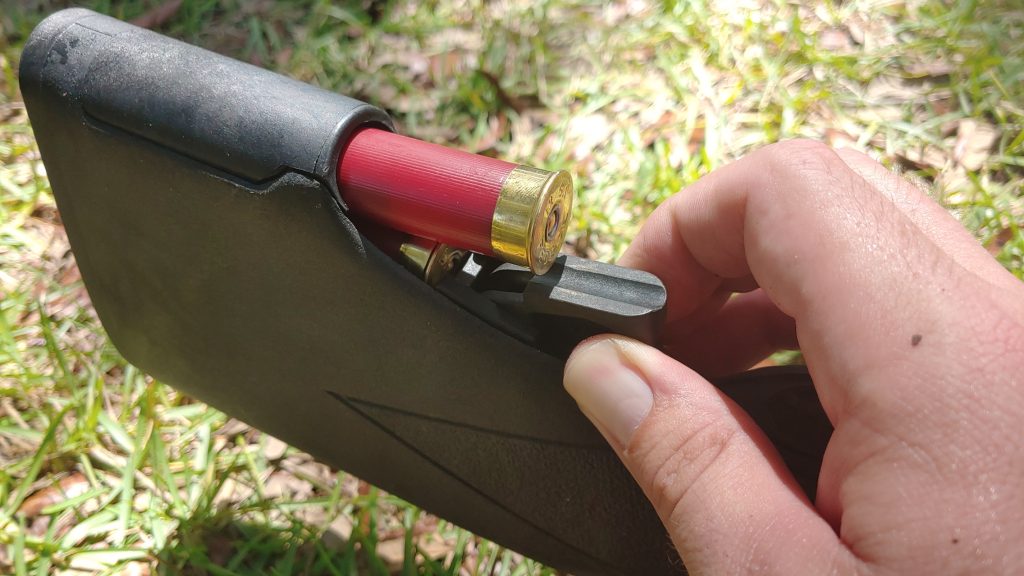
Reloading with the Flash 5
The setup is simple and fairly intuitive to use. The brass and rims face toward the shooter. The spring-loaded gate keeps the rounds in place, but when the shooter grabs the rim, it’s easy to press down and is a natural part of your draw stroke. The Flash 5 is rapid to reload and is a fair bit faster than a side saddle reload.
Reach rearward with your non-dominant hand with your pointed finger pointing at you. Pinch and grip, and as you do, rotate your wrist forward, and you can shove the round into the tube. Where the Flash 5 is a bit slower than a side saddle is in an emergency port reload. It lags behind by half moment or so but isn’t painfully slower.
Grip, rip, and reloading isn’t difficult. The internal stock magazine ensures the next round is always ready. The rounds stay put until drawn as well. Even butt stroking my Century BOB punching bag didn’t dislocate a round.
The Flash 5 as a Stock
Your stock is a fairly important part of your shotgun, and a good source of reloads doesn’t beat out a well-made stock. Tactaload did a fantastic job of designing the stock. It’s a traditional stock with what appears to be a fat bottom. The stock itself can be adjusted with optional spacers, and the LOP can be as short as 12.5 inches.
There are multiple butt plates, including a recoil and a tactical version. The recoil pad extended the LOP about an inch, so be prepared for that. I stick with the tactical variant for a shorter LOP overall.
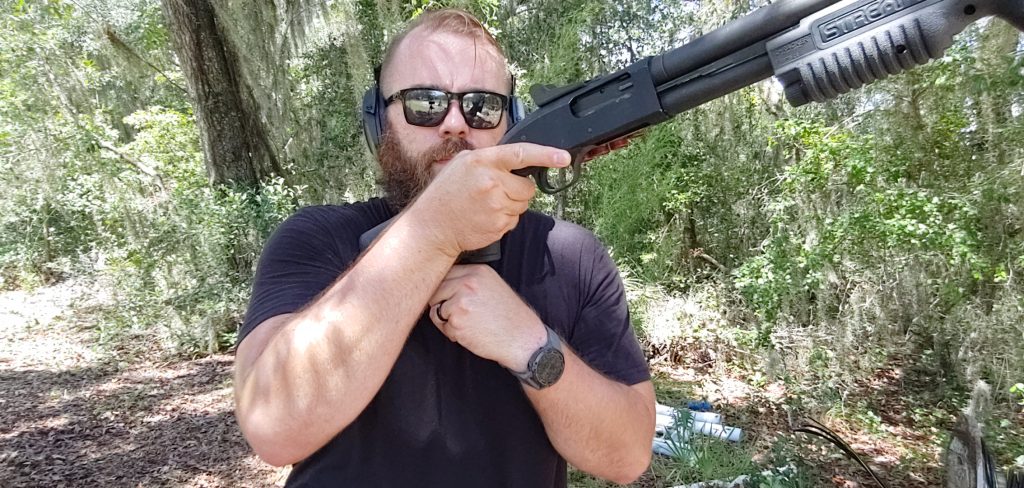
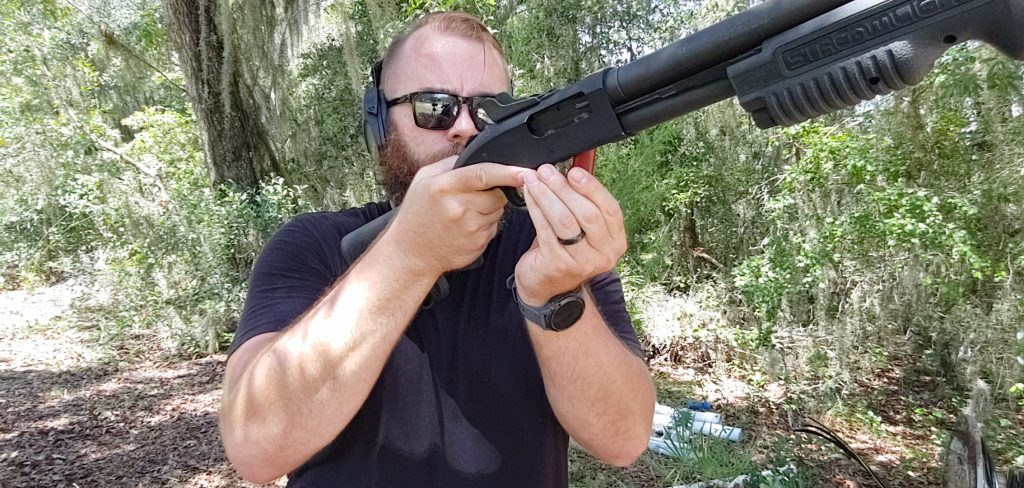
The stock provides a nice comb for using either optics or iron sights and supports a nice cheek weld. I would texture it a hair bit more. When using the push-pull with sweaty hands, I felt the grip slip a bit. September in Florida will do that.
The original setups did not include a sling swivel setup, but the latest models have that as an available upgrade. It’s a modern take with all the modern options shotgunners love and appreciate.
Reload and Reload
Keeping your shotgun topped off in the middle of a fight is a must. For home defense carrying spare ammo isn’t easy, and it has to essentially be locked onto the gun for it to be of any value. The Flash 5 keeps things locked to the gun much like a side saddle, but with a few advantages. It doesn’t have to be an either or situation either, as I’ve attached both to my Mossberg 590A1 and like the spare ammo it offers. Check it out here.


")