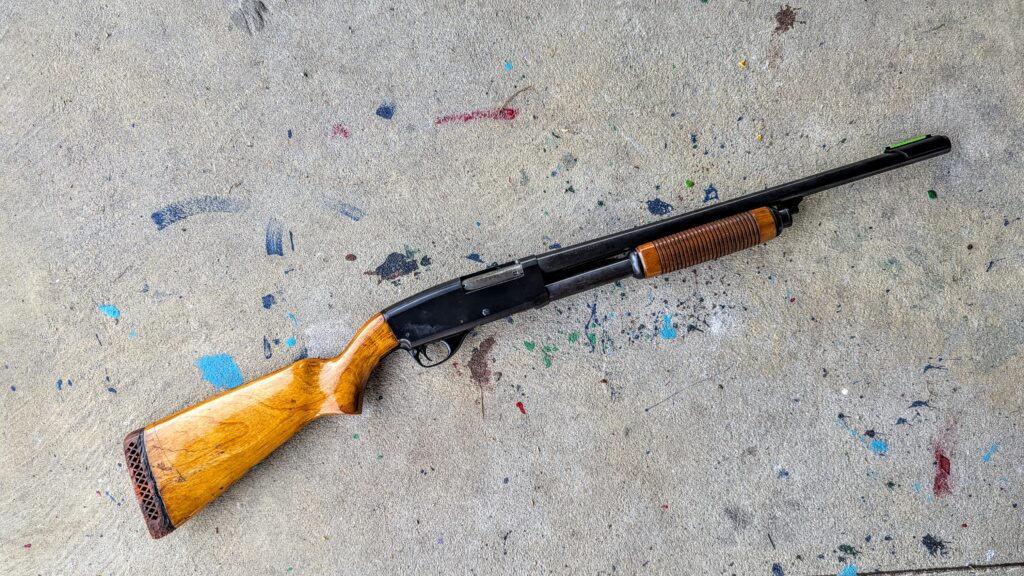
Remember last month when I bought a pawnshop shotgun with the intent of turning it into a home defense/tactical gun?
Well, after much soaking and cleaning and parts replacing, she is ready for the range and hopefully ready to take a class!
This has been a really interesting project. I’ve had shotguns for six or eight years (mostly semiauto), but I’ve never tried to do the type of deep disassembly and cleaning that a used pump gun makeover required. It’s been an education and an exercise in compromise – balancing function, appearance, and budget.
Advertisement — Continue Reading Below

As the photos in the first article attested, this gun was DIRTY. Like, literally crumbs of crud falling out of it dirty. This was not a safe queen and was likely used hard for turkey or waterfowl or both. But the price I paid for it ($110 out-the-door) made it worth some effort at clean-up.
The trigger group, bolt, and other internals cleaned up very nicely. There was some wear, but no obvious rust, so that was a win.
Advertisement — Continue Reading Below
The magazine tube required some compromise. I could hear the spring scraping around in there and wanted to get it out for inspection. However, I soon discovered that it wasn’t age/corrosion that kept me from getting the magazine tube off, it was the fact the Mossberg apparently uses/used some form of Loctite in the assembly of my 30-year old gun which necessitates special measures like a heat gun and strap wrenches for removal. The interwebs also warned that it was possible to damage the tube in the process of removal.
Though I had friends who generously offered tools and assistance, I opted to try just cleaning it out first. I used a 12 gauge bore mop soaked in Hoppes and ran it up inside the magazine a few time from the follower end and again with a smaller mop from the top end, down through the center of the spring, hoping to dissolve crud that might be clinging to the spring and magazine walls. After a few repetitions with wet and dry mops and big patches wrapped around the mops, I did the same procedure with gun oil.
It all moves and sounds much better now, so I’m leaving well enough alone. Feel free to tell me I’m wrong, I’m a learner after all. But this was a compromise, and I opted for good-enough function rather than risking damage. If it becomes a problem in the future then my hand will be forced and I’ll deal with it then.
Advertisement — Continue Reading Below
My next big decision was whether to just repaint the existing stock and forend, or replace them with Magpul components. After some deliberation and budgeting I decided to spring for the Magpuls. I got a great deal on the stock on Amazon, and the forend came from Brownells – along with a mount for a flashlight.
The advantage to the Magpul stock is that it has spacers for adjusting the length of pull (an ongoing issue for me), and I also like the ergonomics of the grip. The installation was easy-peasy.
The advantage to the Magpul forend for me is that it allows me to attach a light. The original forend had no such ability. The Magpul additionally, is contoured such that there is a bit of a grip stop at the end. With my short arms I am unlikely to overreach and endanger my fingers, but a tactile endpoint is still good to have.
Advertisement — Continue Reading Below
I tossed around the idea of a foregrip with an integral light, but it was pricey. I already own three Surefire flashlights so I opted for just a Magpul mount for one of my existing handheld lights. I’m not a Tammy Tactical, but a few of the classes I’ve looked at use a light, so I wanted to have something I could use for a class. Installation of the light mount was not so easy-peasy, but still accomplished by a non-expert, non-mechanically inclined pediatrician.
This gun came from the pawnshop with a 26-inch barrel, so I needed a tactical-length replacement. I found a Mossberg factory barrel in 18.5 inches with a matte finish at my local Sportsman’s Warehouse for about a hundred bucks. That price seemed about average and I avoided shipping costs by buying it locally.
Although I hadn’t originally planned to, I ended up replacing the slide assembly on this gun, too. While messing with trying to remove the original foregrip I realized how rattly and loose it all was. It may have been mechanically fine, but since I was replacing the forend anyway, I decided to go all new, since there is a lot of wear and tear on those pieces. If the pump mechanism goes bad in an emergency you’ve got a one shot gun, so I replaced it with Mossberg factory parts from MidwayUSA.
Advertisement — Continue Reading Below
That jacked up my cost of the makeover even further, but I still came in under what it would have cost me to buy and equip a new tactical shotgun. I easily rationalized these expenses because I sold two handguns (that I didn’t like and rarely shot) to the same pawn shop from which I bought the Mossberg. That gave me over $300 more to play with without budgetary guilt. Gotta love guilt-free gun purchases!
I’m planning on getting a sling and a fiber optic sight for this project as well, but I’m still shopping around for those. If anybody has any suggestions, I’m happy to hear them.
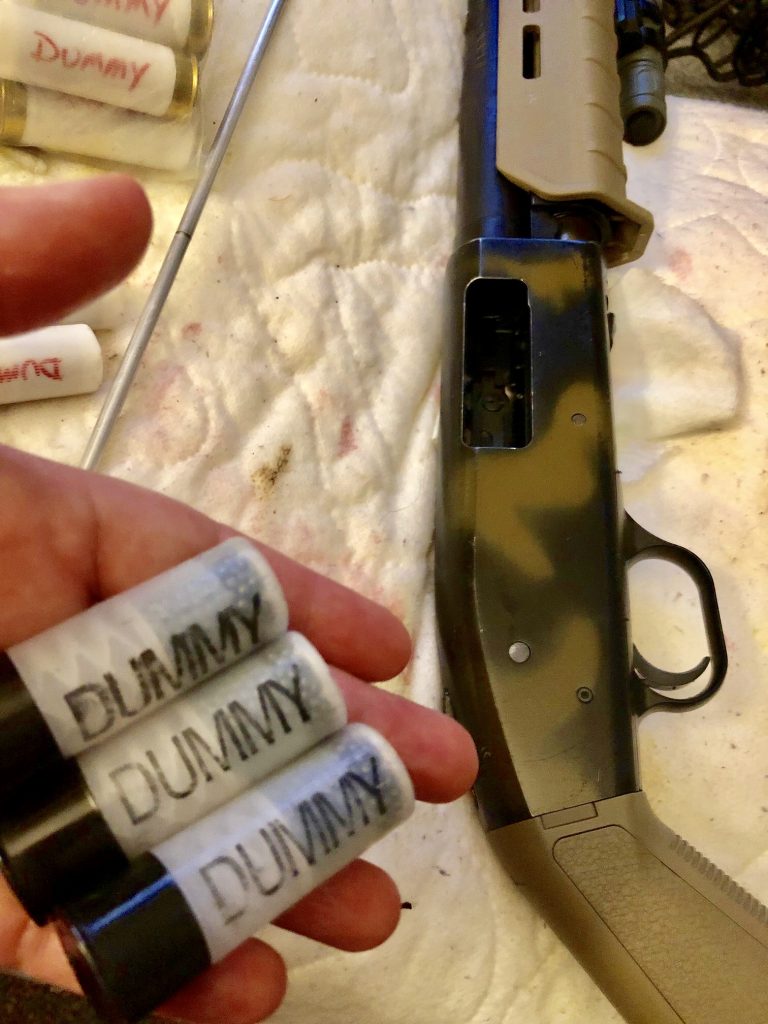
After dropping a few F-bombs and questioning the virtuous parentage of a few of the parts – especially the trigger assembly – I finally managed complete reassembly. I ran some dummy rounds through my project to verify function and then took my new/old gun to the range for a test shoot.
Advertisement — Continue Reading Below
Range testing is always a better measure of the build because farting around in your living room with dummy rounds can only tell you so much. The first thing that the range test of a box of birdshot and some 00 Buck taught me is that my Benellis – with their lovely recoil-reducing stocks – have heretofore sheltered me from the true recoil of a 12 gauge.
It was brisk. I could handle it, but I’m going to have to work on making sure I don’t develop a flinch. I’ll have to see if there is such a thing as lower recoil defensive shotgun ammo. I was just using what I had lying around leftover from 3-Gun for right now. Granted, I was blasting off six rounds at a time as fast as I could cycle the gun to make sure it worked well, but still. A multi-day class may be a bad idea without lower recoil ammo.
The other thing that range testing showed me is that I need to move the flashlight mount somewhere ELSE. I originally mounted it on the front bottom left side of the slide, thinking this would be easiest access. The purple and tender knuckle on my left hand that developed after the first 6 rounds slammed the flashlight into my hand proved that this location was not going to work. Suffice to say the flashlight and mount were removed post-haste before the testing continued.
Over all though, I am pleased. The gun cycled the thirty or so rounds I put through it flawlessly. The magazine fed smoothly and the extraction and ejection were fine. For a thirty year old gun, she’s still got it.
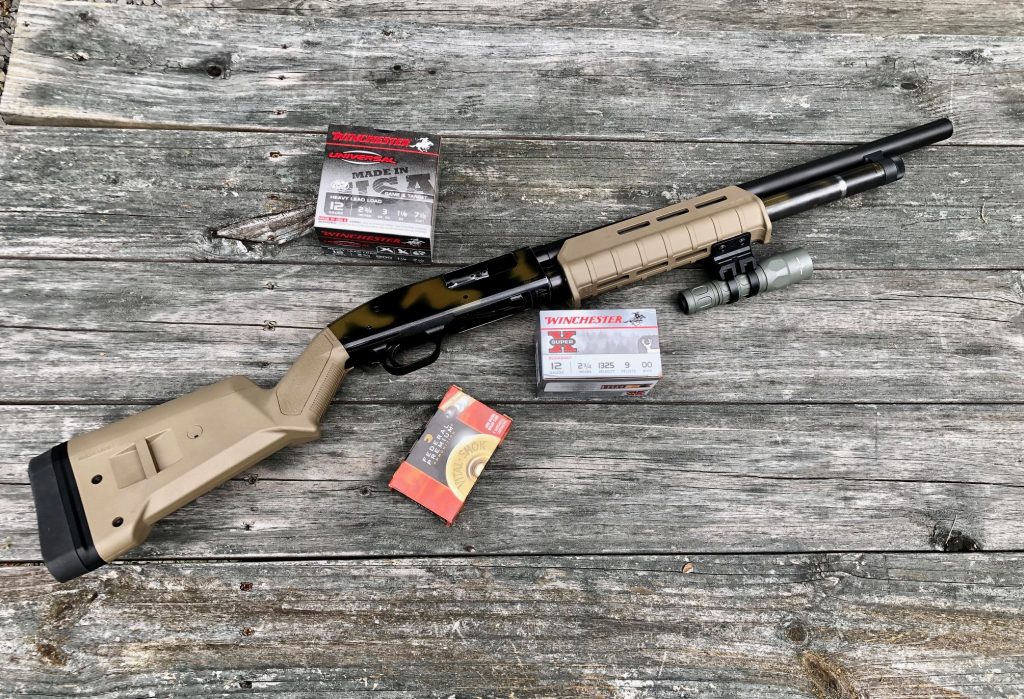
As you may have noticed from the photos, I decided not to refinish the receiver and magazine tube (at least not yet). I’m leaving the rattle can camo job that was done by the previous owner as a nod to the pawnshop origin of the gun. The FDE furniture blends quite well with it anyway, and I figure if anyone comments, then I have an opening to tell my make-over story.
I would wholeheartedly recommend a project like this to anyone. Though some may argue that it’s easier to just buy a new gun for what the parts cost me, I would reply that not only have I made this gun truly “mine” by this process, but that the associated education in the mechanics of the pump gun was priceless.