This headline in Tallahassee Democrat is highly, and I do mean, highly disingenuous.
The implications are, unremarkably, that Florida’s gun policies are to blame for their ranking in mass shootings. This is nonsense. If gun policy were the maker/breaker, then its twin, Illinois, couldn’t be its twin. The current leader, California, also couldn’t be the leader, right? It couldn’t, they have “strong” gun laws, and Florida has “weak” gun laws.
Why is Florida Really in the Top Four States for Mass Shootings?
How do you explain this lack of congruence between stringent non-permissive gun policies, like in Illinois and California, compared to permissive ones, like Florida and Texas? Those are currently, as of this April 9th, the four top states for ‘mass shootings.’
Strangely enough, unless you actually look at and have an understanding of statistics, they are also four of the six most populous states. The 5th state, Pennsylvania, also has a high mass shooting total for the year, with only one fewer instance than both Illinois and Florida. The outlier is actually New York, which only has two mass shootings. We’re about to hit summer, and that means that crime in the cold states is going to start criming. But this data still remains consistent.
Your “strong” gun policies don’t stop ‘mass shootings.’ Stop playing around like the prohibitions matter when we aren’t enforcing anything with any consistency. How many felons aren’t getting hit with possession charges when they warrant them? How many PPOs filed are not getting rigorously followed up upon?
Follow the Money
How long are we going to pretend these vapid differences in ‘stringent’ firearms policy are actually reducing deaths and saving lives when all the evidence points to the general stability of and affluence of the population as the strongest determinants? Why does California have the most mass shootings? Largest population and enough criminal or socio-political motivated crazies. Why is their overall firearm homicide below the national average?
Lots of money.
Not laws, money. It doesn’t pay to leverage violence at the higher income brackets. This isn’t rocket surgery.
Data shows that the safest class in the US from violent crime is the upper middle class. You get a small uptick again when you get into the truly wealthy categories (household incomes above $400,000, if I recall correctly). However, that uptick is minor compared to the much greater risks associated with the lowest income brackets.
When you track out all that data, it makes sense when you consider that most violence is transactional. It has a financially quantifiable motive. If you don’t need violence as leverage because you have money, you use the money. In higher income brackets, emotively motivated violence becomes the norm—it also occurs at those lower rates.
If we were to filter financially motivated violence out of the lower income brackets, I bet we would see the amount of emotively motivated violence track with the rest of the population pretty consistently.
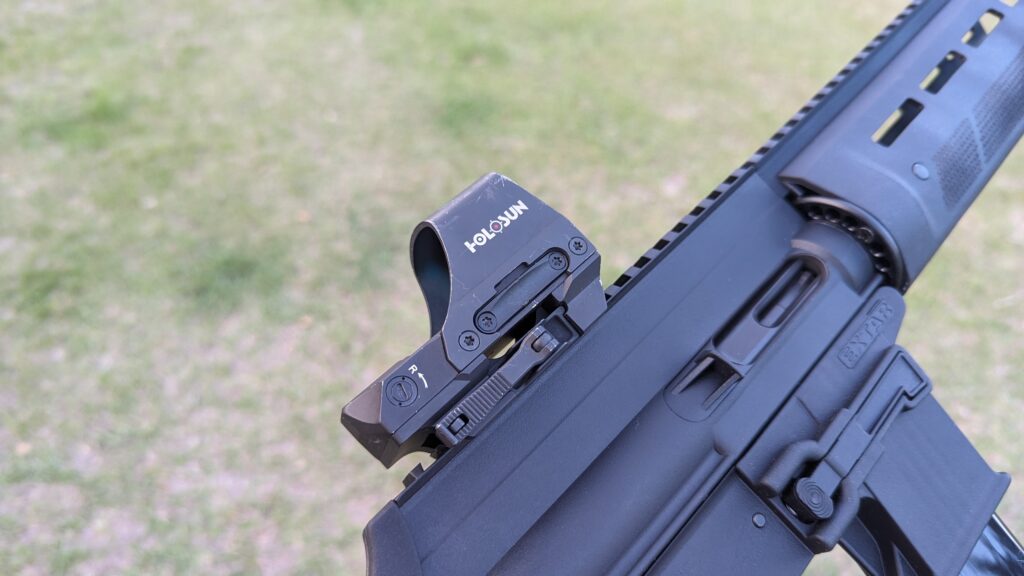
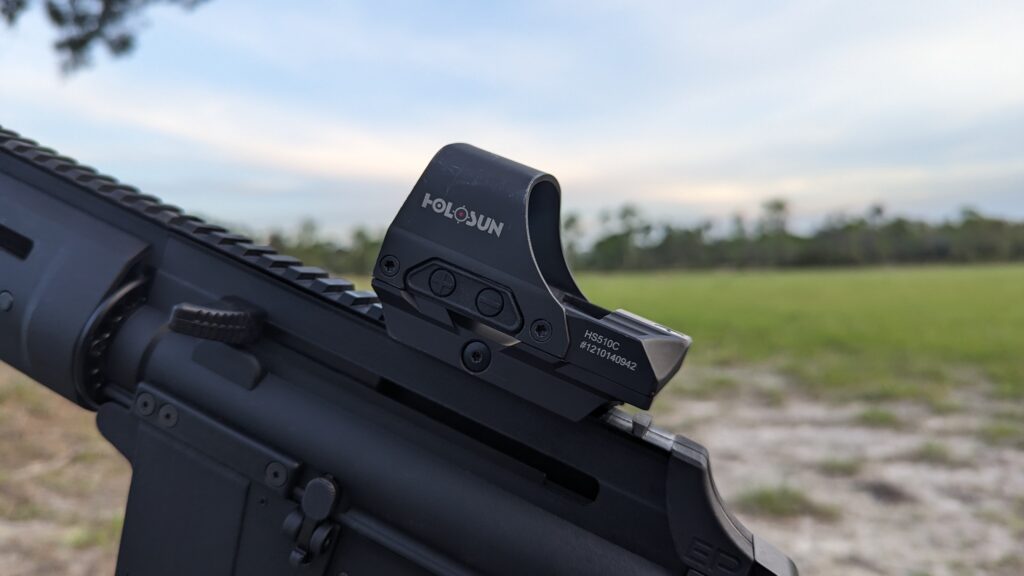
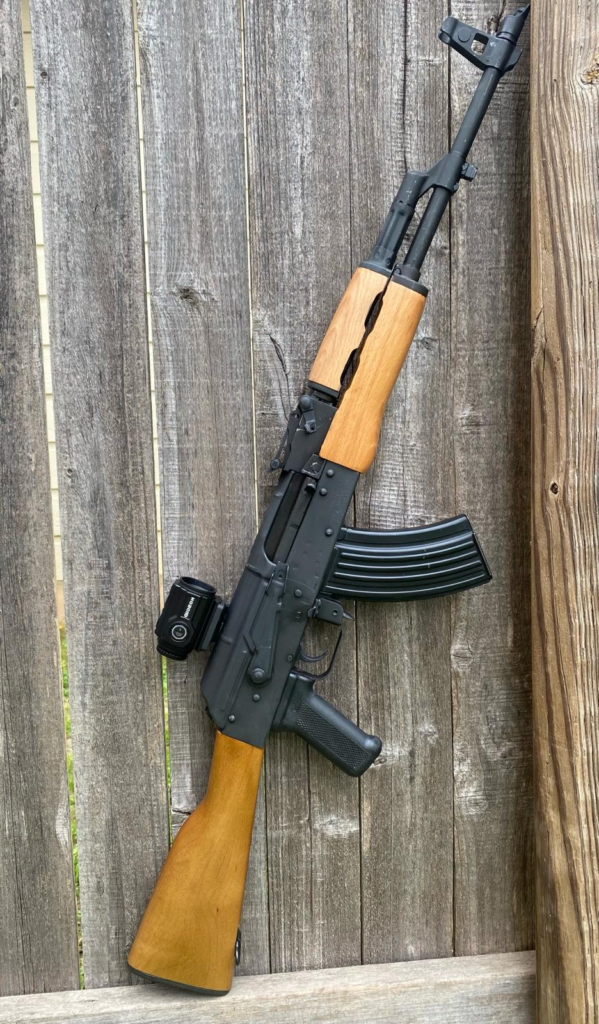
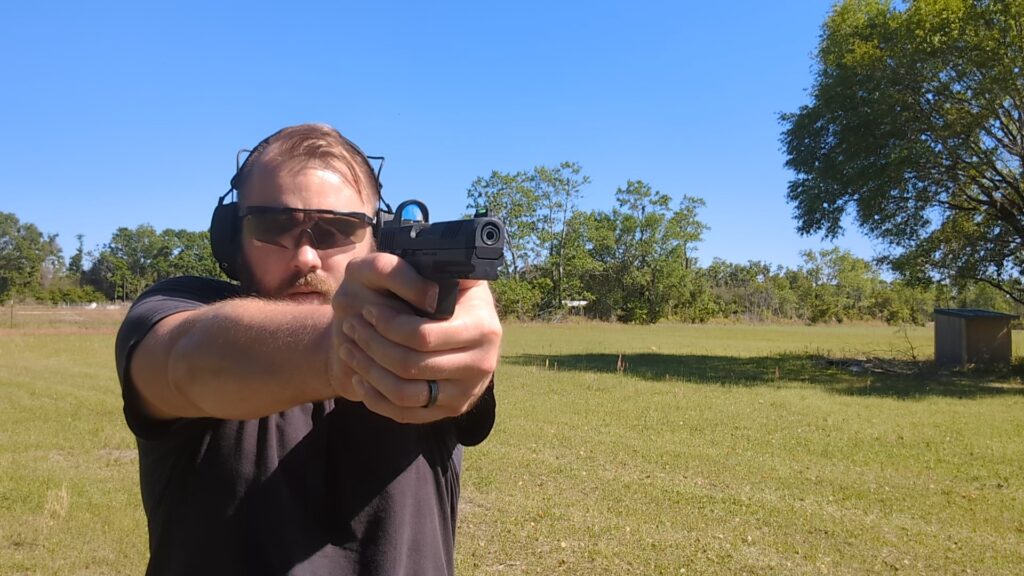
Good gear costs. It’s a fact. If you want the best gear and guns, you’ll have to pay for it. It’s a sad truth, but a truth nonetheless. Sometimes, you can find a pretty good deal on a budget piece of gear. Mil-surplus chest rigs rock, P-MAGs aren’t pricey, and the Holosun HS510C is a great budget optic. A budget optic can’t perform to the standard of Aimpoint or EOTech, but the HS510C has to be one of the best budget-grade optics out there.
Inside the HS510C
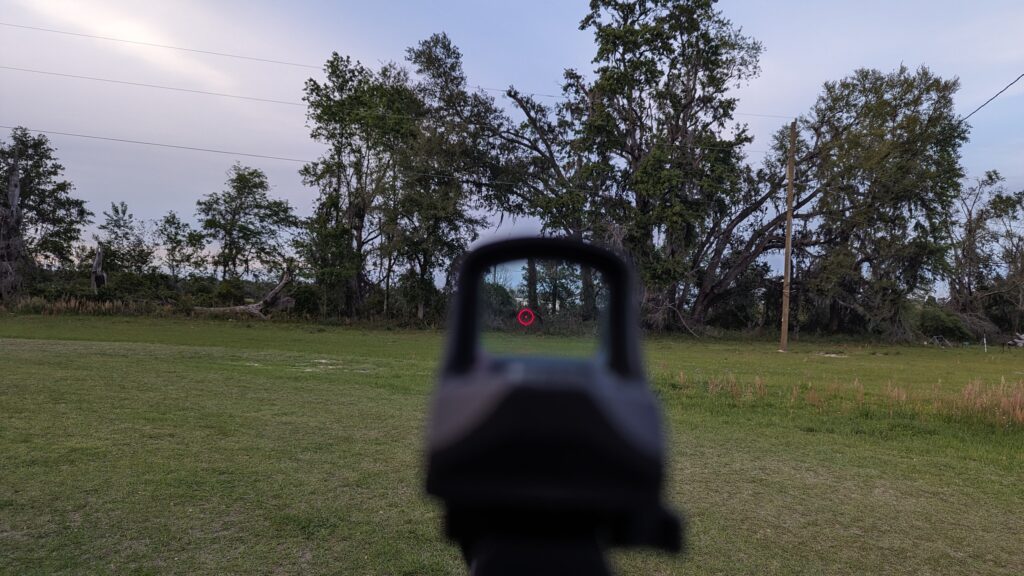
The Holosun HS510C is an open-emitter long gun sight designed to be fairly basic but usable. It’s a red dot, to be clear, and comes packed with Holosun’s most famous features. This includes the multi-reticle system. You can pick from a 2 MOA dot, 65 MOA Circle, or a dot and circle reticle that combines the two.
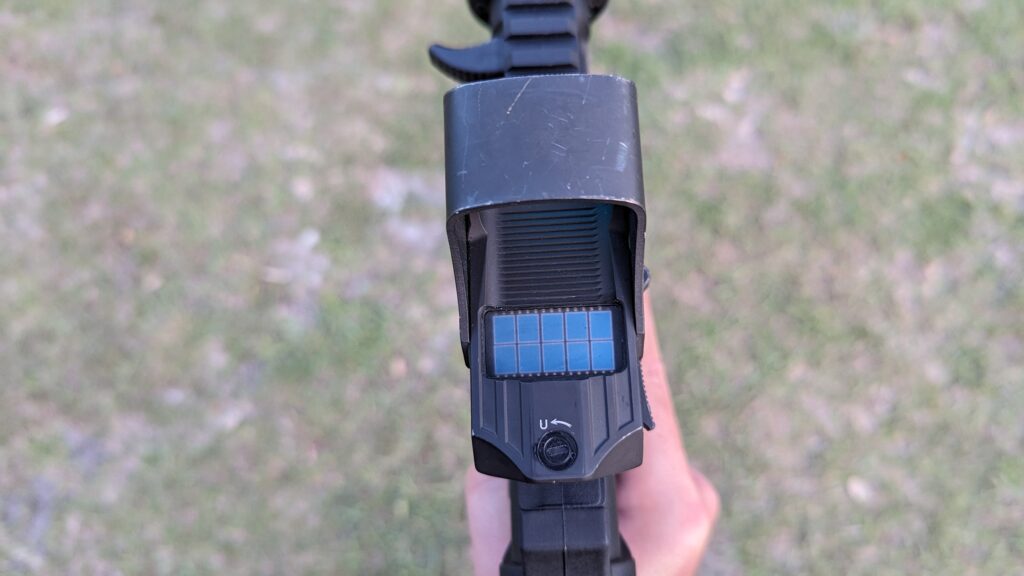
We have a solar panel built into the optic for backup power. The battery has a handy side-mounted slot that’s easy to remove and swap batteries in and out. The optic has the famed Holosun shake awake tech that shuts it down when it’s left motion-free. When it detects motion, the optic fires back to life.
The HS510C features an integrated mount that makes it acceptable for rifles with inline stocks like the AR-15. Yet, it is low enough to be fairly comfortable on a wide variety of rifles, like AKs or PCCs, such as the CZ Scorpion. The mount is a QD type with a lever that makes it easy to install and remove.
It’s a bit of a universal optic, and I say that because I’ve been using it for a multitude of purposes and firearms. I typically come to the HS510C when I have a new gun to review that requires some form of sight.
Through the Looking Glass
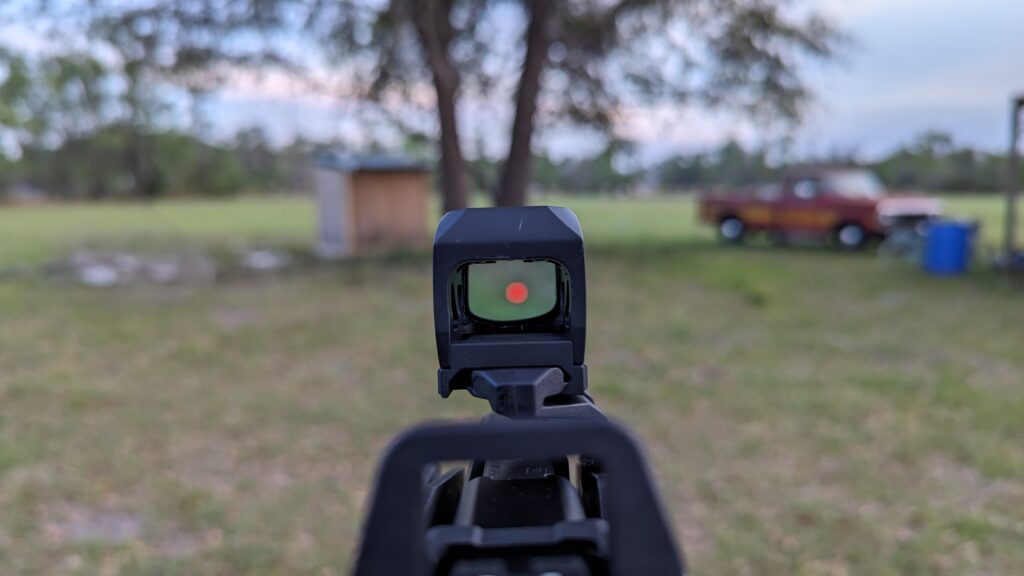
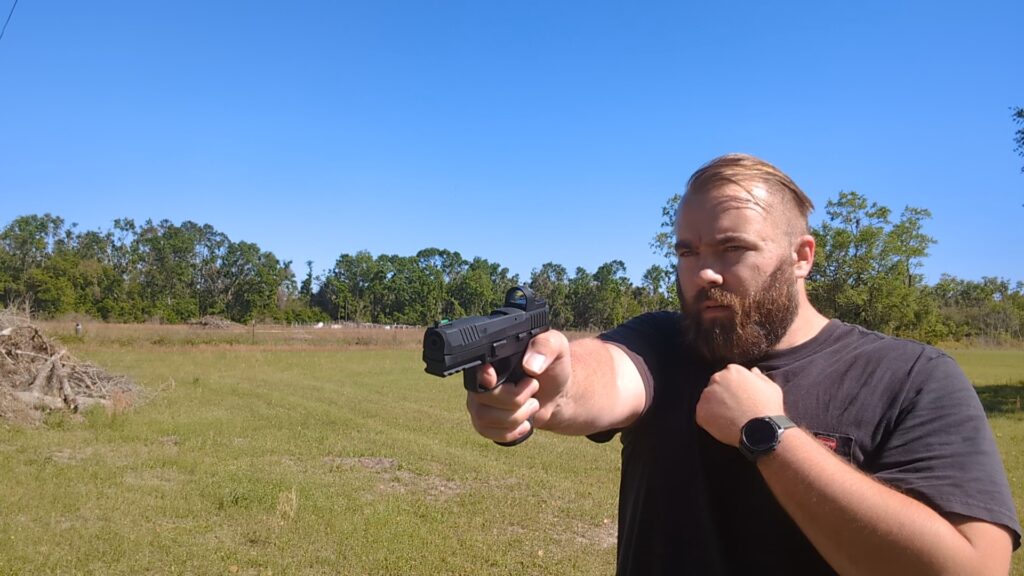
The HS510C gets quite bright and packs ten brightness settings and two night vision options. We get a fairly aggressive notch filter that likely helps keep that reticle bright while cutting battery usage. The look through the glass is quite clear for a budget-friendly optic. It’s likely due to the fact it’s an open emitter, and we only have to look through a single pane of glass.
Holosun delivers a nice, crisp, and clear reticle. Holosun’s parent company is an emitter manufacturer, so the company should excel at this role. The multitude of reticle options is quite nice. The 2 MOA dot provides that super crisp and clear dot that occupies very little of the screen. It mixes well with a magnifier and gives you the longest battery life.
I tend to really like the 65 MOA circle and 2 MOA dot reticle. It’s just a big and eye-catching reticle option. The 65 MOA circle can be used for range finding in the field, but I don’t really use it for that function. Snapping in and on target is quick and easy with this reticle.
It can be used to pattern your shotgun. If you pair this optic with the 65 MOA circle reticle and some buckshot, you can pattern it at different ranges. Smart observers will learn the range in which their chosen buckshot will exceed the circle.
The HS510C In Action
I’d love to give you a round count that I’ve shot with the HS510C, but I have never bothered to keep one. I can tell you it’s been on shotguns, AR-15s, an AK, various PCCs, and likely a few really big pistols. The optic has been used a ton, in and out of rain, cold, and heat. It’s been zeroed for what must be a dozen different guns.
I have found rain to be its greatest enemy. The open emitter design does not play well with rain and water. A drop landing on or near the emitter makes your dot basically useless. The reticle disappears entirely. This is the big reason why this is not a duty-worthy optic.
Outside of rain, the optic has taken a beating and never delivered problems. It’s been dropped, both purposefully and accidentally, knocked off the shooting table. Everything still functions as it should, and the zero never drifted.
While it might not be a good duty-rated optic, it is a dominator in the competition field. By dominate, I mean it’s prevalent, especially in PCC competition. It’s a lightweight, easy-to-use optic that’s affordable and perfect for the PCC field. Some higher-level competitors are even rocking dual HS510C dots for those hard, lean shots.
The open design does provide a great field of view with menial disruption. The thin sides of the open emitter design make it easy to see around for that greater field of view and a higher level of situational awareness.
Throwing Lead
The Holosun HS510C is a great option that still sits at the budget-friendly price point. It works well with magnifiers and is reportedly okay with night vision. The design is feature-filled, and if you want a solid home defense red dot or a competition option, then this one is tough to beat. For me, it’s a great optic for gun reviews and perfect to toss around as I see fit.
I’m calling this subject matter enthusiast (SME) tips because pro tips seem awfully cringy for me to say. I’m not a pro, but I do tend to shoot a good bit, and I’ve learned a few things on my journey to be better at this whole pew pew thing. Today’s subject matter enthusiast tip concerns shotgun lights and batteries.
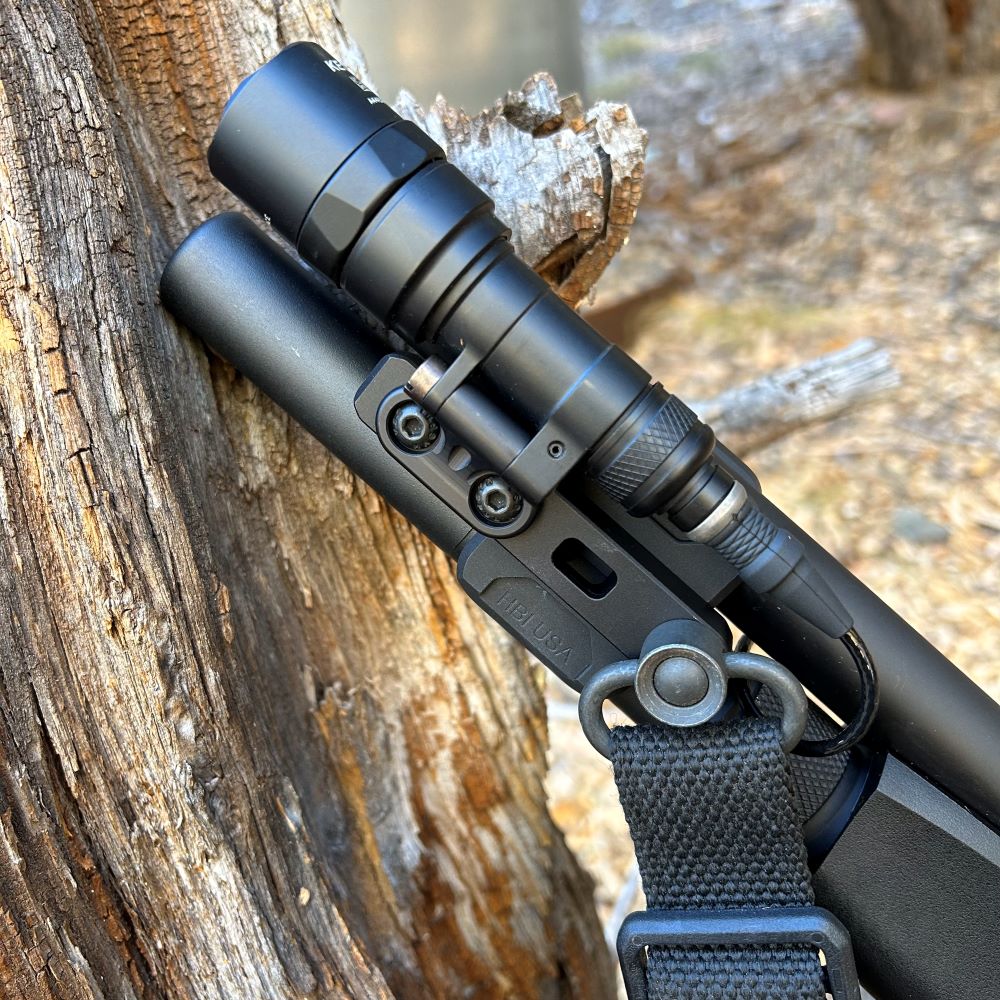
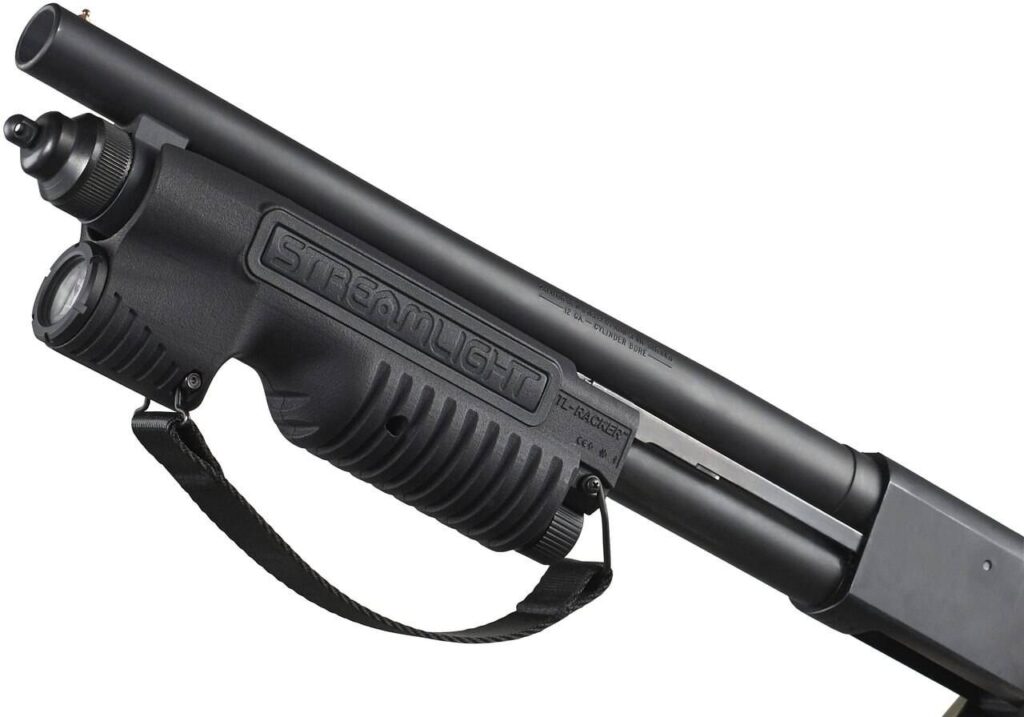
HB Industries
Shotguns are weapons with lots and lots of recoil. As a shooter, you can help reduce felt recoil but can’t dissipate it. We might toss in the push/pull style control to save our shoulders and increase our control, but that doesn’t stop the freight train on our guns. Shotgun lights are subject to that recoil.
What’s inside a light? Batteries!
Batteries aren’t made to get beaten up, yet recoil beats them up. This gets exceptionally worse if you mount the light to the pump of a pump-action shotgun. The batteries begin to break, and when they break, they break hard. There is lots of bad stuff in there that can hurt the light and probably the user.
Should You Remove Your Shotgun Lights?
No, not at all. If it’s a defensive weapon, it needs a white light for positive threat identification. My base-level SME tip is to remove the batteries when conducting daylight training. If you are at the range without the need of a white light, pop them out and preserve them.
I’m one dude with one dude’s experiences, but the batteries tend to break during intense training with high round counts. This isn’t a huge concern in a defensive scenario. You aren’t likely to fire more than a few rounds in a defensive encounter, which won’t break your light. With shotguns, the high-round shooting situations are for training and Fallujah.
Drop the batteries for training purposes. If you are doing low light training, I’d even switch batteries during the training, maybe midway through, to keep them from getting too beat up.
Securing Your Batteries
Removing the batteries during high-round-count training is one way to prevent the issue. However, other ways exist to prevent the issue or at least mitigate the problem.
If you are running a pump action, my recommended method would be to get a Surefire DSF. This issue doesn’t seem to affect that light. Surefire likely encountered it when designing the light, so the company seems to have mitigated it. The Surefire DSF is only made for the Remington 870 and Mossberg 500 series shotguns.
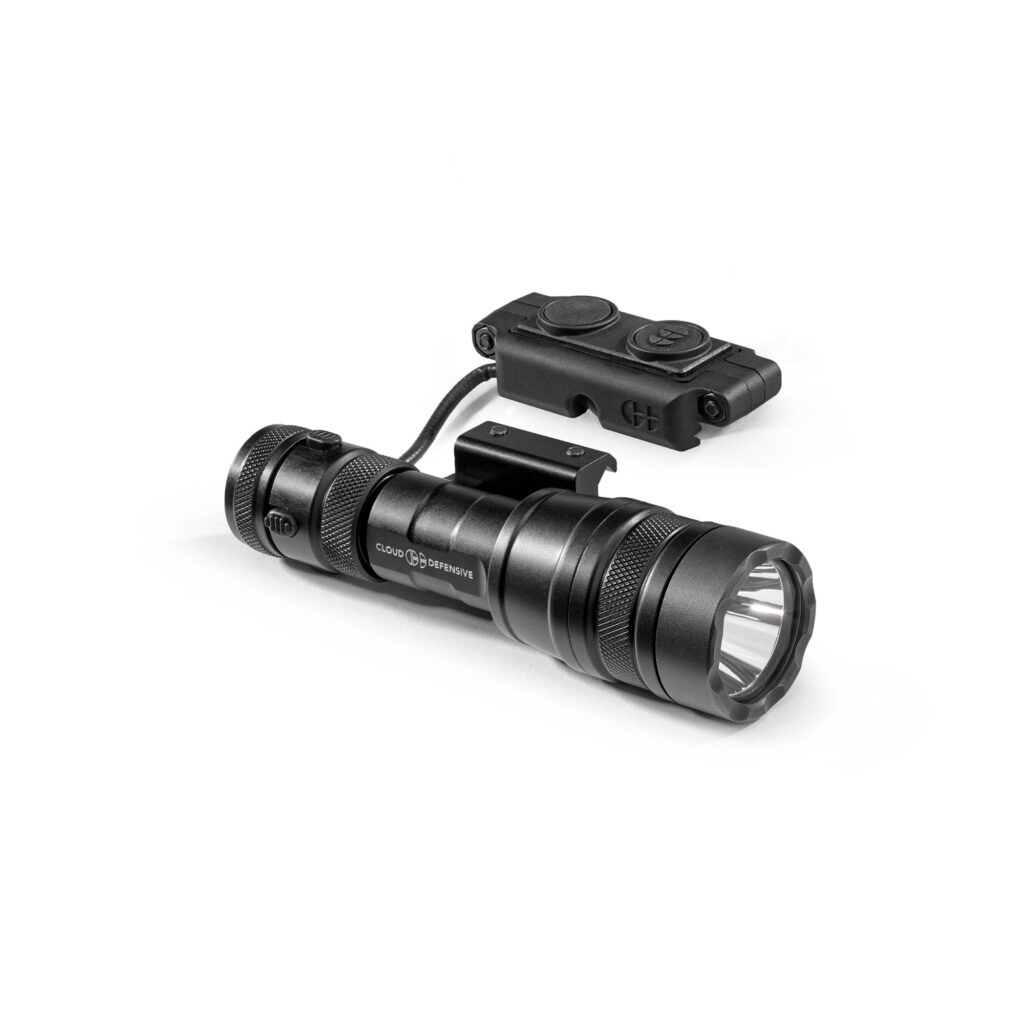
Another high-quality option is the Cloud Defensive lights with the battery jack. This was designed to prevent battery bounce, and this also helps them with shotgun recoil.
When you mount a light to your shotgun, you want to mount it to something that doesn’t flex. If the mounting platform is flexible, the light can move more with the recoil impulse. If the shotgun light moves, the batteries move.
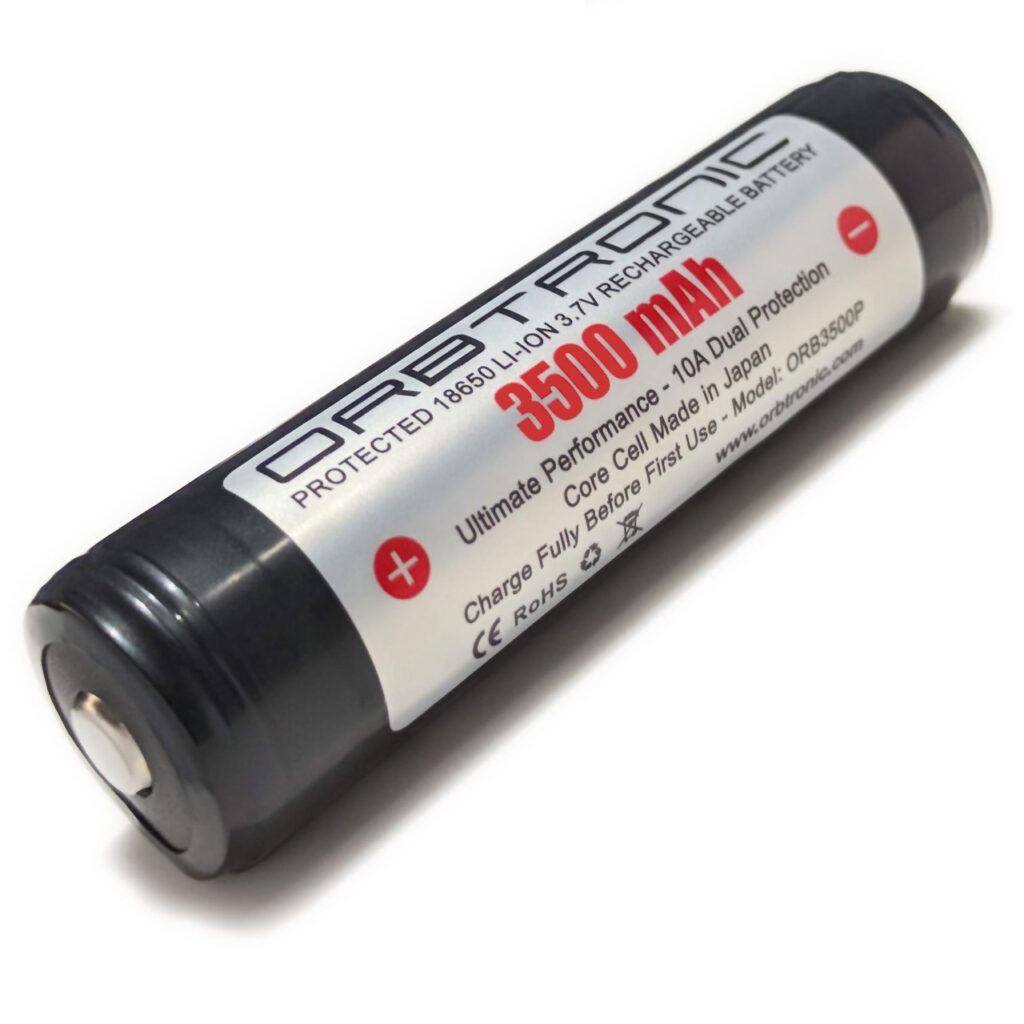
You can also reconsider your battery type. Heavier rechargeable batteries get beaten up more than lighter options. Your typical 18650 batteries are nice and heavy and tend to be victims of recoil. Lighter CR123s will still get beaten up, just not as fast. Also, if your light can use them, flat-top batteries tend to be less abusive to each other.
Protecting Your Light
Hopefully, we’ve spelled out a few things about shotgun lights. Batteries are not meant to be abused, and anything involving shotguns is abusive. While you can mitigate the problems through careful gear selection, mounting solutions, and light and battery options, you can also just remove the batteries when you train, and you’ll be fine.
This is another one of those tropes you hear if you’ve spent any time on social media, especially in gun-oriented groups. The problem is that it’s a lazy, throwaway response that is either elitist and alienating or insufficiently detailed to give the subject of the comment an idea of how to improve.
Gun Snobbery for the Gram
The expression certainly has some validity because there are plenty of people out there playing Pokemon Gun. And they’re just interested in acquiring as many as possible, with little concern for actual performance. As long as it looks cool and gets likes on the Gram, that AAA light, Sightmark optic, and gun show laser all work just fine!
These people generally own multiple low-quality firearms for a total cost that’s the same as one with a more proven track record. This is generally accompanied by unnecessary cosmetic “upgrades” like color fill, gold barrels, etc.
This is what most people mean when they say, “Stop being poor.” Don’t buy three $200 guns with $50 accessories. Buy the best quality possible once.
The Only Option Available
Now, the other common usage for “stop being poor” is a little more myopic and less compassionate. It’s a refusal to acknowledge that there are instances where a firearm of sub-optimal quality may be the only option available due to either availability, immediacy of need, local restrictions, or budget.
Greg Ellifritz has a phenomenal article on this that I think is very relevant.
It’s easy for folks who live this every day to lose sight of what “normal” or “acceptable” is to the general population. Especially when they lack the technical knowledge to readily understand the value proposition associated with higher-dollar items.
The amusing part is that a lot of these same folks will drop $1,000 on a carry gun, $300 on a flashlight, and $500 on a custom knife and then balk at the idea of a $2,000 suit or wristwatch. Because “buy once, cry once” is relative, and everyone has some aspect of their life where “good enough” is acceptable.
Now, I’m not saying that you should compromise your defensive equipment for superficial trappings of luxury, but simply to put it into context.
If you don’t want to do a lot of research, go with the most overbuilt, duty-grade stuff you can get your hands on. That way, you’re virtually guaranteed not to do anything to it that it can’t handle.
For me personally, I don’t need equipment that was built to sustain the rigors of a HALO jump. I need something that can get knocked into door jambs, fall from tailgates, and bounce around in range bags.
I love April Fools Day because I work in the gun industry. I don’t know why, but the gun industry really embraces April Fools Day wholeheartedly. Sometimes, the jokes become permanent parts of firearms culture. For example, the Magpul Waffle maker still gets brought up. I honestly can’t believe they haven’t had one made. In the gun industry, April Fool’s jokes are typically release announcements that will make you take a second look. I picked a few of my favorites to share with you, just in case you missed them.
The Trijicon MGRS Hand Gun Announcement
The Trijicon MGRS isn’t an optic that a ton of people know about because most people don’t have access to heavy machine guns. MGRS stands for Machine Gun Reflex Sight, and it’s an optic aimed at guns like the M2 .50 caliber heavy machine gun. As such, it’s a big beastly thing. Trijicon went ahead and announced a method to mount your MGRS on your favorite handgun. They touted the following benefits of the MGRS on a handgun:
Large Window
Included 3X magnifier
Less Recoil
Picatinny Rail for Lasers
No Printing
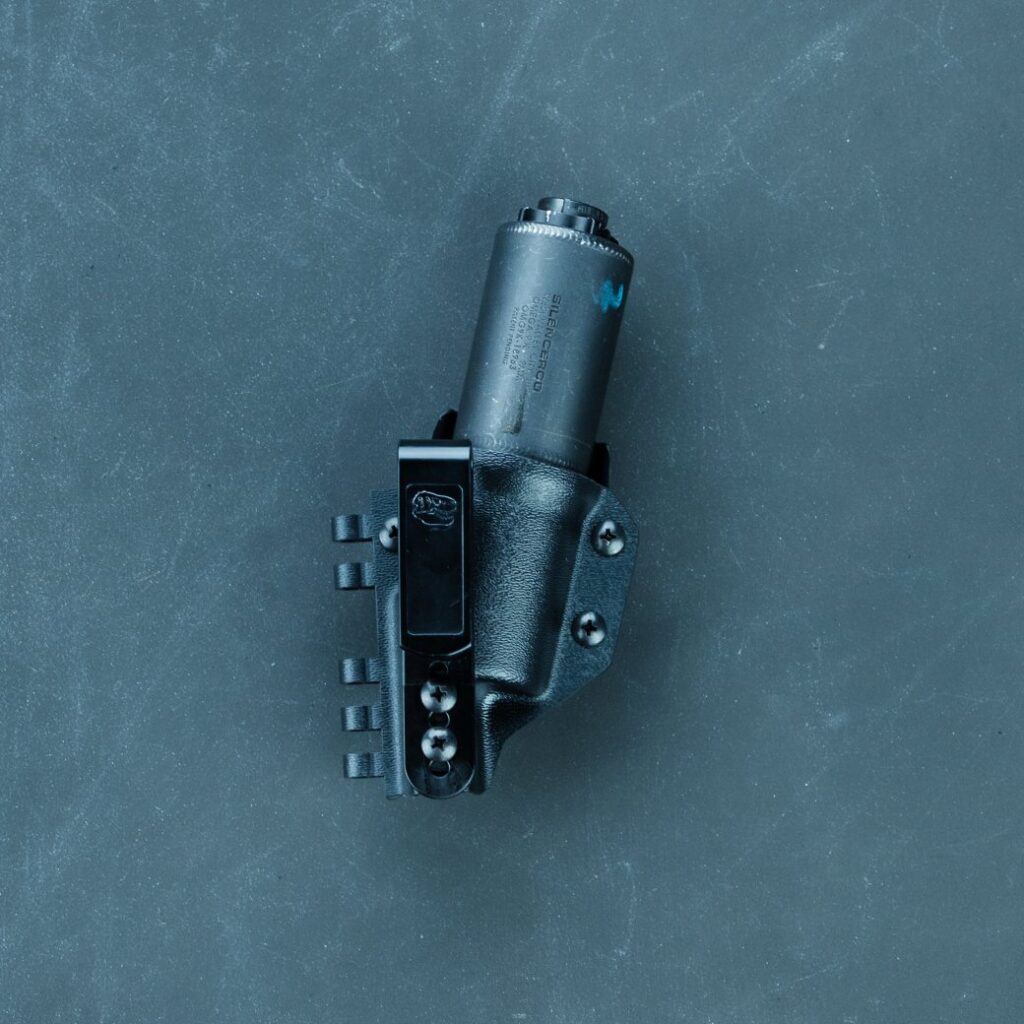
T.REX Sidecar SD Attachment
Most April Fools Jokes are just jokes. There is no intention to ever release them. However, I’m pretty sure T.REX Arms not only released the Sidecar SD Attachment as a joke but is willing to sell it. The Sidecar SD attachment mounts to your T.REX Arms holster and allows you to carry a suppressor covertly. Is it necessary? No, but do I want it? Yeah, kind of.
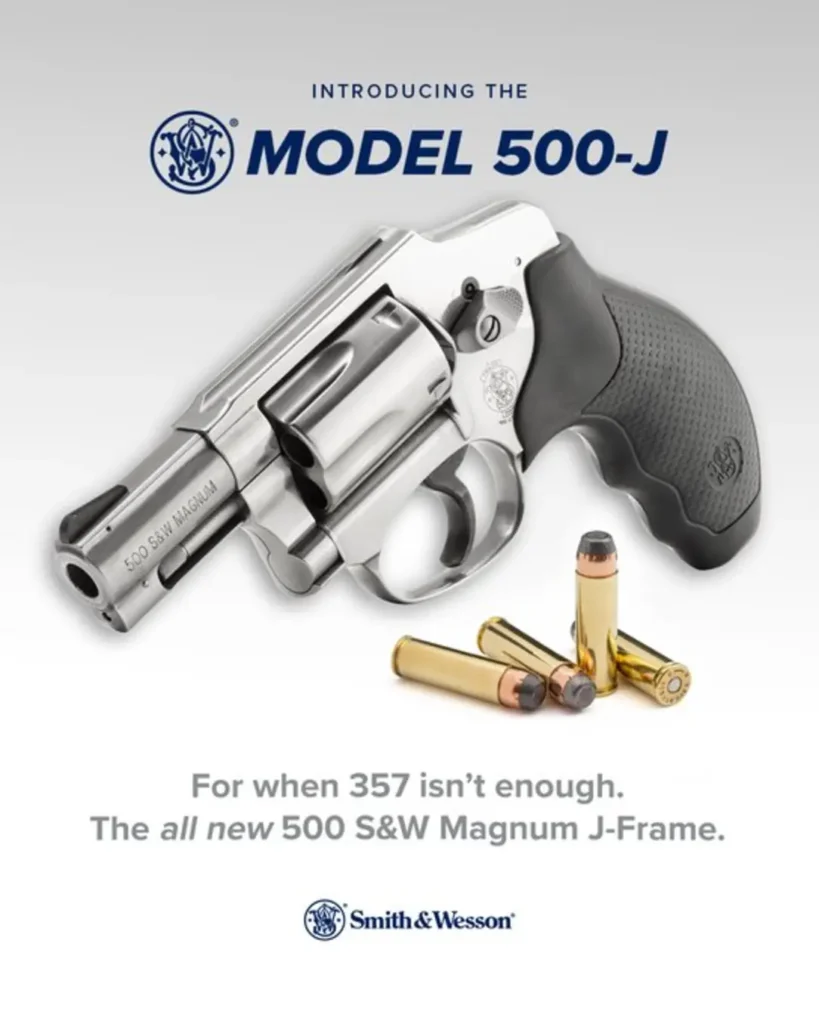
S&W Model 500-J
Is the .357 Magnum not enough for you? Is the .44 Magnum a sissy option for concealed carry? Clearly, you need a S&W 500 Magnum, but concealing one of them is a pain…until now! S&W announced the four-shot 500-J. That’s right, a J-Frame S&W 500 Magnum. It will surely pop your wrist into a couple of pieces, but man, you got that real stopping power!
VZ Grips Brings Us Optics-Ready Daggers
VZ grips make grips for guns, but they also dove into the dagger game. This April Fools, they are bringing us the world’s first optics-ready dagger. These daggers are available exclusively at VZGrips.com and allow you to easily mount the red dot of your choice to better aim your tactical dagger in the direction of your enemy.
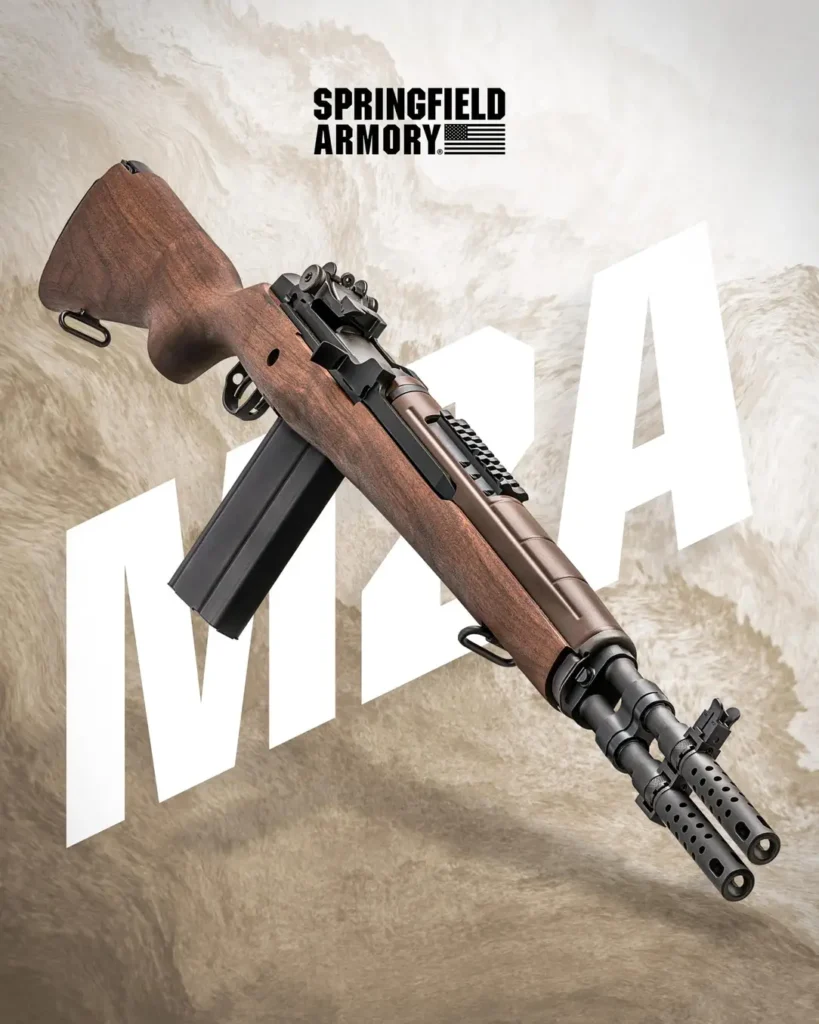
Springfield Armory M2A
Springfield Armory has kept the boomer generation supplied with their precious M1A rifles but has now announced the revolutionary M2A. The M2A is kind of like Spinal Tap’s 11. It just goes one more than normal. With the M2A, this means it was two barrels that feed from one 40-round magazine. The M2A promises to give you two rounds of .308 per trigger pull to make double taps a single trigger pull. Recoil be darned!
Beretta Goes Retro
The most believable April Fools joke has to be Beretta announcing their latest accessory, the Beretta Retro Fanny Pack. This denim fanny pack offers you the latest and greatest way to carry a gun from 1982. This stylish accessory makes carrying your favorite Beretta a breeze. It’s perfect for being low-key casual and fancy. I would definitely buy one of these to pack my Tomcat in.
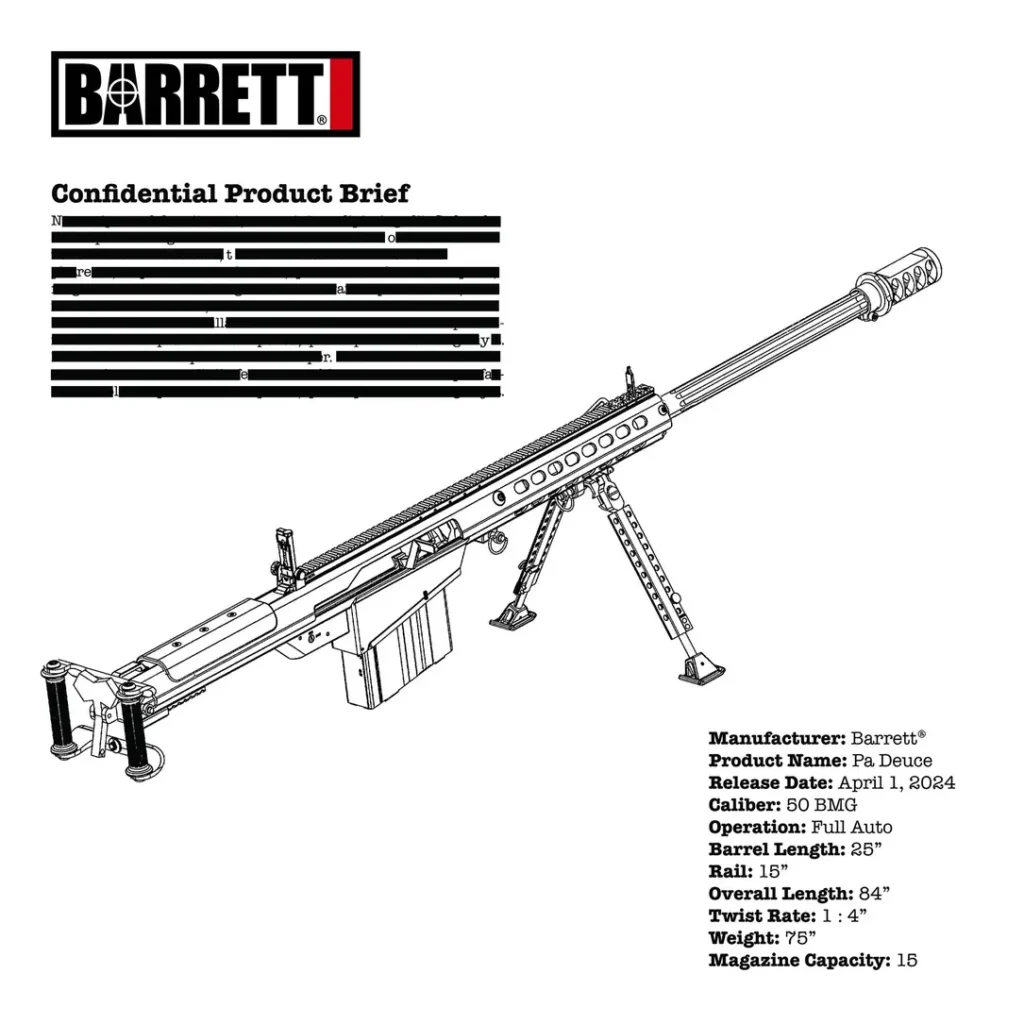
Barrett Brings Us Pa Deuce
The famed Ma Deuce, or M2 Machine gun, has served its country since the 1920s. Finally, Barrett has introduced us to Pa Deuce. Pa Deuce is a Barrett rifle fit with a set of spade grips. According to the one-pager we saw released by Barrett on April Fools Day, the gun is fully automatic and has a capacity of 15 rounds. Well, sign me up!
The April Fools Industry
I love April Fools and the gun industry. Ultimately, it’s a day everyone can enjoy. We get a laugh, and the companies get tons of social media engagement. It’s a real win-win. With that said, Magpul, c’mon, make the waffle maker!
Many times, you’ll hear someone say, “You don’t need a $X thing. You need a $X-Y thing and $Y in training and ammo.”
This is usually used to justify buying their 3rd meme-tier pistol or rifle so that they can dress it up for Tha ‘Gram!
However, there are absolutely instances where people are, in fact, paying more than they have to, and there are alternatives that are truly “just as good.”
A lot of dudes I encounter roll their eyes at the idea of dressing well (which isn’t the same as dressing up, but that’s going to be another video). But regardless of whether we’re talking jeans and a T-shirt or a three-piece suit, what if there was a way to spend less money on the same products? Not “just as good” products, the SAME products.
With just a little time and research, you can either get MUCH higher quality for the same dollar or just spend less for the same product. Consignment shops are your friends! And even if there isn’t one around you, there are plenty of second-hand options online.
EBay and Poshmark are pretty ubiquitous. And all it takes is a little education to know what to look for.
“Spend that money on ammo & training” has been a meme on the gunternet for a while, but why not actually take advantage of that opportunity if you’re not sacrificing anything to do so?
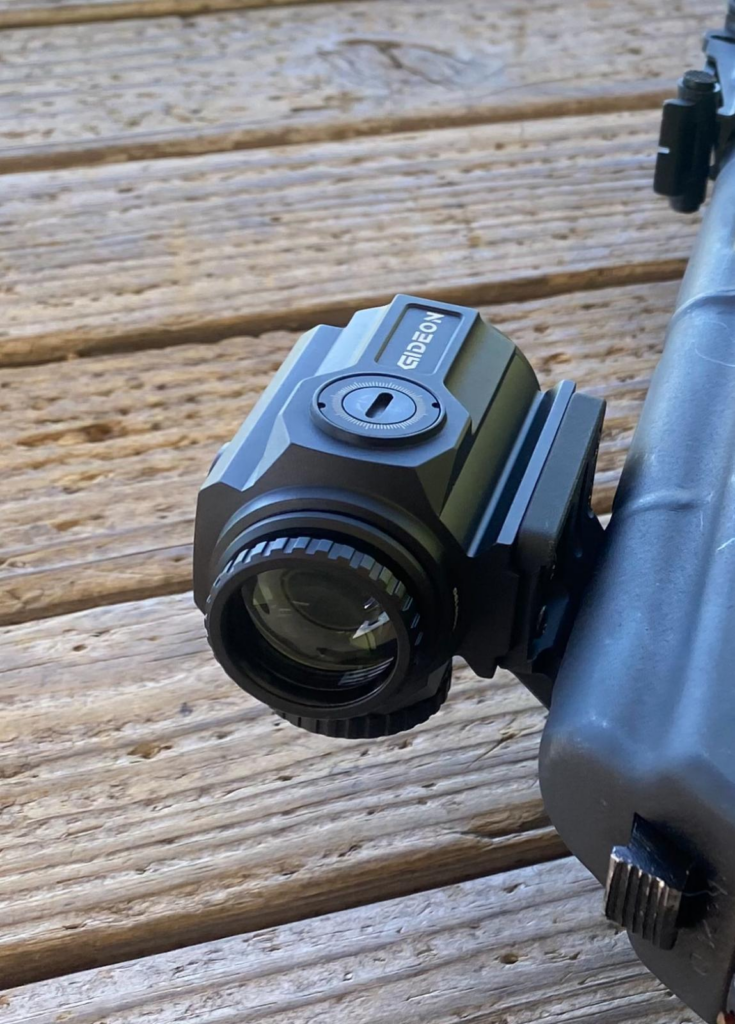
I recently dipped my toe into the world of prismatic sights with Gideon Optic’s new Advocate. I included the Advocate in my review of a Romanian-made WASR-10 7.62x39mm AK with the help of an RS Regulate mount. This was my first time spending any amount of actual trigger time with any prismatic sight, so my inner optics-nerd was very excited.
Prismatic Optic Background Info
Fundamentally, prismatic optics work exactly like traditional riflescopes: they capture and handle light in order to magnify an image to the shooter’s eye. Riflescopes accomplish this by passing light through stacks of lenses whereas prismatic optics use a series of strategically placed glass prisms to do the same. The different arrangement of prisms in these types of optics allows them to be more compact as well; both their magnifications and prisms are fixed in place, and their placement is proportional to magnification.
A different angle of the Gideon Advocate prismatic sight while mounted on the AK. Note the textured diopter that adjusts focus.
Non-magnified prismatic sights, especially compact units, seem to be increasing in popularity as alternatives to the traditional reflex (red-dot) sight. All red-dot sights work by emitting a small beam of LED light that is caught and reflected off a coated lens back to the shooter’s eye while allowing all other light to pass through. Reflex sights are simple and effective; but one of their drawbacks for many is that dots appear starburst or blurry for those with astigmatisms. Because prismatic optics employ etched reticles the way traditional riflescopes and LPVOs do, the blurry-starburst effect is non-existent. There’s no emitted beam to reflect.
The etched reticles are always visible, whether the illumination is on or off like with any other scope. In the case of a 1x optic like the Gideon Advocate, it helps to think of it as a “zoomless” mini-scope that takes the place of a red-dot. Like any other scope, the Advocate still has objective and ocular lenses and utilizes a diopter to adjust the prescription (focus). This also means that there’s an eyebox involved when looking through the optic, unlike with red-dot sights.
Gideon Advocate Overview
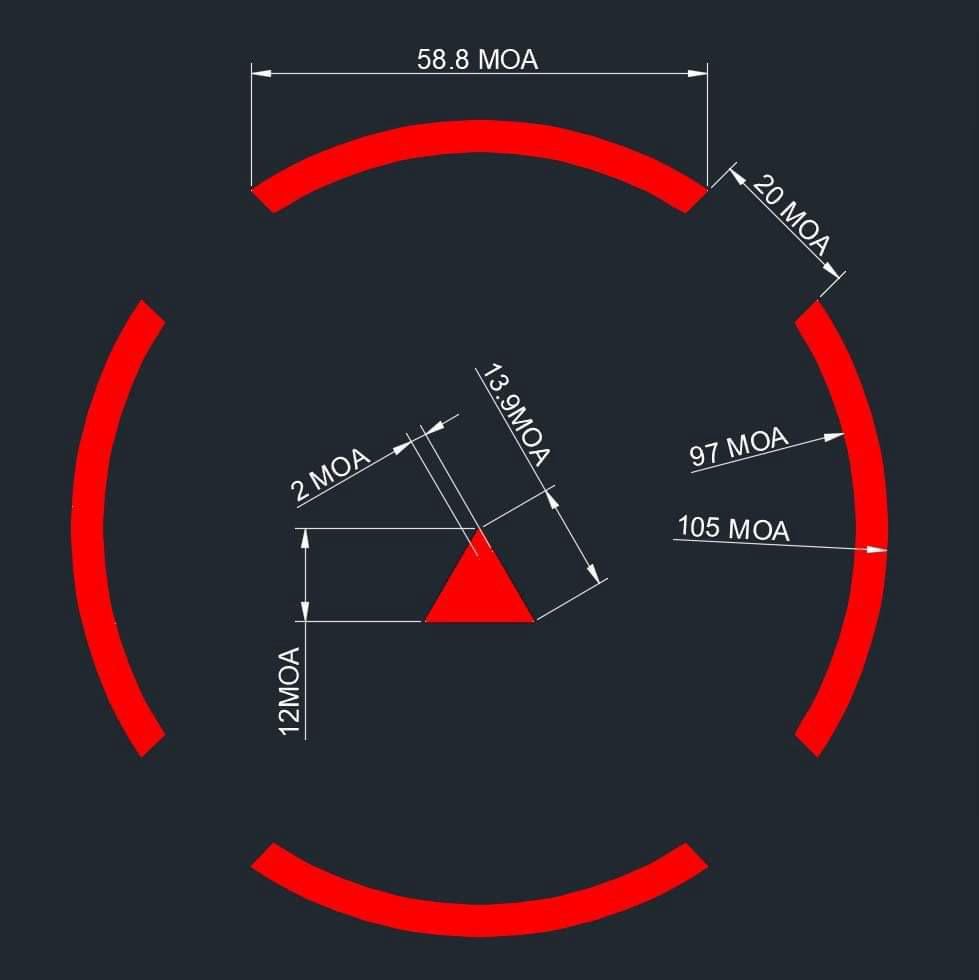
This diagram doesn’t list the width of the triangle’s base, but I used the Pythagorean Theorem to roughly determine it is approximately 14 MOA in width. One can also observed that approximately each sixth of the triangle’s height corresponds to 2 MOA.
The Gideon Advocate is a fairly compact 1 x 20mm “micro” prismatic sight built with roof prisms. Its external housing is made from 6061 aluminum and has an IPX7 waterproof rating. The etched and illuminated reticle consists of a simple upright triangle that’s 12 MOA tall and approximately 14 MOA wide that sits inside a segmented circle. Similarly, its click values are straight forward, with each click moving either windage or elevation 1 MOA at 100 yards. The Advocate uses the standard Aimpoint T1 mounting footprint, so finding mounts and adapters isn’t difficult.
The Gideon Advocate’s illumination array is fueled by a single CR 2032 battery and offers eight different daytime illumination settings with two that work under night vision. The system is motion activated (shake-awake) and shuts down after four minutes of inactivity. The unit has an adjustable eyepiece in order to set the correct focus. Eye relief is approximately 3.5 inches and I found the Advocate’s eyebox to be fairly reasonable. Field of view is listed on Gideon’s website as 79 feet at one hundred yards.
While shooting it, I didn’t think about the specific FOV but it felt like most any other 1x optic in this regard. Parallax is minimal to the point where it’s not relevant, and whatever amount of distortion present is another non-issue given this optic’s use case. Gideon Optics also includes by default a Picatinny compatible rail mount as convenience, and this is something else that’s hard to complain about for its cost.
The Gideon Advocate On the Range
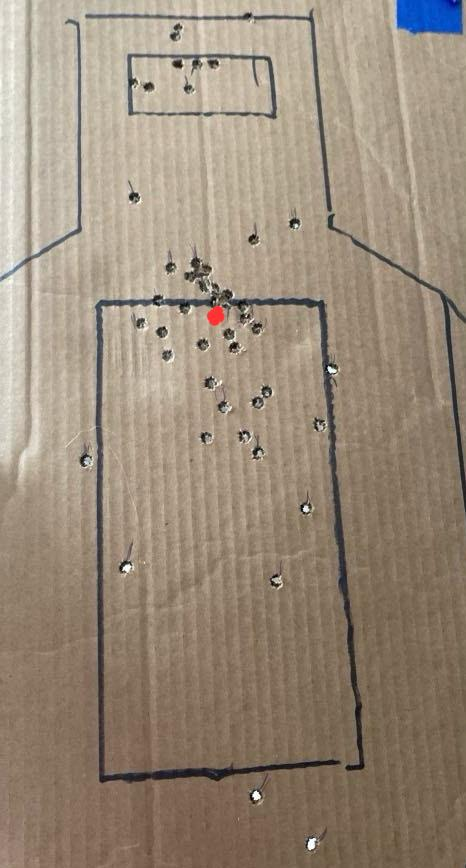
So far, my only experience with the Gideon Advocate has been in the review of the Century Arms WASR-10 AK which consisted of 220 rounds with shots fired at distances of 15, 25, 50 and 100 yards at various targets like IPSC paper targets and NRA B-8s. Regrettably, I didn’t have access to steel targets at further intermediate distances like 200-300 yards. I’d still love for a chance to try shooting the Gideon Advocate that way.
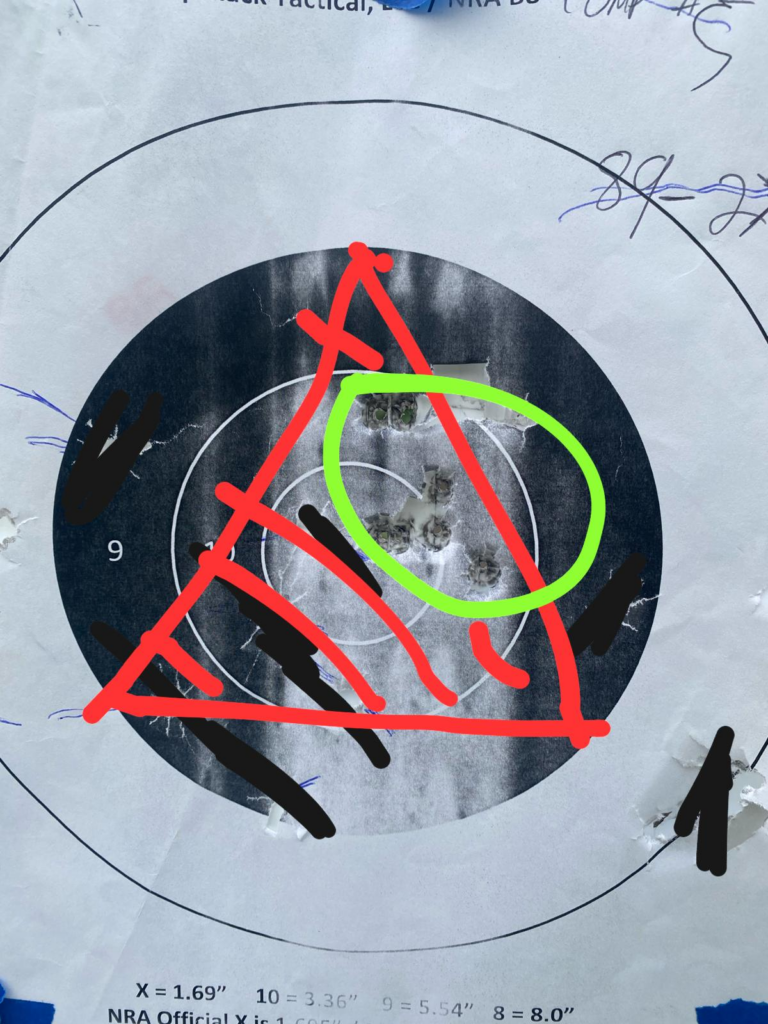
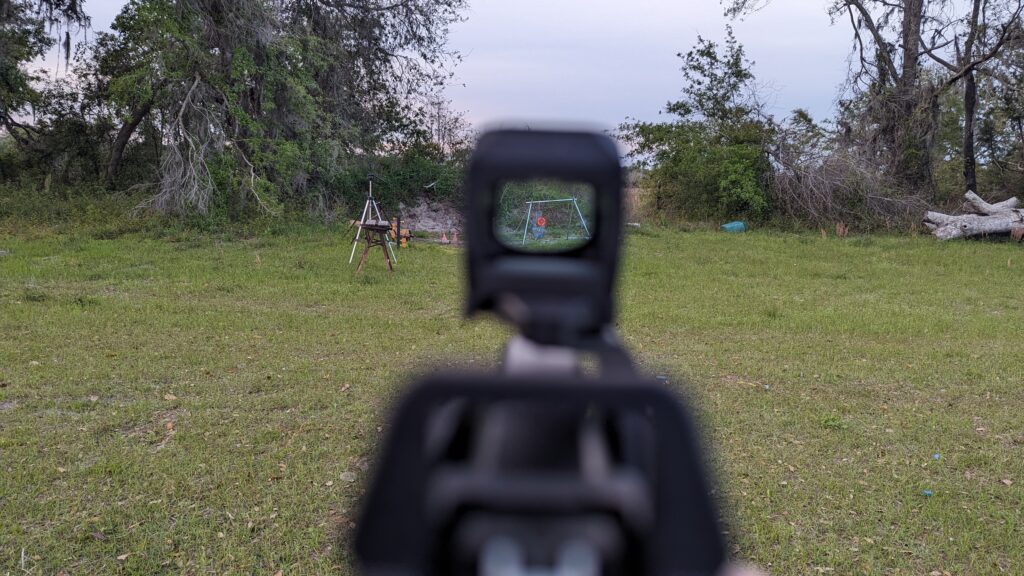
The Advocate’s 12 MOA tall triangular reticle favors CQB distances. For example, at 25 yards, when aiming at an NRA B-8 target, all three corners of the triangle will touch the edges of the 5.5 inch B-8’ black scoring area. Keep in mind that this bullseye at 100 yards would measure 5.5 MOA. Again, the reticle is “coarse” for fast shots. On Gideon’s official IG account, one will find the Advocate mounted on a Beretta 1301 shotgun, which makes a lot of sense for a 12-gauge weapon. Similarly, this optic would be right at home on a subgun, PPC or any other firearm set up for quick, close range shots.
A 25-yard NRA B-8 with a mock up of what the sight picture looked like at that distance with a hasty 8-9 round group of 7.62 steel-case AK ammo. Windage was slightly off to the right, but with this same exact elevation, POI was 15-yards (see photo on right) on the tip and just a few inches below “inside” the triangle at 25-yards. An A/C zone target set at 15-yards for rapid fire with the AK. Point of aim is roughly where the red circle is using the tip of the triangle.
On A Kalashnikov
In the case of my Kalashnikov review, I zeroed the optic at 100 yards with the upper tip of the triangle. This adjustment resulted in having impacts dead-on at 15-yards with the same upper tip of the reticle. At 25-yards with the sight picture I just described (the reticle being imposed over the entire black portion of the B-8) all shots were landing comfortably inside the center of the B-8. At both 50 and 100 yards, this same zero gave me impacts just underneath the upper tip (with a little variation).
Distance Challenges
At 100 yards, it’s still easy to aim and strike any “full-size” target. However, due to the inherent design of the reticle, precision takes a backseat. Even shooting from a bench/rested position, I struggled to consistently hit B-8 targets or even the 8.5×11″ sheet of paper they’re printed on. Groups looked more like patterns, with too much lateral deviation–more than is reasonable even for an AK shooting 7.62×39 ammo. This wasn’t an AK problem as much as it was an aiming reference issue. Without magnification, it’s simply challenging to precisely align the top of the triangular tip with respect to both windage and elevation. Furthermore not having any other reference to help align, center or bracket the reticle also makes it challenging because its easy to swing too wide on both the X & Y axes.
Without the magnification, it’s like shooting at a target with a front sight or bead only. It wouldn’t matter at close distance but at further distance the lack of a rear sight as a reference becomes a hindrance. Keep in mind that this specific critique only concerns shooting smaller targets, say 6″ or less at distance. There is no doubt the optic will still help a shooter get hits on A/C-zone sized (or bigger) targets–but the challenging in precision is something to be aware of. This isn’t to say it can’t be done, but it will take more work.
Further Thoughts
For its price, the quality of the construction and glass found in the unit is hard to complain about. I can’t honestly speak as to what extent the Gideon Advocate will hold up long-term because I haven’t had a chance to run it hard for a longer amount of time. With its current price, it’s quite competitive in its optics peer-group. When zeroing this optic, I was pleasantly surprised to see that the clicks were sharper and crisper than I expected.
I had an issue seeing double in a way that doesn’t happen with LPVOs or riflescopes, so I shot the Gideon Advocate with one eye closed 99% of the time. I’m unsure whether this double-vision is my own issue or something inherent to prismatic sights (which I’m new to). I yet can’t say, but in the meantime I’ve been shooting with one eye closed. Twisting the diopter did nothing to solve the issue, and the further the target, the further the images on my double vision sit apart.
CQB-wise the Advocate’s reticle works just fine, but I’m still on the fence on about that 12×14 MOA triangle due to how coarse it can be at distance, especially for firearms chambered in intermediate or larger cartridges.
As an upstart optics company, Gideon Optics has really been getting in gear with their product launches over the past few months. They started out with pistol dots only and are now selling LPVOs and prismatic sights. For a smaller upstart in the affordable optics tier, the company is starting to get really aggressive in their offerings. With regards to a non-magnified prismatic sight, the new Gideon Advocate represents another affordable option.
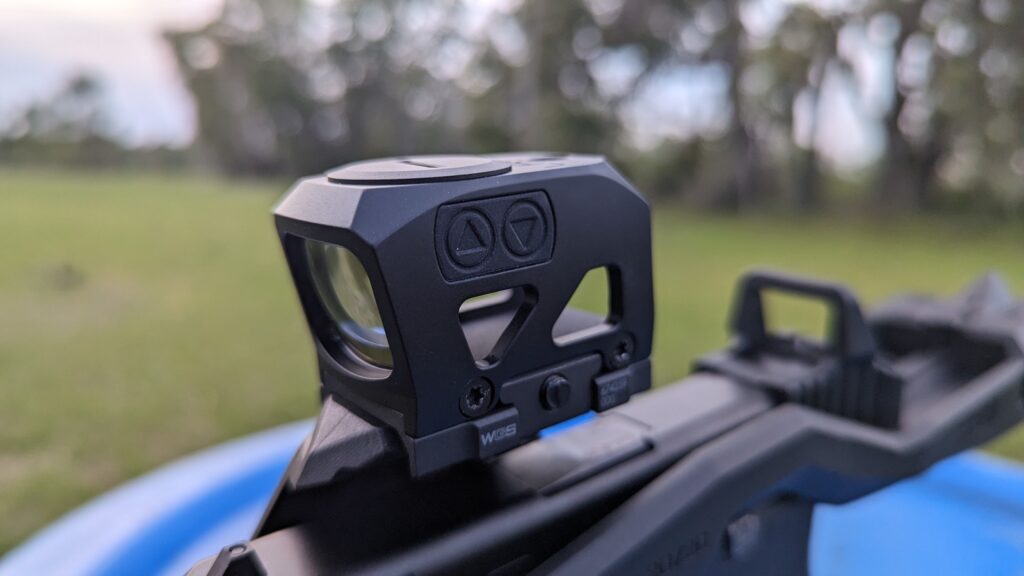
Williams Gun Sight might not be a familiar name to the non-hunters in the audience, but it made its name with high-visibility and easy-to-see iron sights. The company is very well known in that field and was revolutionary with its original Firesights, which are still popular. They aren’t an optics company. I’m sorry, they weren’t an optics company. They are now. The Williams Gun Sight LRS is the company’s latest and greatest gun sight and first red dot optic.
LRS stands for Low Reflex Sight. At first glance, you might think it’s an enclosed optic, but you’d be wrong. You might also assume it’s a pistol optic, but you’d be wrong again. Well, you’d be mostly wrong. The LRS is not an enclosed red dot, but there is a cage around it. The reason for the cage comes from the low profile design. The LRS is basically a mini red dot flipped upside down. The roof of the optic contains the emitter.
How Low Can You Go?
How low does Low mean with this sight? It’s easily the lowest red dot sight on the market. The key to the whole design is the upside-down design and unique attachment method. Instead of using an established normal rail mounting system, the legs of the optic’s body mount directly to your Picatinny rail adapter or specific shotgun adapter.
There is no optic body, so it sits about 30% lower than the standard red dot. I mentioned shotgun mounts, and it’s worth mentioning that the LRS was made with the intention of utilizing standard shotgun stocks and Monte Carlo-style stocks that position the head lower than normal. The LRS isn’t designed or tested for reciprocating slides. The design is unique, and it doesn’t seem possible to attach it to a reciprocating slide anyway.
The LRS will work on pistols like the Buckmark or Ruger MK series. They’ll also work on my Glock 43X turned PDW. This setup uses the Recover Tactical 20/20 as its base. The RT 20/20 has a separate optics mount, but in the interest of keeping the kit as compact as possible, I want an optic that sits as low as possible. The LRS had fortuitous timing to land when my PDW experiment started. Fortuitous for me anyway.
Blasting Away With the LRS
With the optic mounted and sitting low on the gun, I began the zeroing process. In those first shots fired, I noticed that the optic had a very light notch filter. There is a slight blue tint, but not terribly so. The reticle is a non-traditional but ultimately very nice circle and dot design. It’s a segmented circle that’s cut in half, and there is a small dot in the center. The dot has a 32 MOA design, and in the center sits a 3 MOA dot.
It’s big, easy to see, and can get crazy bright. In fact, it gets impressively bright for an optic that falls into the budget price point. There are six total settings for brightness, and it provides enough range of brightness to be easy to see in any lighting condition I’ve encountered. The optic has an auto shut-off after six hours of use, but the optic doesn’t have a shake-awake design, which is its real Achilles heel. This makes it tough to use for home defense because you might have to manually turn the optic on when the gun is needed.
Zeroing was quick and easy, and once the LRS was zeroed, I was ready to rock and roll. I began blasting away at fifty and twenty-five yards and moved back to fifty. I had no trouble staying on my target at fifty yards. The bigger pain was issues with the RT 20/20, but that’s a different story for a different day.
Staying Low With the LRS
For close-range snapshots, the 32 MOA circle worked quite nicely. At the beep, all I needed to do was get the big circle on target and pull the trigger. If it’s a man-sized target, all you need is a good portion of the target in the circle, and you’ll land hits. The LRS held a steady zero and made it easy to produce good tight groups. The big reticle will obscure small targets at longer range, but this is most certainly a close quarter’s optic, so there isn’t a big concern to me.
Williams Gun Sight sent a Mossberg shotgun mount, which was super easy to attach to my Mossberg 590 in 20 gauge. The mount keeps the LRS even lower than the Picatinny rail adapter. A low mount on a shotgun means a low cheek weld, which is a more comfortable sight picture. The 32 MOA reticle is also perfectly suited for buckshot and provides a reticle I can pattern my ammo into.
A Niche Option
The Williams Gun Sight LRS would be mounted too low for most other weapons. It’s not going to be the best option for many firearms. It’s too low on guns like the Scorpion and most certainly too low for an AR-type rifle. The LRS is most certainly a niche optic, but I appreciate the original design and the ease of use. It might not be for everyone, but it’s well-suited for shotguns and apparently even PDWs. Check it out here.
Whenever we discuss the importance of dry fire, we rarely talk about how to get out there and dry fire. It’s easy to see: hey, dry fire is good, go do it. However, that isn’t always productive for new shooters. Pointing at a light switch and dry firing gets boring real quick. Experienced shooters know what to practice, but newbies might feel lost. You don’t know what you don’t know. With that in mind, I put together a quick and easy dry-fire workout you can do in around ten minutes or so.
I designed this to be a bit like a workout. There are exercises and reps. You’ll practice a variety of exercises. If you get to a portion you don’t know how to do properly, well, great, now you have an opportunity to learn. Let’s use reloading as an example. You might say, I don’t know how to reload properly. Take this opportunity to use the internet machine in the palm of your hand to research how to reload, specifically how to reload a handgun. Now, take what you learn and apply it to dry fire. With that in mind, here is your simple dry-fire workout.
Your Daily 10 Dry Fire Workout
The Marine Corps used to have a thing called the Daily 16. It was an old-school calisthenics program that Marines could conduct nearly anywhere. The Daily 10 is my version of that. A dry fire program you can do anywhere. You’ll need your gun, two magazines, a holster, and something to create a malfunction. This can be a snap cap, an old piece of brass, or anything similar. As always, ensure your gun is unloaded, ensure your magazines are unloaded, store ammunition in a different room, and recheck your gun if you happen to set it down during practice.
Round 1 – Ten Presses Slow Fire
Our first round of the dry fire workout will be ten basic trigger presses. Establish a good two-handed grip and stance, and extend into a firing position. Find a small target, like a light switch, and work on your basic dry fire presses. Your goal is to press the trigger until the weapon dry fires without the sights moving off the target. Practice this ten times; focus on a good, consistent grip to ensure your sight does not move through your trigger press.
Round 2 – Ten Presses Dominant Hand Only
Switch to a one-handed grip with your dominant hand. Your support hand can hang low, grip your chest, go in your pocket, or do whatever else. Aiming at a small target once more, pull the trigger and maintain a consistent grip. The entire goal is to maintain a perfect sight picture throughout the entirety of the press. Repeat this round ten times.
Round 3 – Ten Presses Support Hand Only
Move the gun from your dominant hand to your support hand. Tuck away the dominant hand and work only with the support hand. Work on that perfect press without disturbing your sight picture. It’s awfully tricky with the support hand, so feel free to take breaks during your dry-fire workout.
Round 4 – Draw and Press
Don your holster and place your firearm in the holster. You should practice exactly how you carry. This means concealment, if applicable, with the holster you EDC and the position you carry in. Practice drawing your handgun and committing one press per draw. When drawing, work to establish a good grip and utilize efficient movements. Do not put your finger on the trigger until the gun is pointing at the target. Speed is important, but getting a good basic first is critical. Practice this ten times and take a break.
Round 5 – Dominant Hand Draw and Fire
Just like before, you’ll be drawing carefully, safely, and efficiently. This time, you will not utilize your support hand. You’ll draw and fire with your dominant hand only. Ensure that the shot is aimed carefully, and even with the draw, you are not interrupting your sight picture.
Round 6 – Reloads
You’ll need a spare magazine, empty, of course. A snap cap or TRT device can be used to ensure the slide doesn’t lock open. Place your spare magazine in a magazine pouch. If you do not have a magazine pouch, I’d invest in one. If you still don’t have one, you can set the magazine on a table, although it’s not the most realistic reload. Pull your slide to the rear and lock the slide. Aim and simulate firing a shot and your gun going empty.
Now conduct a reload. Ensure you ‘release’ the slide. If doing a sling shot release on an empty magazine, then the slide will not move, but ensure the practice of tugging on the slide is sufficient. Practice this part of the dry fire workout ten times.
Round 7 – Malfunction Drills
Setup your handgun with a malfunction. There are two types of malfunctions. The first is a simple malfunction, and it occurs when the gun goes click instead of bang. When this occurs, there is a need to slap the bottom of the magazine, rack the slide, and then attempt to fire again. You can simulate this without a snap cap or piece of brass.
The second malfunction is the complicated malfunction. It requires a piece of brass or an accessory of some kind. Pin the accessory between the slide and barrel. This represents a complicated malfunction. To remedy this you remove the magazine, retract the slide and clear the malfunction. Now reinsert the magazine, rerack the slide, and attmept to fire. Repeat either malfucntion drill ten times, or each five times.
Round 8 – Dry Fire With a Handheld Light
There are several handheld light techniques you can use with your firearm. Utilize your chosen method of handling the gun and light at the same time. Now practice getting a good trigger press in with disrupting the sight picture. Bonus points if you practice in the dark with the lights on.
Round 9 – Dry Fire Around Cover – Dominant Side
You will need a wall, couch, or anything else you can pretend is cover that allows you to lean around on your dominant side. Assume a good firing position and practice leaning out from cover, acquiring your small target, and pressing the trigger. After one press, go back behind cover and reset. Practice this ten times total.
Round 10 – Dry Fire Around Cover – Support Side
For the last session of our dry fire workout, we’ll need another wall, couch, or whatever to act as cover. This time, you’ll need to be able to lean out from the weak side. Just like before, we want to assume a good firing position, then lean out the weak side of cover and engage the target with a well-aimed shot. Between dry fire presses, tuck behind cover and practice rolling out for ten trigger presses.
The Dry Fire Workout Is Over
Drink some water, reload, call it a day. If you practice this simple workout daily, you’ll see some serious gains in your pistol handling. Eventually, you can add speed and a timer, which will increase your training potential even more. This is aimed at beginners, and if you’re a beginner it’s great way to get those dry fire reps in.
People have been carrying guns in their pockets for as long as there have been pockets.
In the early 20th Century, the iconic Fitz Special was purpose-built to be a pocket gun.
These days, many people still look to revolvers for their pocket carry considerations.
The challenge is that many modern-day pants pockets aren’t quite as suited to accommodating a firearm as they were in the past. I tried making the J-frame work as a “pocket gun,” but in anything other than baggy, oversized pants, it just looked too obvious for me.
Going back and looking over the history of pocket guns (mostly Forgotten Weapons videos and podcasts featuring Darryl Bolke), most of the trends I saw with pocket guns were that they were being carried in jackets, as opposed to pants. Outerwear is a lot more forgiving since it’s generally not as fitted, and made of heavier materials.
When I opt for pocket carry, it’s generally because I need something lower profile. Because of that, I’ve found that flatter guns (LCP size/profile) tend to work better in those applications.
I spent too long trying to cram a round peg into a flat hole before I stepped back and evaluated things.
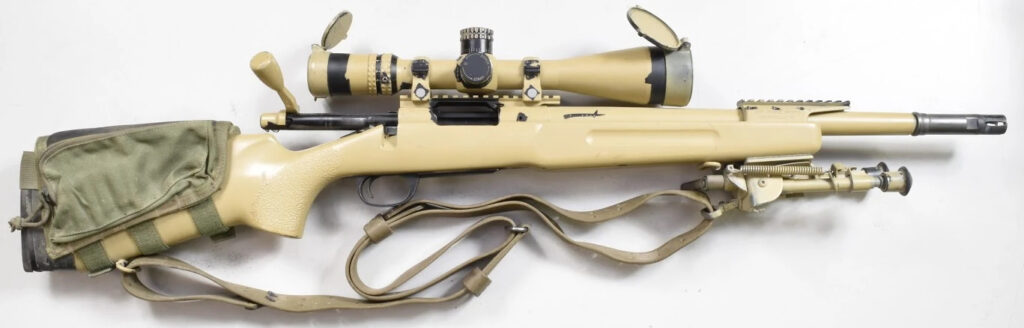
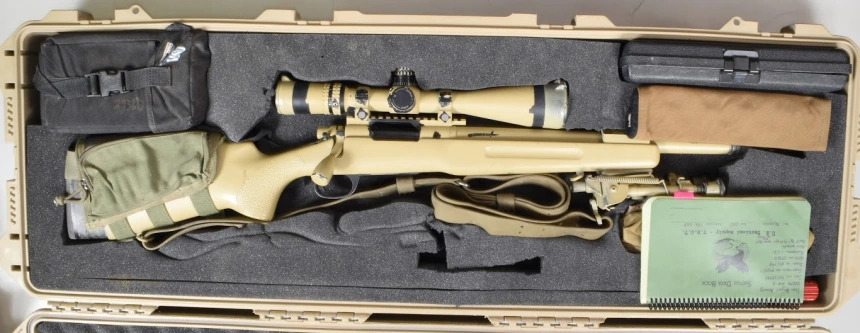
One common theme of militaries going to war is that they are never really prepared for it. The United States and the Global War On Terror were no different. Read Generation Kill to see that even elite units weren’t ready for the invasion of Iraq. Marine snipers deployed to Afghanistan and Iraq started to see the shortcomings of their beloved M40 rifles. This led to a fairly interesting partnership with DARPA and resulted in the XM3 sniper rifle series.
(Gun Wiki)
Marine Snipers are not a special operations force and are attached to traditional conventional units. Obtaining new weapons is a very long process, and Marine snipers needed new rifles yesterday. A group of officers and staff noncommissioned officers teamed up with DARPA to examine the shortcomings of the M40 series and produce improvements. The end result became known as the short-lived XM3 sniper rifle.
Shortcomings of the M40
While the M40 is a great rifle, the GWOT was a new war. The urban, desert, and mountainous terrain of Iraq and Afghanistan showed some real weaknesses of the M40 platform. The gun was too long with its 25-inch long barrel. Attaching suppressors wasn’t possible, and night vision optics meant removing and reszeroing the daytime optic. The rifle is big and heavy, which made it tough to use in these more dynamic environments, especially in counter-sniper efforts.
The Problem Solving XM3
DARPA, the Marine Corps, and custom rifle company Iron Briagde Armory teamed up to create a bolt-action sniper rifle that solved these issues. The rifle system used the M40 series as its core rifle but would make extensive modifications to the design.
The XM3 trimmed the barrel to 18.5-inches overall, which is a major trim job to the long M40 barrel. Predictably, the barrel was threaded and fit with a mount to accommodate a Surefire suppressor. A forward rail mount allowed the use of clip-on night vision optics so the daytime scope never had to be removed.
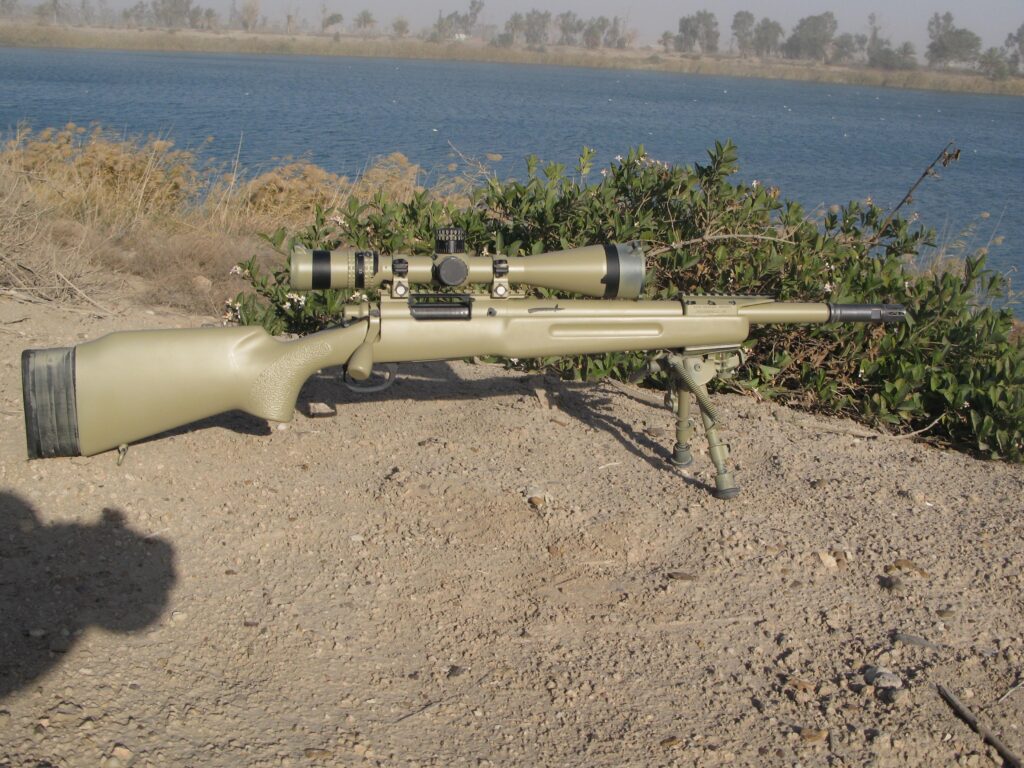
Darpa’s XM3 (Source Unknown Marine Afghanistan)
The receiver’s rail was now made from titanium and chip-slotted. The rifles used custom McMillan A1 stocks. Although two were built with takedown stock designs. The chambers were recut to accept M118LR ammo. The receiver’s internal threads were opened up to 1.07 inches to allow for a perfect alignment of the bolt face and bore dimension.
The team took stainless stell box magazines and hand fit and welded them to prevent any movement of the magazine. The team used a titanium Devcon and Marine Tex to bed the barreled actions. This increased the lifespan of the gun and maintained the correct torque.
The rifles were issued with Surefire suppressors, a Nightforce NXS 3.5-15×50 scope, a FLIN AN/PVS-22 UNS night vision unit, a Harris bipod, an Eagle cheek rest, a Turner Saddlery sling, and a variety of maintenance tools.
The XM3 In Service
Fifty-two rifles were produced for the Marine Corps and sent to the world of Marine Snipers. The rifles made their way to the badlands of Iraq and Afghanistan. Almost immediately, they were hit with Marine Snipers. They were shorter and lighter, much easier to insert.
The rifles proved to be accurate and capable. The ability to use suppressors and night vision helped the snipers be more effective killers. The rifle received high marks from the Snipers Using the rifle, as well as sniper instructors and Marien Rifle Team members. They were well known for their accuracy, but the significantly shorter barrel didn’t seem to make much of a difference in accuracy or ballistics.
(Sniper’s Hide)
There are a lot of dead bad guys due to the XM3 rifle. That might leave you wondering why we don’t hear much about the platform today. It did serve well but was never an official program. There was never any training or proper guidelines issued for maintaining the rifles. When they eventually broke, they were sidelined, and Marine Armroers were not allowed to fix them.
The optic also used MOA instead of MIL adjustments. The Marine Corps had moved to MILs years back, and the younger snipers weren’t trained in MOA. The scope also used an SFP reticle, so the elevation and windage measurements only worked at maximum magnification. These rifles were theater assets, which meant that they were passed from unit to unit overseas, so an incoming sniper was being issued a completely new weapon system without prior training.
What Happened to the XM3
The rifles were great, so why weren’t they refined and made an official M40 designation? Price was likely one factor. They were expensive rifles. We also entered an era where guns like the M110 were coming into play. Those rifles were already set up with suppressors and ready for night vision; plus, they were lighter and offered a semi-auto design.
(BG Defense)
Features from the XM3 made their way to the M40A5, which included a suppressor-ready option and the ability to add a clip-on optic. The Xm3 walked so later sniper rifles could run. If you read this article, it might seem like most of the XM3 features are now common with snipers. The gun provided a working blueprint of how those features could work. It’s a small but important step to sniper modernization.
The XM3 rifles were eventually given to the Army, who gave them to the CMP, who later made a killing by auctioning the rifles to the market. If you ever see one, be prepared to spend machine gun money on it.
I’ve been running the Striker Control Device from Tau Development Group for the last few years.
I think that if you’re carrying a Glock pistol it’s an invaluable addition, especially if you’re carrying appendix.
The idea behind “The Gadget,” as it’s known, is that a shooter can now “thumb the hammer” during re-holster, as they would with a traditional double action gun.
After playing around with it, I discovered that, for me at least, there was one very specific consideration that I had to factor into my re-holstering procedure.
The pad of my thumb didn’t provide sufficient resistance against the backplate of the Gadget and the pistol could still discharge with sufficient pressure on the trigger.
So, when putting the gun away, I make sure I’m pressing with the TIP of my thumb, with the fingernail perpendicular to the backplate instead of parallel.
If you don’t have one already, you really should.
If you do, I encourage you to play around with it and see if this is something you want to work into your process.
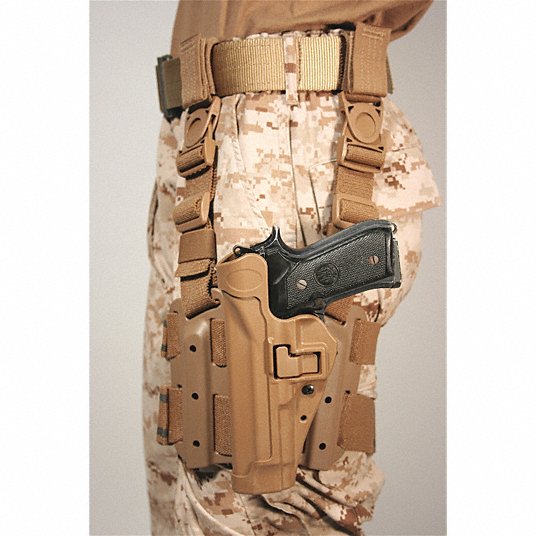
Sometimes, I get the idea that some things are universally known throughout the gun world. Then, I get exposed to the internet again. Typically, it’s low-information groups where training isn’t heard of, but sometimes you’ll be surprised by what you consider a high-information group. Recently, the discussion of SERPA holsters came up.
In my opinion, it’s well known that the SERPA series with active retention finger release devices had serious flaws in their design. This isn’t a chance to beat up Blackhawk—I do like the T-Series holsters and even the Omnivore. However, the SERPA series are simply not good holsters and certainly not acceptable for duty use.
This whole article is inspired by a few conversations on a social media post portraying the SERPA series. There were more than a few people either defending the SERPA or asking what’s the problem with the SERPA. Some of the statements in its defense included the classic “The SERPA is fine; it’s only considered bad because all the cool kids say it’s bad.”
It’s as if the world forgot about the flaws of the SERPA as the GWOT ended. Let’s take a moment to review why the SERPA series has fallen out of favor.
My Credentials and the SERPA Series
I try to stay in my lane as much as possible and listen to those more experienced than myself. There are very few topics in which I consider myself an expert, but I feel like an expert in SERPA. I even used to call myself a fan of the SERPA before I knew anything about holsters. I defended the holster when I thought I knew everything about guns and there was nothing left for me to learn.
Call it the follies of youth. My expertise on the SERPA series comes from around five years of using the SERPA. Well, less than five when you take away boot camp, SOI, and my first fleet position. I still have years of experience with the rig. I normalized and accepted its flaws, and due to the gun issue, I rarely ran into those flaws. It was like dating an abusive partner.
When you’re wearing rose-colored glasses, red flags just look like red flags. My rose-colored glasses came from the fact that I was issued a Bianchi holster in what I assumed was 1945. In reality, while the Bianchi wasn’t high-speed, it was still a fairly decent holster compared to the SERPA.
Problem 1 – Negligent Discharges
One of the big defenses I, and others, used to make was that NDs caused by the SERPA series were skill issues. In reality, I carried a DA/SA Beretta M9, and having the safety on was required. I wasn’t going to ND my Beretta.
Having the gun release where the trigger finger falls creates a fundamental problem. When you press the firearm release and pull upwards, you are creating the possibility of your trigger finger falling into the trigger guard and firing the weapon.
When we famously watched Tex Grebner give himself 1911-leg the problems started to become more obvious. With the rise of striker-fired pistols that lacked manual safeties, the problem grew. It grew enough that numerous competition circuits banned the rig, as did tactical instructors.
You can argue it’s a skill issue, and to a degree, it is. However, if the holster presents the possibility of an ND when you draw, then we have issues. Safariland doesn’t create that issue with their numerous holsters, so I don’t see why the SERPA warrants defense.
Problem 2 – The Button
One of the reasons I like the SERPA is the button. The button we press with the trigger finger to release the gun is quite intuitive. It becomes a natural part of your draw. I will say the button makes sense ergonomically but not practically. I carried an M9 as a grunt because I was a machine gunner.
We issued SERPA holsters with thigh rigs. An M240 is fired primarily from the prone or some form of rested position. This often exposed the gun to dirt and rocks, and all sorts of crap. The button, as great as it was, left a big gap between it and the holster body. This big gap was perfect for getting clogged with dirt, debris, and rocks.
In fact, one very frustrating problem I had was when a rock got stuck under the button. I couldn’t draw my gun, and I couldn’t get the rock out. I had to grab my bayonet, pin the rock into the corner of the slot, and start using a bigger rock to tap the bayonet. Eventually, I chipped enough of the rock away to dump it out and free the gun.
I eventually moved the holster from my thigh to my flak with an adapter. Admittedly, I also went with the chest-born gun because it was easier to cross water with, easier to use in vehicles, and kept dirt and grime off my gun and holster.
Problem 3 – The Mounting System Sucks
So there I was, Djibouti, Africa. It’s 0230 AM, and I am toting a 28-pound machine gun on a night patrol. It’s dark, and the PVS-14 is doing its best. We are on a long movement that traced the entirety of our bivouac. It’s a simple security patrol.
I suddenly felt a shift in weight on my thigh. The SERPA and my M9 had fallen loose and swung downward. Two of the three locking screws had unthreaded themselves. The patrol isn’t halting, so I’m trying to figure out what the hell to do in the dark while moving and toting an M240.
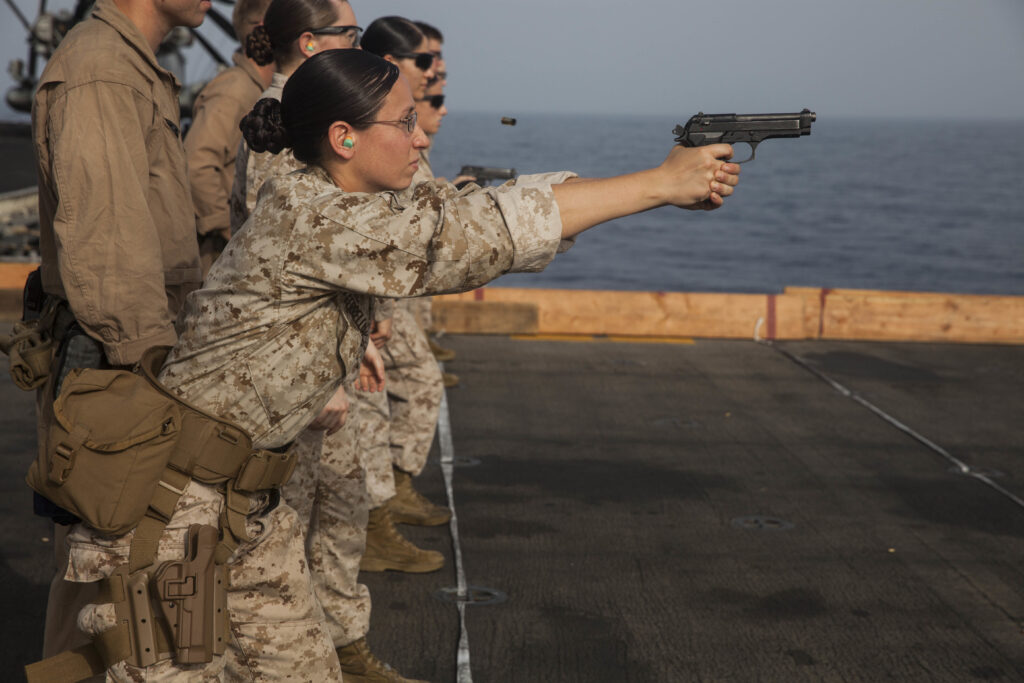
U.S. Marine Lance Cpl. Chevon Ferrel fires at her target with an M9 Beretta pistol during a deck shoot aboard the amphibious assault ship USS Essex (LHD 2). Ferrel is an ammunition technician with Combat Logistics Battalion 15, 15th Marine Expeditionary Unit. These Marines executed a pistol qualification during Female Engagement Team training. The 15th MEU is embarked on the Essex Amphibious Ready Group and deployed to maintain regional security in the U.S. 5th Fleet area of operations. (U.S. Marine Corps photo by Cpl. Anna Albrecht/Released)
I am able to free the gun and eventually dump it into my kangaroo pouch on the front of my flak. I managed to find the little screws, still attached to the holster—somehow—and pocketed them. This wasn’t the first time this had happened. I’m long out of loc-tite, and the super shallow attachment screw seems to wiggle its way out often.
I’m always checking the rig, but I must have missed it before we stepped off. This wasn’t an isolated event. Another machine gunner in a sister squad had the same problem. I eventually moved my M9 to my chest and made tightening the screws part of my PCC/PCIs before any operation. The other gunner just tossed the SERPA into a sea bag and used his kangaroo pouch to tote his M9.
The mounts sucked, were always breaking or coming loose, and were a serious source of frustration.
The SERPA Today
I’m not sure why anyone would use a SERPA today. We live in an era where even the manufacturer of the SERPA series makes a better-competing holster. Even the notoriously cheap military moved to the Safariland series holsters, and so should you.
I don’t have a military or law enforcement background. I shot my first gun at summer camp when I was a kid, but didn’t start shooting with any level of frequency until high school.
About Me
I bought my first handgun on my 21st birthday, and started carrying almost immediately. Like most folks out there, the only formal instruction I had (or thought I needed) was my state Concealed Handgun Permit class.
A couple years after that, I was exposed to my first formal “tactical” shooting class, and it started to crystallize the need for continuing education.
For a time, I was your typical “gun guy”. You’d regularly find me in 5.11 pants. I thought that you HAD to have a full sized pistol, at least one extra magazine, a tactical folder, and a backup gun in order to be “prepared”; anything short of that and you clearly didn’t take your safety seriously. Well when you’re working at a gun shop in your early twenties, it’s easy to get away with that kind of thing, because your lifestyle and social circles allow it.
Like most folks, I matured and evolved. During that evolution, I also pursued additional training, and came across some other great resources in the form of blogs & podcasts. They started helping me understand what’s really important, and where I should direct my training efforts.
Fighting Shape
Fast forward a few more years, my hobbies are now fully entrenched in personal protection: I’m taking a couple training classes ever year, I’m at the shooting range regularly, I start getting into BJJ, and I’m improving my physical conditioning to get into “fighting shape”. I’m what you’d consider reasonably competent with a firearm. Not winning any awards, but definitely part of the 1% that Karl Rehn talks about in some of his writings.
Then, I find myself confronted with what felt like a pretty significant challenge: all the content I’d been consuming, all the YouTube videos, all the articles, all the gear that’s being advertised to me through various channels is all geared towards casual street clothes! My world were colliding. My chosen lifestyle was now conflicting with my chosen profession, and something had to give. The chosen profession was what funded all the gunday funday stuff, so that meant I’d have to find a way to work the gun into my daily life, and not live my life around carrying a gun.
My understanding and proficiency of both style and self defense have progressed significantly over the past several years, to the point where I feel I’ve managed to strike the most effective balance between the two. My hope is that this is enough of a shared experience that others can benefit from my trial and error.