From 248Shooter.com
The tragedy in Texas was an abhorrent event that should have never happened, but it did. The small community is still healing. We’d be remiss however if we didn’t take time to learn lessons from this tragedy and use these lessons to help minimize future tragedies. Dust it off, stow your anger, put your heads in the game.
Advertisement — Continue Reading Below
The murderer was wearing body armor, this is outside the norm. He was wearing at least one plate over his chest in a plate carrier. Today we are going to talk about what to do if you encounter a similar situation.
Lessons From Texas
Advertisement — Continue Reading Below
The accurate and observant shooting utilized by Stephen Willeford allowed him to defeat an armored attacker by realizing he had armor and reacting to it. Stephen Willeford was a trained shooter and NRA instructor. He was armed with a hastily loaded AR 15 and was still able to stop the better armed and armored attacker.
Identifying Armor
Advertisement — Continue Reading Below
Is the threat armored?

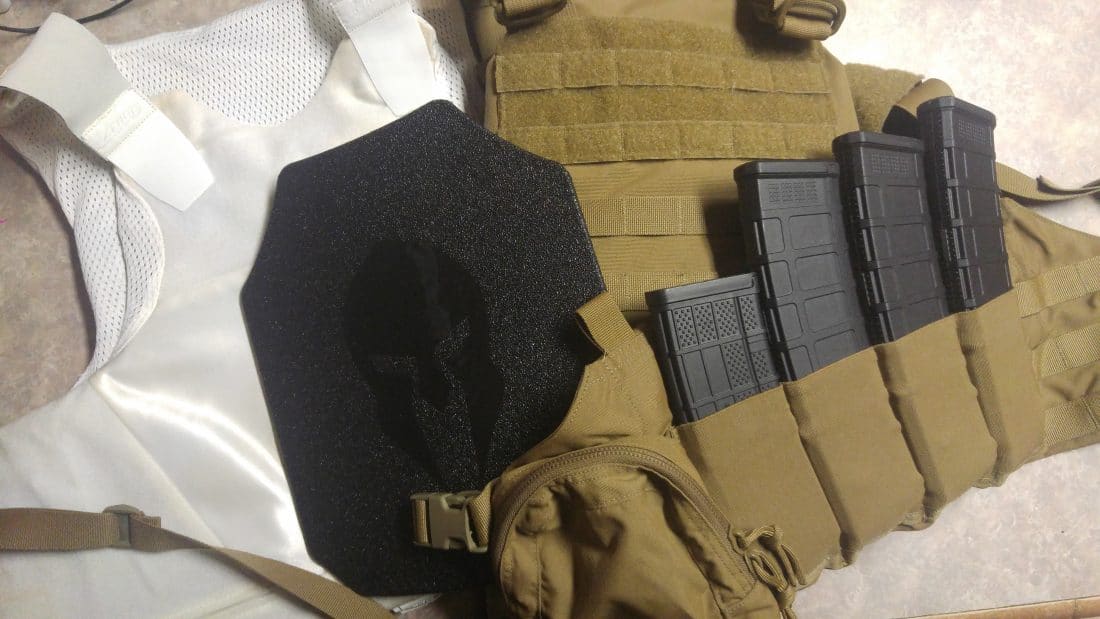
The first thing we need to do is learn the difference between body armor and load bearing gear.
A lot of people, including the media, will often mistake load bearing gear for body armor. Load bearing gear and tactical vests provide no armor, just a way to carry gear. It’s fairly simple to tell what’s a load-bearing vest and what is body armor.
Advertisement — Continue Reading Below
First, what does it cover? If it’s not covering vital organs it’s not body armor. Pieces of kit known as chest rigs are available to hold ammunition but do not provide protection. They are usually just small enough to pack necessary ammo and gear. Sometimes they are worn over armor but are not armor themselves.
Second, does it have a zipper or buckles down the middle? If so that’s probably not body armor but a load bearing vest. You’ll see the use of mesh quite a bit with LBVs, and not with body armor.
The biggest tell is the way it fits. If it droops, sags, or moves easily it’s not body armor. Body armor, even soft armor, has a stiff nature to it overall and doesn’t move much. It also when worn properly sits high on the chest protecting the lungs and heart.
Advertisement — Continue Reading Below
Now if you aren’t sure if its armor or an LBV you can always assume it’s armor. Treating an opponent like he’s wearing body armor is better than assuming he’s not. Two to the chest the head gets the rest.
Types of Body Armor
Advertisement — Continue Reading Below

Hard Armor
The biggest give away is the plate carrier itself. Plate carriers are often built to be small and light and in the general shape of a plate. Plates vary, but most common hard armor plates will be in the shape of a spade. Most of the carriers will be worn with thick straps over the shoulders and a cumberbun connecting the rear and front portions of the carrier.
Hard armor is capable of stopping most rifle rounds as well as handgun and shotgun rounds without issue. Most hard armor you see in the civilian market is steel armor. Steel armor is heavier than most modern ceramic mixes but will still effectively stop rifle rounds. We could do an entire article on the difference between ceramic armor and steel armor, but that’s not what’s important here. You aren’t going to shoot through it bottom line.
Soft Armor

Soft Armor, like Kevlar, is a semi-cloth like material that is designed to stop most handgun and shotgun rounds. This armor is often much lighter and more malleable material. Soft armor is easily penetrated by rifle rounds. Soft armor is lower profile in nature and is what most police forces wear as their primary threats are usually handguns. Many officers keep a plate carrier nearby their patrol rifle rig so the can up armor when they up gun if time and space allow. Some soft armor is low profile enough to be worn under street clothes but offers a smaller degree of body protection.
Shooting an opponent wearing soft body armor could be incredibly painful to the threat. In fact, a shot to soft armor from a handgun could easily crack or break ribs and even cause permanent injury.
Shooting Around Armor
Encounters with shooters wearing body armor are about as common as getting struck by lightning on the day you win the lottery. However, knowledge weighs nothing so why not know a thing or two? Better to have it and never need it than need it and… well you know.
Most likely you’d engage a shooter armed with your carry gun. In this case, you’ll be at a disadvantage against both soft and hard armor. You’ll want to shoot around the armor. When it comes to body armor shot placement is more critical than ever. Let’s look at the different angles and how that affects engaging an armored opponent.
Facing the Attacker
If you and the attacker are facing each other the armor is squared up to you. Most hard armor plates are going to be protecting the lungs and heart, leaving a good portion of the stomach and pelvis open.
In this case, the largest target is going to be the lower stomach and pelvis. The pelvic area does support the entire body and is a great target. Handgun rounds may not break the pelvis but putting rounds in that location as quickly as possible will likely take the attacker off his feet. The pelvis also contains the femoral artery and would make an attacker bleed out quickly.
I don’t suggest the headshot first because it’s a smaller target, and when facing the threat you may not have time to hit that zone. It may not kill a target, but incapacitation takes the attacker out of the fight.
From the Rear
If the attacker is facing away from you and wearing armor on his back you have an exposed lower back and buttocks. In this case putting a round in the lower back can kill or neutralize the threat quickly. The spine is critical to human function and landing a spine shot is a good way to end a fight.
Facing the rear of the target also opens up the availability of a headshot with less threat to you.
From the Side
Armor is dedicated to the front and back of the body primarily, but side plates do exist. They do not provide total side protection though. Placing a shot in the armpit area is like placing a round in the chest area. Rounds can go through the arm if necessary, but a handgun round may be deflected by bone. Placing several rounds in this area increases your chances of a vital strike.
You can also hit the pelvic area at this angle but the femoral is more protected and it’s often a smaller target than under the arm. A headshot is also an option.
How To Train
There are two means to train for these encounters. The first is to increase your ability to hit small targets fast. For this, I like to mention Dot torture. Dot torture is a simple drill that uses 10 small dots each with their own unique command. You can read a bit more about it here,
This will train your core shot placement ability while building speed. Both are necessary when facing an armored attacker.
The Second drill is for a situation where you are facing a shooter head on and you need to react. It’s known as a failure to stop drill in polite circles and as the Mozambique drill everywhere else.
It’s simple, you draw, fire two rounds into the target’s chest. Even with armor this can knock them off balance and cause pain depending on the armor. The goal is to be effective so they don’t recover from those first two shots.
After those two shots, you transition to either a headshot or a pelvic shot. Most people teach the drill as two to the chest and one to the head (Or pelvis). However, I wouldn’t limit myself, especially for a pelvic shot. More is better in these situations. The more rounds you put in the pelvis the better, and a headshot isn’t always an instant kill so you don’t need to be stingy with ammo.
You can expand this drill to side shots as well with the right targets. I prefer targets like you see above with defined anatomy. There is lots of options for that, but if you have a printer I have a few you can print at one. The first two are from Sage Dynamics, and are available here http://www.sagedynamics.org/ (Scroll to almost the bottom of the page.) These are front facing targets.
Kit Badger of Kitbadger.com was inspired by the Sage Dynamics targets and produced side profile targets. These are free and can be printed at home. https://kitbadger.com/profile-anatomy-targets/
Training is always the key to survival. The more training you get the better overall chance you’ll have. Hopefully, you’re leaving from this understanding the weaknesses and strengths of body armor, and most importantly how to react to it. As always stay safe and stay ready.